

Spring Data Redis简介以及项目Demo,RedisTemplate和 Serializer详解
一、概念简介:
Redis:
Redis 是一款开源的 Key-Value 数据库,运行在内存中,由 ANSI C 编写,详细的信息在 Redis 官网上面有,因为我自己通过 google 等各种渠道去学习 Redis,走了不少弯路,所以总结一条我认为不错的学习路径给大家:
1.《The Little Redis Book》
是一本开源 PDF,只有 29 页的英文文档,看完后对 Redis 的基本概念应该差不多熟悉了,剩下的可以去 Redis 官网熟悉相关的命令。
2.《Redis 设计与实现》
如果想继续深入,推荐这本书,现在已经出到第二版了,有纸质版书籍可以购买。上面详细介绍了 Redis 的一些设计理念,并且给出了一些内部实现方式,和数据结构的 C 语言定义,有一些基本 C 语言基础,就能看明白。
3.Redis 2.6 源代码:
《Redis 设计与实现》的作者发布在 Github 上的一个开源项目,有作者详细的注释。
https://github.com/huangz1990/annotated_redis_source
Jedis:
Jedis 是 Redis 官方推出的一款面向 Java 的客户端,提供了很多接口供 Java 语言调用。可以在 Redis 官网下载,当然还有一些开源爱好者提供的客户端,如 Jredis、SRP 等等,推荐使用 Jedis。
Spring Data Redis
SDR 是 Spring 官方推出,可以算是 Spring 框架集成 Redis 操作的一个子框架,封装了 Redis 的很多命令,可以很方便的使用 Spring 操作 Redis 数据库,Spring 对很多工具都提供了类似的集成,如 Spring Data MongDB…
这三个究竟有什么区别呢?可以简单的这么理解,Redis 是用 ANSI C 写的一个基于内存的 Key-Value 数据库,而 Jedis 是 Redis 官方推出的面向 Java 的 Client,提供了很多接口和方法,可以让 Java 操作使用 Redis,而 Spring Data Redis 是对 Jedis 进行了封装,集成了 Jedis 的一些命令和方法,可以与 Spring 整合。在后面的配置文件(redis-context.xml)中可以看到,Spring 是通过 Jedis 类来初始化 connectionFactory 的。
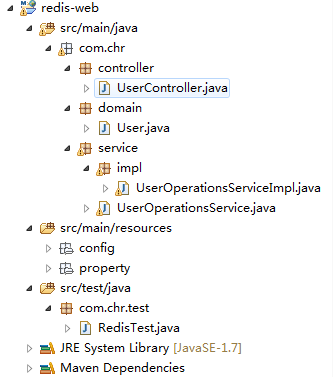
二、Spring Data Redis Demo
项目目录:

Pom.xml 配置:
Spring jar 因为比较多,就不贴出来了,读者可以下载后面的项目源码查看详细配置,其实 pom.xml 可以精简,并非一定需要写的这么细,我之所以这么写,是为了看得更清楚。
 1 <!-- config junit jar -->
 2         <dependency>
 3             <groupId>junit</groupId>
 4             <artifactId>junit</artifactId>
 5             <version>4.8.2</version>
 6             <scope>test</scope>
 7         </dependency>
 8         <!-- config redis data and client jar -->
 9         <dependency>
10             <groupId>org.springframework.data</groupId>
11             <artifactId>spring-data-redis</artifactId>
12             <version>1.0.2.RELEASE</version>
13         </dependency>
14         <dependency>
15             <groupId>redis.clients</groupId>
16             <artifactId>jedis</artifactId>
17             <version>2.1.0</version>
18         </dependency>
19
20         <!-- config need jar -->
21         <dependency>
22             <groupId>commons-lang</groupId>
23             <artifactId>commons-lang</artifactId>
24             <version>2.6</version>
25         </dependency>
26         <dependency>
27             <groupId>org.apache.geronimo.specs</groupId>
28             <artifactId>geronimo-servlet_3.0_spec</artifactId>
29             <version>1.0</version>
30         </dependency>
31     <!-- cofig spring jar -->
32         <dependency>
33             <groupId>org.springframework</groupId>
34             <artifactId>spring-core</artifactId>
35             <version>${org.springframework.version}</version>
36         </dependency>
37     ……
redis.properties 配置(WEB-INF/property/redis.properties)
从 properties 文件的内容就知道这个文件是干嘛的了,主要是 redis 连接池基本配置,详细的配置可以查看 redis 文档。
redis.host=127.0.0.1
redis.port=6379
redis.pass=
redis.maxIdle=300
redis.maxActive=600
redis.maxWait=1000
redis.testOnBorrow=true
spring-context.xml(WEB-INF/config/spring-context.xml)
Spring 配置,这个也没什么说的,就是 springMVC 的一些基本配置,开启注解扫描功能和扫描路径。
 1 <!-- 激活 @Controller 模式 -->
 2     <mvc:annotation-driven />
 3
 4     <context:annotation-config />
 5
 6     <!-- 对包中的所有类进行扫描,以完成 Bean 创建和自动依赖注入的功能 -->
 7     <context:component-scan base-package="com.chr" />
 8
 9
10     <!-- 引入 redis 属性配置文件 -->
11     <import resource="redis-context.xml"/>
redis-context.xml(WEB/config/redis-context.xml)
Spring 配置 redis,这些配置都比较基本,看文档就好了,但是有一个比较重要的点,就是 redistemplate 的 Serializer 配置,在后面通过 SDR(Spring Data Redis)封装的一些方法操作 Redis 时会说到。
 1 <!-- scanner redis properties -->
 2     <context:property-placeholder location="classpath:property/redis.properties" />
 3 <!—注意此处注入的是 JedisPoolConfig,说明 SDR 还依赖与 Jedis -->
 4     <bean id="poolConfig" class="redis.clients.jedis.JedisPoolConfig">
 5         <property name="maxIdle" value="${redis.maxIdle}" />
 6         <property name="maxActive" value="${redis.maxActive}" />
 7         <property name="maxWait" value="${redis.maxWait}" />
 8         <property name="testOnBorrow" value="${redis.testOnBorrow}" />
 9     </bean>
10
11     <bean id="connectionFactory"
12         class="org.springframework.data.redis.connection.jedis.JedisConnectionFactory"
13         p:host-name="${redis.host}" p:port="${redis.port}" p:password="${redis.pass}"
14         p:pool-config-ref="poolConfig" />
15
16     <bean id="redisTemplate" class="org.springframework.data.redis.core.StringRedisTemplate">
17         <property name="connectionFactory" ref="connectionFactory" />
18 <!--         如果不配置 Serializer,那么存储的时候智能使用 String,如果用 User 类型存储,那么会提示错误 User can't cast to String!!!
19  -->        <property name="keySerializer">
20             <bean
21                 class="org.springframework.data.redis.serializer.StringRedisSerializer" />
22         </property>
23         <property name="valueSerializer">
24             <bean
25                 class="org.springframework.data.redis.serializer.JdkSerializationRedisSerializer" />
26         </property>
27     </bean>
28
29     <bean id="viewResolver"
30         class="org.springframework.web.servlet.view.InternalResourceViewResolver" />
web.xml
web.xml 中只配置了 spring-context.Xml,这是因为我在 spring-context.xml 中加了一条语句:<import resource="redis-context.xml"/>,所以看起来有两个配置,其实只需要配置 spring-context.xml。这样做的好处是:项目的层次比较清晰,方便后期改动。
 1     <listener>
 2         <listener-class>org.springframework.web.context.ContextLoaderListener</listener-class>
 3     </listener>
 4
 5     <context-param>
 6         <param-name>contextConfigLocation</param-name>
 7         <param-value>/WEB-INF/config/spring-context.xml</param-value>
 8     </context-param>
 9
10      <servlet>
11         <servlet-name>SpringMVC</servlet-name>
12         <servlet-class>org.springframework.web.servlet.DispatcherServlet</servlet-class>
13         <init-param>
14                  <param-name>contextConfigLocation</param-name>
15                  <param-value>/WEB-INF/config/spring-context.xml</param-value>
16          </init-param>
17          <load-on-startup>2</load-on-startup>
18     </servlet>
19
20     <servlet-mapping>
21         <servlet-name>SpringMVC</servlet-name>
22         <url-pattern>/</url-pattern>
23     </servlet-mapping>
下面是 Spring MVC 的 java 实现了:
User.java(实体类, com.chr.domain.User.java)
注意 User 类必须实现 Serializable 接口,后面会解释。User 类总共定义了三个字段:id、name、password。省略了相应的 setter/getter 方法。
 1 public class User implements Serializable {
 2     private static final long serialVersionUID = 522889572773714584L;
 3
 4     private String id;
 5     private String name;
 6     private String password;
 7
 8     public User(){}
 9
10     public User(String id,String name,String password) {
11         this.id = id;
12         this.name = name;
13         this.password = password;
14     }
UserOperationsService.java(service 接口,com.chr.service.UserOperationsService.java)
在 service 接口中定义了两个方法:
Add 方法用于向 redis 中添加 User 实例,getUser 则从 redis 中取出 User 实例。
1 public interface UserOperationsService {
2     void add(User user);
3     User getUser(String key);
4
5 }
UserOperationsServiceImpl.java(service 的实现类,实现 service 借口 com.chr.service.impl. UserOperationsServiceImpl.java)
 1 @Service
 2 public class UserOperationsServiceImpl implements UserOperationsService {
 3     @Autowired
 4     private RedisTemplate redisTemplate;
 5
 6     @Override
 7     public void add(User user) {
 8         // TODO Auto-generated method stub
 9         /*
10          * boolean result = redisTemplate.execute(new RedisCallback<Boolean>() {
11          * public Boolean doInRedis(RedisConnection redisConnection) throws
12          * DataAccessException { RedisSerializer<String> redisSerializer =
13          * redisTemplate .getStringSerializer(); byte[] key =
14          * redisSerializer.serialize(user.getId()); byte[] value =
15          * redisSerializer.serialize(user.getName()); return
16          * redisConnection.setNX(key, value); } }); return result;
17          */
18         ValueOperations<String, User> valueops = redisTemplate
19                 .opsForValue();
20         valueops.set(user.getId(), user);
21     }
22
23
24     @Override
25     public User getUser(String key) {
26         ValueOperations<String, User> valueops = redisTemplate
27                 .opsForValue();
28         User user = valueops.get(key);
29         return user;
30     }
31
32 }
RedisTemplate 和 Serializer 详解
可以看到我在代码中注释掉了一段代码,现在可以解释上面留下的两个问题了,第一个是在 redis.xml 中配置 redistemplate 的时候,同时配置了两个 Serializer:keySerializer 实现了 StringRedisSerializer,valueSerializer 实现了 JdkSerializationRedisSerializer。
一、为什么要使用 Serializer
因为 redis 是以 key-value 的形式将数据存在内存中,key 就是简单的 string,key 似乎没有长度限制,不过原则上应该尽可能的短小且可读性强,无论是否基于持久存储,key 在服务的整个生命周期中都会在内存中,因此减小 key 的尺寸可以有效的节约内存,同时也能优化 key 检索的效率。
value 在 redis 中,存储层面仍然基于 string,在逻辑层面,可以是 string/set/list/map,不过 redis 为了性能考虑,使用不同的“encoding”数据结构类型来表示它们。(例如:linkedlist,ziplist 等)。
所以可以理解为,其实 redis 在存储数据时,都把数据转化成了 byte[] 数组的形式,那么在存取数据时,需要将数据格式进行转化,那么就要用到序列化和反序列化了,这也就是为什么需要配置 Serializer 的原因。
二、SDR 支持的序列化策略:
(详细可查阅 API 文档)
- JdkSerializationRedisSerializer:
- StringRedisSerializer:
- JacksonJsonRedisSerializer:
- OxmSerializer:
其中 JdkSerializationRedisSerializer 和 StringRedisSerializer 是最基础的序列化策略,其中“JacksonJsonRedisSerializer”与“OxmSerializer”都是基于 stirng 存储,因此它们是较为“高级”的序列化 (最终还是使用 string 解析以及构建 java 对象)。
基本推荐使用 JdkSerializationRedisSerializer 和 StringRedisSerializer,因为其他两个序列化策略使用起来配置很麻烦,如果实在有需要序列化成 Json 和 XML 格式,可以使用 java 代码将 String 转化成相应的 Json 和 XML。
三、使用 Serializer
在本项目中,是在配置文件中直接配置了相应的 Serializer,key 用的是 StringRedisSerializer,value 用的是 JdkSerializationRedisSerializer,因为在此项目中,key 为 userId, 为 String 类型,value 为 user 为 java 类,即 POJO,所以使用 JdkSerializationRedisSerializer。
在 redistemplate 中直接配置 Serializer 当然比较方便,因为在后面想 redis 中存取数据时,就不用再次配置 Serializer,但是这仅限于只有一种数据类型的情况,比如在本项目中只有 <String userId,User user> 类型的数据需要存储,如果有多种数据类型时,在配置文件中配置就显得不方便了,那么我们可以在存取数据时,即 Service 的实现类存取数据操作时分别指定相应的 Serializer。
所以在编程时有两种选择:
1. 在 redistemplate 中配置 Serializer(本项目即采用这种方式)
ValueOperations<String, User> valueops = redisTemplate
                .opsForValue();
valueops.set(user.getId(), user);
2. 不在 redistemplate 中配置 Serializer,而是在 Service 的实现类中单独指定 Serializer。就如同 UserOperationsServiceImpl.java 注释的代码:
1 boolean result = redisTemplate.execute(new RedisCallback<Boolean>() {
2      public Boolean doInRedis(RedisConnection redisConnection) throws DataAccessException {
3          RedisSerializer<String> redisSerializer = redisTemplate .getStringSerializer();
4          byte[] key = redisSerializer.serialize(user.getId());
5          byte[] value = redisSerializer.serialize(user.getName());
6          return redisConnection.setNX(key, value); } });
7     return result;
8 }
四、Redistemplate
SDR 官方文档中对 Redistemplate 的介绍:the template is in fact the central class of the Redis module due to its rich feature set. The template offers a high-level abstraction for Redis interactions.
通过 Redistemplate 可以调用 ValueOperations 和 ListOperations 等等方法,分别是对 Redis 命令的高级封装。
但是 ValueOperations 等等这些命令最终是要转化成为 RedisCallback 来执行的。也就是说通过使用 RedisCallback 可以实现更强的功能,SDR 文档对 RedisCallback 的介绍:RedisTemplate and StringRedisTemplate allow the developer to talk directly to Redis through the RedisCallback interface. This gives complete control to the developer as it talks directly to the RedisConnection。
具体的使用方法可以参考 Api 文档。
UserController.java(控制器类,com.chr.controller)
 1 @Controller
 2 @RequestMapping(value = "/redis")
 3 public class UserController {
 4     @Autowired
 5     private UserOperationsServiceImpl userOperationsService;
 6     private User user;
 7
 8     @RequestMapping(value = "/addUser", method = RequestMethod.POST)
 9     public String addUser(
10             @RequestParam(value = "Id", required = true) String Id,
11             @RequestParam(value = "name", required = true) String name,
12             @RequestParam(value = "password", required = true)String password) {
13         user = new User(Id, name, password);
14         userOperationsService.add(user);
15         return "/WEB-INF/jsp/AddUserSuccess.jsp";
16     }
17
18     @RequestMapping(value = "/addUser", method = RequestMethod.GET)
19     public String addUser() {
20         return "/WEB-INF/jsp/AddUser.jsp";
21     }
22 }
这里只贴出了部分代码(addUser 的代码),剩下的 getUser 代码类似,可以下载源码查看。
其中分为两种方法,get 和 post,get 方法直接 return 到表单填写页面,从而实现 post 到 addUser 添加 User。
AddUser.jsp
<form id="addUser" name="addUser" action="redis/addUser" method="post">
                ID:<input id="Id" name="Id" type="text" /><br/>
                Name:<input id="name" name="name" type="text" /><br/>
                Password:<input id="password" name="password" type="password" /><br/>
                <input value="添加"
                    type="submit" />
</form>
三、部署运行
最后部署到 Tomcat 中,浏览器运行:http://localhost:8080/redis-web/redis/addUser
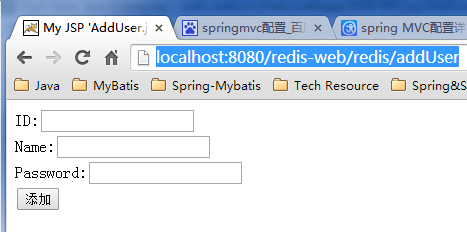
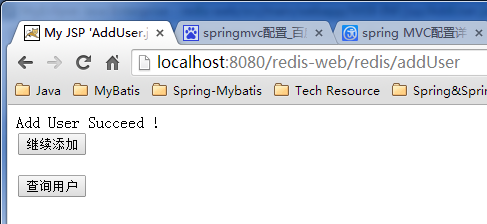
填写信息,单击添加 Button 后,即跳转到结果页面
整个项目只是一个展示 Spring 整合 Redis 基本使用的 Demo,因本人知识有限,如文中有错误或偏颇之处,请各位提出。非常感谢:)
四、项目源码:
https://files.cnblogs.com/edwinchen/redis-web.rar
Jdk 1.7
MyEclipse 10.1