

深入浅出Mybatis系列(一)---Mybatis入门
最近两年 springmvc + mybatis 的在这种搭配还是蛮火的,楼主我呢,也从来没真正去接触过 mybatis, 趁近日得闲, 就去学习一下 mybatis 吧。 本次拟根据自己的学习进度,做一次关于 mybatis 的一系列教程, 记录自己的学习历程, 同时也给还没接触过 mybatis 的朋友探一次道。本系列教程拟 由浅(使用)入深(分析 mybatis 源码实现),故可能需要好长几天才能更新完。好啦,下面就开始本次的 mybatis 学习之旅啦, 本次为第一篇教程, 就先简单地写个 demo, 一起来认识一下 mybatis 吧。
为了方便,我使用了 maven, 至于 maven 怎么使用, 我就不做介绍了。没用过 maven 的, 也不影响阅读。
一、Mybatis 环境搭建及简单实例
1. 新建 web 项目, 添加依赖包:mybatis 包、数据库驱动包 (我使用的是 mysql)、日志包 (我使用的是 log4j), 由于我的是 maven 项目, 那么添加依赖包就简单了,直接在 pom.xml 添加依赖即可。
pom.xml:
<dependencies> <!-- 添加 junit --> <dependency> <groupId>junit</groupId> <artifactId>junit</artifactId> <version>4.11</version> <scope>test</scope> </dependency><span style="color: rgba(0, 128, 0, 1)"><!--</span><span style="color: rgba(0, 128, 0, 1)"> 添加log4j </span><span style="color: rgba(0, 128, 0, 1)">--></span> <span style="color: rgba(0, 0, 255, 1)"><</span><span style="color: rgba(128, 0, 0, 1)">dependency</span><span style="color: rgba(0, 0, 255, 1)">></span> <span style="color: rgba(0, 0, 255, 1)"><</span><span style="color: rgba(128, 0, 0, 1)">groupId</span><span style="color: rgba(0, 0, 255, 1)">></span>log4j<span style="color: rgba(0, 0, 255, 1)"></</span><span style="color: rgba(128, 0, 0, 1)">groupId</span><span style="color: rgba(0, 0, 255, 1)">></span> <span style="color: rgba(0, 0, 255, 1)"><</span><span style="color: rgba(128, 0, 0, 1)">artifactId</span><span style="color: rgba(0, 0, 255, 1)">></span>log4j<span style="color: rgba(0, 0, 255, 1)"></</span><span style="color: rgba(128, 0, 0, 1)">artifactId</span><span style="color: rgba(0, 0, 255, 1)">></span> <span style="color: rgba(0, 0, 255, 1)"><</span><span style="color: rgba(128, 0, 0, 1)">version</span><span style="color: rgba(0, 0, 255, 1)">></span>1.2.16<span style="color: rgba(0, 0, 255, 1)"></</span><span style="color: rgba(128, 0, 0, 1)">version</span><span style="color: rgba(0, 0, 255, 1)">></span> <span style="color: rgba(0, 0, 255, 1)"></</span><span style="color: rgba(128, 0, 0, 1)">dependency</span><span style="color: rgba(0, 0, 255, 1)">></span> <span style="color: rgba(0, 128, 0, 1)"><!--</span><span style="color: rgba(0, 128, 0, 1)"> 添加mybatis </span><span style="color: rgba(0, 128, 0, 1)">--></span> <span style="color: rgba(0, 0, 255, 1)"><</span><span style="color: rgba(128, 0, 0, 1)">dependency</span><span style="color: rgba(0, 0, 255, 1)">></span> <span style="color: rgba(0, 0, 255, 1)"><</span><span style="color: rgba(128, 0, 0, 1)">groupId</span><span style="color: rgba(0, 0, 255, 1)">></span>org.mybatis<span style="color: rgba(0, 0, 255, 1)"></</span><span style="color: rgba(128, 0, 0, 1)">groupId</span><span style="color: rgba(0, 0, 255, 1)">></span> <span style="color: rgba(0, 0, 255, 1)"><</span><span style="color: rgba(128, 0, 0, 1)">artifactId</span><span style="color: rgba(0, 0, 255, 1)">></span>mybatis<span style="color: rgba(0, 0, 255, 1)"></</span><span style="color: rgba(128, 0, 0, 1)">artifactId</span><span style="color: rgba(0, 0, 255, 1)">></span> <span style="color: rgba(0, 0, 255, 1)"><</span><span style="color: rgba(128, 0, 0, 1)">version</span><span style="color: rgba(0, 0, 255, 1)">></span>3.2.6<span style="color: rgba(0, 0, 255, 1)"></</span><span style="color: rgba(128, 0, 0, 1)">version</span><span style="color: rgba(0, 0, 255, 1)">></span> <span style="color: rgba(0, 0, 255, 1)"></</span><span style="color: rgba(128, 0, 0, 1)">dependency</span><span style="color: rgba(0, 0, 255, 1)">></span> <span style="color: rgba(0, 128, 0, 1)"><!--</span><span style="color: rgba(0, 128, 0, 1)"> 添加mysql驱动 </span><span style="color: rgba(0, 128, 0, 1)">--></span> <span style="color: rgba(0, 0, 255, 1)"><</span><span style="color: rgba(128, 0, 0, 1)">dependency</span><span style="color: rgba(0, 0, 255, 1)">></span> <span style="color: rgba(0, 0, 255, 1)"><</span><span style="color: rgba(128, 0, 0, 1)">groupId</span><span style="color: rgba(0, 0, 255, 1)">></span>mysql<span style="color: rgba(0, 0, 255, 1)"></</span><span style="color: rgba(128, 0, 0, 1)">groupId</span><span style="color: rgba(0, 0, 255, 1)">></span> <span style="color: rgba(0, 0, 255, 1)"><</span><span style="color: rgba(128, 0, 0, 1)">artifactId</span><span style="color: rgba(0, 0, 255, 1)">></span>mysql-connector-java<span style="color: rgba(0, 0, 255, 1)"></</span><span style="color: rgba(128, 0, 0, 1)">artifactId</span><span style="color: rgba(0, 0, 255, 1)">></span> <span style="color: rgba(0, 0, 255, 1)"><</span><span style="color: rgba(128, 0, 0, 1)">version</span><span style="color: rgba(0, 0, 255, 1)">></span>5.1.12<span style="color: rgba(0, 0, 255, 1)"></</span><span style="color: rgba(128, 0, 0, 1)">version</span><span style="color: rgba(0, 0, 255, 1)">></span> <span style="color: rgba(0, 0, 255, 1)"></</span><span style="color: rgba(128, 0, 0, 1)">dependency</span><span style="color: rgba(0, 0, 255, 1)">></span></dependencies>
2. 配置 log4j, 配置 mybatis
在 classpath 建立一个用于配置 log4j 的配置文件 log4j.properties, 再建立一个用于配置 Mybatis 的配置文件 configuration.xml(文件可随便命名)。log4j 的配置,我就不多说,这儿主要说一下 configuration.xml:
configuration.xml:
 1 <?xml version="1.0" encoding="UTF-8" ?>
 2 <!DOCTYPE configuration
 3   PUBLIC "-//mybatis.org//DTD Config 3.0//EN"
 4   "http://mybatis.org/dtd/mybatis-3-config.dtd">
 5 <configuration>
 6
 7   <!-- 指定 properties 配置文件, 我这里面配置的是数据库相关 -->
 8   <properties resource="dbConfig.properties"></properties>
 9
10   <!-- 指定 Mybatis 使用 log4j -->
11   <settings>
12      <setting name="logImpl" value="LOG4J"/>
13   </settings>
14
15   <environments default="development">
16     <environment id="development">
17       <transactionManager type="JDBC"/>
18       <dataSource type="POOLED">
19           <!--
20           如果上面没有指定数据库配置的 properties 文件,那么此处可以这样直接配置
21         <property name="driver" value="com.mysql.jdbc.Driver"/>
22         <property name="url" value="jdbc:mysql://localhost:3306/test1"/>
23         <property name="username" value="root"/>
24         <property name="password" value="root"/>
25          -->
26
27          <!-- 上面指定了数据库配置文件, 配置文件里面也是对应的这四个属性 -->
28          <property name="driver" value="${driver}"/>
29          <property name="url" value="${url}"/>
30          <property name="username" value="${username}"/>
31          <property name="password" value="${password}"/>
32
33       </dataSource>
34     </environment>
35   </environments>
36
37   <!-- 映射文件,mybatis 精髓, 后面才会细讲 -->
38   <mappers>
39     <mapper resource="com/dy/dao/userDao-mapping.xml"/>
40   </mappers>
41
42 </configuration>
3. 开始写 Demo
首先,在 mysql 数据库 test1 建立一张表 user:

然后,开始编写 java 代码。
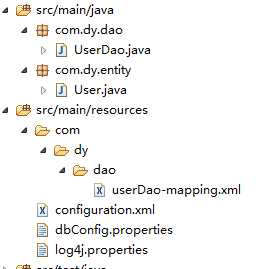
看看我的项目结构:
先编写一个实体类 User: User 类用于与 User 表相对应。
User:
 1 package com.dy.entity;
 2
 3 public class User {
 4
 5     private int id;
 6     private String name;
 7     private String password;
 8     private int age;
 9     private int deleteFlag;
10
11     public int getId() {
12         return id;
13     }
14     public void setId(int id) {
15         this.id = id;
16     }
17     public String getName() {
18         return name;
19     }
20     public void setName(String name) {
21         this.name = name;
22     }
23     public String getPassword() {
24         return password;
25     }
26     public void setPassword(String password) {
27         this.password = password;
28     }
29     public int getAge() {
30         return age;
31     }
32     public void setAge(int age) {
33         this.age = age;
34     }
35     public int getDeleteFlag() {
36         return deleteFlag;
37     }
38     public void setDeleteFlag(int deleteFlag) {
39         this.deleteFlag = deleteFlag;
40     }
41
42 }
再编写一个 UserDao 接口:
UserDao:
 1 package com.dy.dao;
 2
 3 import java.util.List;
 4
 5 import com.dy.entity.User;
 6
 7 public interface UserDao {
 8
 9     public void insert(User user);
10
11     public User findUserById (int userId);
12
13     public List<User> findAllUsers();
14
15 }
再编写一个 userDao-mapping.xml (可随便命名):
userDao-mapping.xml:
 1 <?xml version="1.0" encoding="UTF-8" ?>
 2 <!DOCTYPE mapper
 3 PUBLIC "-//ibatis.apache.org//DTD Mapper 3.0//EN"
 4 "http://ibatis.apache.org/dtd/ibatis-3-mapper.dtd">
 5 <mapper namespace="com.dy.dao.UserDao">
 6
 7    <select id="findUserById" resultType="com.dy.entity.User" >
 8       select * from user where id = #{id}
 9    </select>
10
11 </mapper>
userDao-mapping.xml 相当于是 UserDao 的实现, 同时也将 User 实体类与数据表 User 成功关联起来。
4. 下面编写 junit 测试代码 UserDaoTest:
UserDaoTest:
 1 public class UserDaoTest {
 2
 3     @Test
 4     public void findUserById() {
 5         SqlSession sqlSession = getSessionFactory().openSession();
 6         UserDao userMapper = sqlSession.getMapper(UserDao.class);
 7         User user = userMapper.findUserById(2);
 8         Assert.assertNotNull("没找到数据", user);
 9     }
10
11     //Mybatis 通过 SqlSessionFactory 获取 SqlSession, 然后才能通过 SqlSession 与数据库进行交互
12     private static SqlSessionFactory getSessionFactory() {
13         SqlSessionFactory sessionFactory = null;
14         String resource = "configuration.xml";
15         try {
16             sessionFactory = new SqlSessionFactoryBuilder().build(Resources
17                     .getResourceAsReader(resource));
18         } catch (IOException e) {
19             e.printStackTrace();
20         }
21         return sessionFactory;
22     }
23
24 }
好啦,这样一个简单的 mybatis 的 demo 就能成功运行啦。通过这个 demo, 应该你就也能初步看出 mybatis 的运行机制,如果不清楚,也没关系。从下一篇文章开始,才开始正式讲解 mybatis。