

MyBatis源码浅析
什么是 MyBatis
MyBatis 是支持定制化 SQL、存储过程以及高级映射的优秀的持久层框架。MyBatis 避免了几乎所有的 JDBC 代码和手工设置参数以及抽取结果集。MyBatis 使用简单的 XML 或注解来配置和映射基本体,将接口和 Java 的 POJOs(Plain Old Java Objects, 普通的 Java 对象) 映射成数据库中的记录。
MyBatis 简单示例
虽然在使用 MyBatis 时一般都会使用 XML 文件,但是本文为了分析程序的简单性,简单的测试程序将不包含 XML 配置,该测试程序包含一个接口、一个启动类:
1 2 3 4 5 6 7 8 9 10 11 12 13 14 15 16 17 18 19 20 21 22 23 24 25 26 27 28 29 30 31 32 33 | public interface UserMapper { @Select("SELECT * FROM user WHERE id = #{id}") User selectUser(int id);}public class Test2 { public static void main(String[] args) { SqlSessionFactory sqlSessionFactory = initSqlSessionFactory(); SqlSession session = sqlSessionFactory.openSession(); try { User user = (User) session.selectOne( "org.mybatis.example.UserMapper.selectUser", 1); System.out.println(user.getUserAddress()); System.out.println(user.getUserName()); } finally { session.close(); } } private static SqlSessionFactory initSqlSessionFactory() { DataSource dataSource = new PooledDataSource("com.mysql.jdbc.Driver", "jdbc:mysql://127.0.0.1:3306/jdbc", "root", ""); TransactionFactory transactionFactory = new JdbcTransactionFactory(); Environment environment = new Environment("development", transactionFactory, dataSource); Configuration configuration = new Configuration(environment); configuration.addMapper(UserMapper.class); SqlSessionFactory sqlSessionFactory = new SqlSessionFactoryBuilder() .build(configuration); return sqlSessionFactory; }} |
UserMapper 是一个接口,我们在构建 sqlSessionFactory 时通过 configuration.addMapper(UserMapper.class) 把该接口注册进了 sqlSessionFactory 中。从上面的代码中我们可以看出,要使用 MyBatis,我们应该经过以下步骤:1、创建 sqlSessionFactory(一次性操作);2、用 sqlSessionFactory 对象构造 sqlSession 对象;3、调用 sqlSession 的相应方法;4、关闭 sqlSession 对象。
在 main 方法中,我们没有配置 sql,也没有根据查询结果拼接对象,只需在调用 sqlSession 方法时传入一个命名空间以及方法参数参数即可,所有的操作都是面向对象的。在 UserMapper 接口中,我们定制了自己的 sql,MyBatis 把书写 sql 的权利给予了我们,方便我们进行 sql 优化及 sql 排错。
JDBC 基础回顾
直接使用 JDBC 是很痛苦的,JDBC 连接数据库包含以下几个基本步骤:1、注册驱动 ;2、建立连接 (Connection);3、创建 SQL 语句 (Statement);4、执行语句;5、处理执行结果 (ResultSet);6、释放资源,示例代码如下:
1 2 3 4 5 6 7 8 9 10 11 12 13 14 15 16 17 18 19 20 21 22 | public static void test() throws SQLException{ // 1.注册驱动 Class.forName("com.mysql.jdbc.Driver"); // 2.建立连接 url格式 - JDBC:子协议:子名称//主机名:端口/数据库名?属性名=属性值&… Connection conn = DriverManager.getConnection("jdbc:mysql://localhost:3306/jdbc", "root", ""); // 3.创建语句 Statement st = conn.createStatement(); // 4.执行语句 ResultSet rs = st.executeQuery("select * from user"); // 5.处理结果 while (rs.next()) {<br> User user = new User(rs.getObject(1), rs.getObject(2)); } // 6.释放资源 rs.close(); st.close(); conn.close();} |
可以看到与直接使用 JDBC 相比,MyBatis 为我们简化了很多工作:
1、把创建连接相关工作抽象成一个 sqlSessionFactory 对象,一次创建多次使用;
2、把 sql 语句从业务层剥离,代码逻辑更加清晰,增加可维护性;
3、自动完成结果集处理,不需要我们编写重复代码。
但是,我们应该知道的是,框架虽然能够帮助我们简化工作,但是框架底层的代码肯定还是最基础的 JDBC 代码,因为这是 Java 平台连接数据库的通用方法,今天我将分析一下 MyBatis 源码,看看 MyBatis 是如何把这些基础代码封装成一个框架的。
MyBatis 调用流程
我们最终调用的是 sqlSession 对象上的方法,所以我们先跟踪 sqlSession 的创建方法:sqlSessionFactory.openSession(),最终这个方法会调用到 DefaultSqlSessionFactory 的以下方法:
1 2 3 4 5 6 7 8 9 10 11 12 13 14 15 | private SqlSession openSessionFromDataSource(ExecutorType execType, TransactionIsolationLevel level, boolean autoCommit) { Transaction tx = null; try { final Environment environment = configuration.getEnvironment(); final TransactionFactory transactionFactory = getTransactionFactoryFromEnvironment(environment); tx = transactionFactory.newTransaction(environment.getDataSource(), level, autoCommit); final Executor executor = configuration.newExecutor(tx, execType); return new DefaultSqlSession(configuration, executor, autoCommit); } catch (Exception e) { closeTransaction(tx); // may have fetched a connection so lets call close() throw ExceptionFactory.wrapException("Error opening session. Cause: " + e, e); } finally { ErrorContext.instance().reset(); } } |
最终返回的对象是一个 DefaultSqlSession 对象,在调试模式下,我们看到 autoCommit 为 false,executor 为 CachingExecutor 类型,在 CachingExecutor 里面有属性 delegate,其类型为 simpleExecutor:

现在,我们跟进 DefaultSqlSession 的 selectOne()方法,查看该方法的调用流程,selectOne() 方法又会调用 selectList() 方法:
1 2 3 4 5 6 7 8 9 10 11 | public <E> List<E> selectList(String statement, Object parameter, RowBounds rowBounds) { try { MappedStatement ms = configuration.getMappedStatement(statement); List<E> result = executor.query(ms, wrapCollection(parameter), rowBounds, Executor.NO_RESULT_HANDLER); return result; } catch (Exception e) { throw ExceptionFactory.wrapException("Error querying database. Cause: " + e, e); } finally { ErrorContext.instance().reset(); }} |
可以看到要得到查询结果,最终还是要调用 executor 上的 query 方法,这里的 executor 是 CachingExecutor 实例,跟进程序得到如下代码:
1 2 3 4 5 6 7 8 9 10 11 12 13 14 15 16 17 18 19 20 21 22 23 24 | public <E> List<E> query(MappedStatement ms, Object parameterObject, RowBounds rowBounds, ResultHandler resultHandler) throws SQLException { BoundSql boundSql = ms.getBoundSql(parameterObject); CacheKey key = createCacheKey(ms, parameterObject, rowBounds, boundSql); return query(ms, parameterObject, rowBounds, resultHandler, key, boundSql);}public <E> List<E> query(MappedStatement ms, Object parameterObject, RowBounds rowBounds, ResultHandler resultHandler, CacheKey key, BoundSql boundSql) throws SQLException { Cache cache = ms.getCache(); if (cache != null) { flushCacheIfRequired(ms); if (ms.isUseCache() && resultHandler == null) { ensureNoOutParams(ms, parameterObject, boundSql); @SuppressWarnings("unchecked") List<E> list = (List<E>) tcm.getObject(cache, key); if (list == null) { list = delegate.<E> query(ms, parameterObject, rowBounds, resultHandler, key, boundSql); tcm.putObject(cache, key, list); // issue #578. Query must be not synchronized to prevent deadlocks } return list; } } return delegate.<E> query(ms, parameterObject, rowBounds, resultHandler, key, boundSql);} |
MyBatis 框架首先生成了一个 boundSql 和 CacheKey,在 boundSql 中包含有我们传入的 sql 语句:

生成 boundSql 和 CacheKey 后会调用一个重载函数,在重载函数中,我们会检测是否有缓存,这个缓存是 MyBatis 的二级缓存,我们没有配置,那么直接调用最后一句 delegate.<E> query(ms, parameterObject, rowBounds, resultHandler, key, boundSql),前面说过这个 delagate 其实就是 simpleExecutor,跟进去查看一下:
1 2 3 4 5 6 7 8 9 10 11 12 13 14 15 16 17 18 19 20 21 22 23 24 25 26 27 28 29 | public <E> List<E> query(MappedStatement ms, Object parameter, RowBounds rowBounds, ResultHandler resultHandler, CacheKey key, BoundSql boundSql) throws SQLException { ErrorContext.instance().resource(ms.getResource()).activity("executing a query").object(ms.getId()); if (closed) throw new ExecutorException("Executor was closed."); if (queryStack == 0 && ms.isFlushCacheRequired()) { clearLocalCache(); } List<E> list; try { queryStack++; list = resultHandler == null ? (List<E>) localCache.getObject(key) : null; if (list != null) { handleLocallyCachedOutputParameters(ms, key, parameter, boundSql); } else { list = queryFromDatabase(ms, parameter, rowBounds, resultHandler, key, boundSql); } } finally { queryStack--; } if (queryStack == 0) { for (DeferredLoad deferredLoad : deferredLoads) { deferredLoad.load(); } deferredLoads.clear(); // issue #601 if (configuration.getLocalCacheScope() == LocalCacheScope.STATEMENT) { clearLocalCache(); // issue #482 } } return list; } |
关键代码是以下三行:
1 2 3 4 5 6 | list = resultHandler == null ? (List<E>) localCache.getObject(key) : null;if (list != null) { handleLocallyCachedOutputParameters(ms, key, parameter, boundSql);} else { list = queryFromDatabase(ms, parameter, rowBounds, resultHandler, key, boundSql);} |
首先尝试从 localCache 中根据 key 得到 List,这里的 localCache 是 MyBatis 的一级缓存,如果得不到则调用 queryFromDatabase() 从数据库中查询:
1 2 3 4 5 6 7 8 9 10 11 12 13 14 | private <E> List<E> queryFromDatabase(MappedStatement ms, Object parameter, RowBounds rowBounds, ResultHandler resultHandler, CacheKey key, BoundSql boundSql) throws SQLException { List<E> list; localCache.putObject(key, EXECUTION_PLACEHOLDER); try { list = doQuery(ms, parameter, rowBounds, resultHandler, boundSql); } finally { localCache.removeObject(key); } localCache.putObject(key, list); if (ms.getStatementType() == StatementType.CALLABLE) { localOutputParameterCache.putObject(key, parameter); } return list;} |
其中关键代码是调用 doQuery()代码,SimpleExecutor 的 doQuery() 方法如下:
1 2 3 4 5 6 7 8 9 10 11 | public <E> List<E> doQuery(MappedStatement ms, Object parameter, RowBounds rowBounds, ResultHandler resultHandler, BoundSql boundSql) throws SQLException { Statement stmt = null; try { Configuration configuration = ms.getConfiguration(); StatementHandler handler = configuration.newStatementHandler(wrapper, ms, parameter, rowBounds, resultHandler, boundSql); stmt = prepareStatement(handler, ms.getStatementLog()); return handler.<E>query(stmt, resultHandler); } finally { closeStatement(stmt); }} |
调用了 prepareStatement 方法,该方法如下:
1 2 3 4 5 6 7 | private Statement prepareStatement(StatementHandler handler, Log statementLog) throws SQLException { Statement stmt; Connection connection = getConnection(statementLog); stmt = handler.prepare(connection); handler.parameterize(stmt); return stmt;} |
终于,我们看到熟悉的代码了,首先得到 Connection,然后从 Connection 中得到 Statement,同时在调试模式下我们看到,我们的 sql 语句已经被设置到 stmt 中了:

现在 Statement 对象有了,sql 也设置进去了,就只差执行以及对象映射了,继续跟进代码,我们会跟踪到 org.apache.ibatis.executor.statement.
PreparedStatementHandler 类的 executor 方法:
1 2 3 4 5 | public <E> List<E> query(Statement statement, ResultHandler resultHandler) throws SQLException { PreparedStatement ps = (PreparedStatement) statement; ps.execute(); return resultSetHandler.<E> handleResultSets(ps);} |
在这里,调用了 ps.execute()方法执行 sql,接下来调用的 resultSetHandler.<E> handleResultSets(ps) 方法明显是对结果集进行封装,我就不继续跟进了。
MyBatis 的数据库连接池
上面一部分介绍了 MyBatis 执行的整体流程,这一部分打算讨论一个具体话题:MyBatis 的数据库连接池。
我们知道,每次连接数据库时都创建 Connection 是十分耗费性能的,所以我们在写 JDBC 代码时,一般都会使用数据库连接池,把用过的 Connection 不是直接关闭,而是放入数据库连接池中,方便下次复用,开源的数据库连接池有 DBCP、C3P0 等,MyBatis 也实现了自己的数据库连接池,在这一节我将探索一下 MyBatis 实现的数据库连接池源码。
跟进上一节的 getConnection()方法,我们最终会进入 JdbcTransaction 的 getConnection() 方法,getConnection()方法又会调用 openConnection() 方法,而 openConnection()又将调用 dataSource 的 getConnection() 方法:
1 2 3 4 5 6 7 8 9 10 11 12 13 14 15 16 17 | public Connection getConnection() throws SQLException { if (connection == null) { openConnection(); } return connection;}protected void openConnection() throws SQLException { if (log.isDebugEnabled()) { log.debug("Opening JDBC Connection"); } connection = dataSource.getConnection(); if (level != null) { connection.setTransactionIsolation(level.getLevel()); } setDesiredAutoCommit(autoCommmit);} |
这里的 dataSource 是 PooledDataSource 类型,跟进查看源码如下:
1 2 3 4 5 6 7 | public Connection getConnection() throws SQLException { return popConnection(dataSource.getUsername(), dataSource.getPassword()).getProxyConnection();}private PooledConnection popConnection(String username, String password) throws SQLException { //暂不分析} |
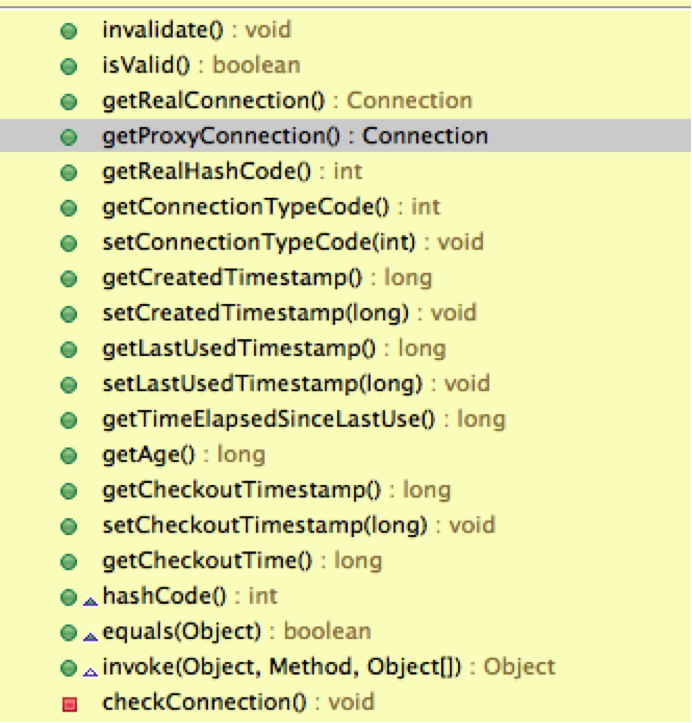
可以看到,在这里我们返回的对象其实已经不是原生的 Connection 对象了,而是一个动态代理对象,是 PooledConnection 的一个属性,所有对对 Connection 对象的操作都将被 PooledConnection 拦截,我们可以查看 PooledConnection 的定义如下:
1 2 3 4 5 6 7 8 9 10 11 12 13 14 15 16 17 18 19 20 21 22 23 24 25 26 27 28 29 30 31 32 33 34 35 36 37 38 39 40 41 42 43 44 45 46 47 48 49 50 51 52 53 54 55 56 57 58 59 60 61 62 63 64 65 66 67 68 69 70 71 72 73 74 75 76 77 78 79 80 81 82 83 84 85 86 87 88 89 90 91 92 93 94 95 96 97 98 99 100 101 102 103 104 105 106 107 108 109 110 111 112 113 114 115 116 117 118 119 120 121 122 123 124 125 126 127 128 129 130 131 132 133 134 | class PooledConnection implements InvocationHandler { private static final String CLOSE = "close"; private static final Class<?>[] IFACES = new Class<?>[] { Connection.class }; private int hashCode = 0; private PooledDataSource dataSource; private Connection realConnection; private Connection proxyConnection; private long checkoutTimestamp; private long createdTimestamp; private long lastUsedTimestamp; private int connectionTypeCode; private boolean valid; public PooledConnection(Connection connection, PooledDataSource dataSource) { this.hashCode = connection.hashCode(); this.realConnection = connection; this.dataSource = dataSource; this.createdTimestamp = System.currentTimeMillis(); this.lastUsedTimestamp = System.currentTimeMillis(); this.valid = true; this.proxyConnection = (Connection) Proxy.newProxyInstance( Connection.class.getClassLoader(), IFACES, this); } public void invalidate() { valid = false; } public boolean isValid() { return valid && realConnection != null && dataSource.pingConnection(this); } public Connection getRealConnection() { return realConnection; } public Connection getProxyConnection() { return proxyConnection; } public int getRealHashCode() { if (realConnection == null) { return 0; } else { return realConnection.hashCode(); } } public int getConnectionTypeCode() { return connectionTypeCode; } public void setConnectionTypeCode(int connectionTypeCode) { this.connectionTypeCode = connectionTypeCode; } public long getCreatedTimestamp() { return createdTimestamp; } public void setCreatedTimestamp(long createdTimestamp) { this.createdTimestamp = createdTimestamp; } public long getLastUsedTimestamp() { return lastUsedTimestamp; } public void setLastUsedTimestamp(long lastUsedTimestamp) { this.lastUsedTimestamp = lastUsedTimestamp; } public long getTimeElapsedSinceLastUse() { return System.currentTimeMillis() - lastUsedTimestamp; } public long getAge() { return System.currentTimeMillis() - createdTimestamp; } public long getCheckoutTimestamp() { return checkoutTimestamp; } public void setCheckoutTimestamp(long timestamp) { this.checkoutTimestamp = timestamp; } public long getCheckoutTime() { return System.currentTimeMillis() - checkoutTimestamp; } public int hashCode() { return hashCode; } public boolean equals(Object obj) { if (obj instanceof PooledConnection) { return realConnection.hashCode() == (((PooledConnection) obj).realConnection .hashCode()); } else if (obj instanceof Connection) { return hashCode == obj.hashCode(); } else { return false; } } public Object invoke(Object proxy, Method method, Object[] args) throws Throwable { String methodName = method.getName(); if (CLOSE.hashCode() == methodName.hashCode() && CLOSE.equals(methodName)) { dataSource.pushConnection(this); return null; } else { try { if (!Object.class.equals(method.getDeclaringClass())) { checkConnection(); } return method.invoke(realConnection, args); } catch (Throwable t) { throw ExceptionUtil.unwrapThrowable(t); } } } private void checkConnection() throws SQLException { if (!valid) { throw new SQLException( "Error accessing PooledConnection. Connection is invalid."); } }} |
可以看到这个类暴露了很多接口检测 Connection 状态,例如连接是否有效,连接创建时间最近使用连接等:
这个类实现了 InvocationHandler 接口,最主要的一个方法如下:
1 2 3 4 5 6 7 8 9 10 11 12 13 14 15 16 | public Object invoke(Object proxy, Method method, Object[] args) throws Throwable { String methodName = method.getName(); if (CLOSE.hashCode() == methodName.hashCode() && CLOSE.equals(methodName)) { dataSource.pushConnection(this); return null; } else { try { if (!Object.class.equals(method.getDeclaringClass())) { checkConnection(); } return method.invoke(realConnection, args); } catch (Throwable t) { throw ExceptionUtil.unwrapThrowable(t); } }} |
可以看到,PooledConnection 会拦截 close 方法,当客户端调用 close()方法时,程序不会关闭 Connection,而是会调用 dataSource.pushConnection(this) 方法,该方法的实现如下:
1 2 3 4 5 6 7 8 9 10 11 12 13 14 15 16 17 18 19 20 21 22 23 24 25 26 27 28 29 30 31 32 33 34 35 36 37 | protected void pushConnection(PooledConnection conn) throws SQLException { synchronized (state) { state.activeConnections.remove(conn); if (conn.isValid()) { if (state.idleConnections.size() < poolMaximumIdleConnections && conn.getConnectionTypeCode() == expectedConnectionTypeCode) { state.accumulatedCheckoutTime += conn.getCheckoutTime(); if (!conn.getRealConnection().getAutoCommit()) { conn.getRealConnection().rollback(); } PooledConnection newConn = new PooledConnection(conn.getRealConnection(), this); state.idleConnections.add(newConn); newConn.setCreatedTimestamp(conn.getCreatedTimestamp()); newConn.setLastUsedTimestamp(conn.getLastUsedTimestamp()); conn.invalidate(); if (log.isDebugEnabled()) { log.debug("Returned connection " + newConn.getRealHashCode() + " to pool."); } state.notifyAll(); } else { state.accumulatedCheckoutTime += conn.getCheckoutTime(); if (!conn.getRealConnection().getAutoCommit()) { conn.getRealConnection().rollback(); } conn.getRealConnection().close(); if (log.isDebugEnabled()) { log.debug("Closed connection " + conn.getRealHashCode() + "."); } conn.invalidate(); } } else { if (log.isDebugEnabled()) { log.debug("A bad connection (" + conn.getRealHashCode() + ") attempted to return to the pool, discarding connection."); } state.badConnectionCount++; } }} |
可以看到,首先会把 Connection 从活跃列表中删除,然后检测空闲列表的长度有没有达到最大长度(默认为 5),若没有达到,把 Connection 放入空闲链表,否则关闭连接。这里的 state 是一个 PoolState 对象,该对象定义如下:
1 2 3 4 5 6 7 8 9 10 11 12 13 14 15 16 17 18 19 20 21 22 23 24 25 26 27 28 29 30 31 32 33 34 35 36 37 38 39 40 41 42 43 44 45 46 47 48 49 50 51 52 53 54 55 56 57 | public class PoolState { protected PooledDataSource dataSource; protected final List<PooledConnection> idleConnections = new ArrayList<PooledConnection>(); protected final List<PooledConnection> activeConnections = new ArrayList<PooledConnection>(); protected long requestCount = 0; protected long accumulatedRequestTime = 0; protected long accumulatedCheckoutTime = 0; protected long claimedOverdueConnectionCount = 0; protected long accumulatedCheckoutTimeOfOverdueConnections = 0; protected long accumulatedWaitTime = 0; protected long hadToWaitCount = 0; protected long badConnectionCount = 0; public PoolState(PooledDataSource dataSource) { this.dataSource = dataSource; } public synchronized long getRequestCount() { return requestCount; } public synchronized long getAverageRequestTime() { return requestCount == 0 ? 0 : accumulatedRequestTime / requestCount; } public synchronized long getAverageWaitTime() { return hadToWaitCount == 0 ? 0 : accumulatedWaitTime / hadToWaitCount; } public synchronized long getHadToWaitCount() { return hadToWaitCount; } public synchronized long getBadConnectionCount() { return badConnectionCount; } public synchronized long getClaimedOverdueConnectionCount() { return claimedOverdueConnectionCount; } public synchronized long getAverageOverdueCheckoutTime() { return claimedOverdueConnectionCount == 0 ? 0 : accumulatedCheckoutTimeOfOverdueConnections / claimedOverdueConnectionCount; } public synchronized long getAverageCheckoutTime() { return requestCount == 0 ? 0 : accumulatedCheckoutTime / requestCount; } public synchronized int getIdleConnectionCount() { return idleConnections.size(); } public synchronized int getActiveConnectionCount() { return activeConnections.size(); }} |
可以看到最终我们的 Connection 对象是放在 ArrayList 中的,该类还提供一些接口返回连接池基本信息。
好了,现在我们可以回去看看 PooledDataSource 的 popConnection 方法了:
1 2 3 4 5 6 7 8 9 10 11 12 13 14 15 16 17 18 19 20 21 22 23 24 25 26 27 28 29 30 31 32 33 34 35 36 37 38 39 40 41 42 43 44 45 46 47 48 49 50 51 52 53 54 55 56 57 58 59 60 61 62 63 64 65 66 67 68 69 70 71 72 73 74 75 76 77 78 79 80 81 82 83 84 85 86 87 88 89 90 91 92 93 94 95 96 97 98 99 100 | private PooledConnection popConnection(String username, String password) throws SQLException { boolean countedWait = false; PooledConnection conn = null; long t = System.currentTimeMillis(); int localBadConnectionCount = 0; while (conn == null) { synchronized (state) { if (state.idleConnections.size() > 0) { // Pool has available connection conn = state.idleConnections.remove(0); if (log.isDebugEnabled()) { log.debug("Checked out connection " + conn.getRealHashCode() + " from pool."); } } else { // Pool does not have available connection if (state.activeConnections.size() < poolMaximumActiveConnections) { // Can create new connection conn = new PooledConnection(dataSource.getConnection(), this); @SuppressWarnings("unused") //used in logging, if enabled Connection realConn = conn.getRealConnection(); if (log.isDebugEnabled()) { log.debug("Created connection " + conn.getRealHashCode() + "."); } } else { // Cannot create new connection PooledConnection oldestActiveConnection = state.activeConnections.get(0); long longestCheckoutTime = oldestActiveConnection.getCheckoutTime(); if (longestCheckoutTime > poolMaximumCheckoutTime) { // Can claim overdue connection state.claimedOverdueConnectionCount++; state.accumulatedCheckoutTimeOfOverdueConnections += longestCheckoutTime; state.accumulatedCheckoutTime += longestCheckoutTime; state.activeConnections.remove(oldestActiveConnection); if (!oldestActiveConnection.getRealConnection().getAutoCommit()) { oldestActiveConnection.getRealConnection().rollback(); } conn = new PooledConnection(oldestActiveConnection.getRealConnection(), this); oldestActiveConnection.invalidate(); if (log.isDebugEnabled()) { log.debug("Claimed overdue connection " + conn.getRealHashCode() + "."); } } else { // Must wait try { if (!countedWait) { state.hadToWaitCount++; countedWait = true; } if (log.isDebugEnabled()) { log.debug("Waiting as long as " + poolTimeToWait + " milliseconds for connection."); } long wt = System.currentTimeMillis(); state.wait(poolTimeToWait); state.accumulatedWaitTime += System.currentTimeMillis() - wt; } catch (InterruptedException e) { break; } } } } if (conn != null) { if (conn.isValid()) { if (!conn.getRealConnection().getAutoCommit()) { conn.getRealConnection().rollback(); } conn.setConnectionTypeCode(assembleConnectionTypeCode(dataSource.getUrl(), username, password)); conn.setCheckoutTimestamp(System.currentTimeMillis()); conn.setLastUsedTimestamp(System.currentTimeMillis()); state.activeConnections.add(conn); state.requestCount++; state.accumulatedRequestTime += System.currentTimeMillis() - t; } else { if (log.isDebugEnabled()) { log.debug("A bad connection (" + conn.getRealHashCode() + ") was returned from the pool, getting another connection."); } state.badConnectionCount++; localBadConnectionCount++; conn = null; if (localBadConnectionCount > (poolMaximumIdleConnections + 3)) { if (log.isDebugEnabled()) { log.debug("PooledDataSource: Could not get a good connection to the database."); } throw new SQLException("PooledDataSource: Could not get a good connection to the database."); } } } } } if (conn == null) { if (log.isDebugEnabled()) { log.debug("PooledDataSource: Unknown severe error condition. The connection pool returned a null connection."); } throw new SQLException("PooledDataSource: Unknown severe error condition. The connection pool returned a null connection."); } return conn; } |
可以看到获取 Connection 一共分以下几种情况:1、如果有空闲 Connection,那么直接使用空闲 Connection,否则 2;2、如果活跃 Connection 没有达到活跃 Connection 的上限,那么创建一个新 Connection 并返回,否则 3;3、如果达到活跃上限,且被检出的 Connection 检出时间过长,那么把该 Connection 置为失效,新创建一个 Connection,否则 4;4、等待空闲 Connection。
至此,我们就把 MyBatis 的数据库连接池代码整理了一遍,其中有两个关键点:1、检出的 Connection 其实不是原生 Connection,而是一个代理对象;2、存放 Connection 的容器是 ArrayList,Connection 的检出遵从先进先出原则。
MyBatis 的缓存
这篇博客讲的很好,mark 一下:http://www.cnblogs.com/fangjian0423/p/mybatis-cache.html
MyBatis 的事务
首先回顾一下 JDBC 的事务知识。
JDBC 可以操作 Connection 的 setAutoCommit()方法,给它 false 参数,提示数据库启动事务,在下达一连串的 SQL 命令后,自行调用 Connection 的 commit()方法,提示数据库确认 (Commit) 操作。如果中间发生错误,则调用 rollback(),提示数据库撤销 (ROLLBACK) 所有执行。同时,如果仅想要撤回某个 SQL 执行点,则可以设置存储点(SAVEPOINT)。一个示范的事务流程如下:
1 2 3 4 5 6 7 8 9 10 11 12 13 14 15 16 17 18 19 20 21 22 23 24 25 26 27 28 29 30 31 32 33 34 35 36 | Connection conn = ...;Savepoint point = null;try { conn.setAutoCommit(false); Statement stmt = conn.createStatement(); stmt.executeUpdate("INSERT INTO ..."); ... point = conn.setSavepoint(); stmt.executeUpdate("INSERT INTO ..."); ... conn.commit();} catch (SQLException e) { e.printStackTrace(); if (conn != null) { try { if (point == null) { conn.rollback(); } else { conn.rollback(point); conn.releaseSavepoint(point); } } catch (SQLException ex) { ex.printStackTrace(); } }} finally { ... if (conn != null) { try { conn.setAutoCommit(true); conn.close(); } catch (SQLException ex) { ex.printStackTrace(); } }} |
在 MyBatis 调用流程一节就写过,在调试模式下,我们看到 autoCommit 为 false,所以每个 sqlSession 其实都是一个事务,这也是为什么每次做删、改、查时都必须调用 commit 的原因。