

Spring Security -- Spring Boot中开启Spring Security
目录
目录
在介绍 Spring Securiry 之前,我们试想一下如果我们自己去实现一个安全框架,我们需要包含哪些功能:
- 我们需要对登录接口或者一些不需要权限的接口放行,同时我们需要对某些接口进行身份认证,例如:在基于 jwt 的认证体系中,我们需要校验 token 是否合法,token 合法我们才会放行;
- 我们希望我们写的安全框架能够做一些授权的操作,比如:我们可以限制认证后的用户访问 /user 接口需要什么权限,访问 /group 接口又需要什么权限;
- 我们希望安全框架能够提供一个缓存,无论是 TreadLocal、还是 HttpServletRequest 也罢,只要能够获取保存当前认证通过的用户信息即可;
试想一下,如果我们去实现这些功能,我们需要怎么做:
- 我们需要去拦截所有的 HTTP 请求,我们首先想到的实现方式就是filter、Spring AOP、Intercepter,这三者的实现方式和应用场景都不一样,这里我们不去细究采用哪种方式,但是我可以告诉你 Spring Security 是采用了一系列的 filter 实现的。
- 假设我们也是采用的 filter 实现,那么我们是不是也要实现一个白名单啊,比如放行 /login 接口啊,然后剩下的接口,就要走认证流程;
- 认证完之后,我们怎么做授权呢,我们可以这么做,我们先获取当前登录用户所拥有的权限,比如某某用户对接口资源 user 具有添加权限,采用这种格式:interface:user:add,我们将若干个这种格式的权限放到一个 list,然后放到缓存中
[
    "interface:user:add",
    "interface:group:delete",
   ...
]
- 然后我们干一件什么事呢,我们搞个 @PreAuthorize 注解,然后再搞个注解处理器,注解处理器可以使用 Spring AOP 去实现。这个注解怎么用呢,我们可以将这个注解加在 UserController /user/add 接口上:
   @PostMapping("/user/add")
   @PreAuthorize("interface:user:add")
   public NgspResponseEntity<User> insertUser(...)
- 如果用户去访问 /user/add 接口,我们就去缓存中拉取用户的权限列表,然后去校验用户是否具有访问这个接口的权限,如果有那么我们就放行。
当然了上面只是一个简单的实现,Spring Security 的实现那是太太太复杂了,他为了满足各种需求,允许我们自己去配置各种过滤器,功能是强大了,但是学习起来还是比较困难的。
下面我将带领大家来学习 Spring Security 框架,Spring Security 是一款基于 Spring 的安全框架,主要包含认证和授权两大安全模块,和另外一款流行的安全框架 Apache Shiro 相比,它拥有更为强大的功能。Spring Security 也可以轻松的自定义扩展以满足各种需求,并且对常见的 Web 安全攻击提供了防护支持。如果你的 Web 框架选择的是 Spring,那么在安全方面 Spring Security 会是一个不错的选择。
一、开启 Spring Security
1、导入依赖
创建一个 Spring Boot 项目 springboot-springsecurity,然后引入 spring-boot-starter-security:
        <!--   Spring Security 的 maven 依赖    -->
        <dependency>
            <groupId>org.springframework.boot</groupId>
            <artifactId>spring-boot-starter-security</artifactId>
        </dependency>
2、创建 Controller
新建包 com.zy.example.controller,接下来我们创建一个 TestController,对外提供一个 /hello 服务:

package com.zy.example.controller;
import org.springframework.web.bind.annotation.GetMapping;
import org.springframework.web.bind.annotation.RestController;
/**
- @Author: zy
- @Description: 测试
- @Date: 2020-2-9
*/
@RestController
public class TestController {
@GetMapping("hello")
public String hello() {
return "hello spring security";
}
}
3、新建 App 入口
新建入口程序 App.java:
package com.zy.example;
import org.springframework.boot.SpringApplication;
import org.springframework.boot.autoconfigure.SpringBootApplication;
/**
- @Author: zy
- @Description: 启动程序
- @Date: 2020-2-9
*/
@SpringBootApplication
public class App {
public static void main(String[] args){
SpringApplication.run(App.class,args);
}
}
这时候我们直接启动项目,访问http://localhost:8080/hello,可看到页面弹出了个 formLogin 认证框:
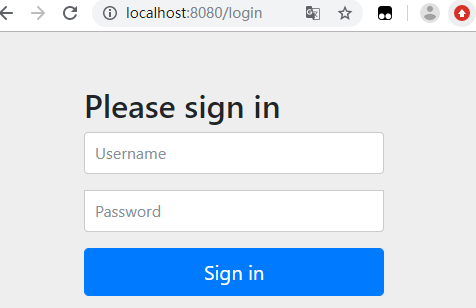
这个配置开启了一个 form Login 类型的认证,所有服务的访问都必须先过这个认证,默认的用户名为 user,密码由 Sping Security 自动生成,回到 IDE 的控制台,可以找到密码信息:
Using generated security password: a77c9456-901e-4848-a221-3822347e52ea
输入用户名 user,密码 a77c9456-901e-4848-a221-3822347e52ea 后,我们便可以成功访问/hello接口。
二、基于 HTTP basic 类型的认证
我们可以通过一些配置将表单认证修改为基于 HTTP Basic 的认证方式。
1、配置 Spring Security
创建包 com.zy.example.config,创建一个配置类 WebSecurityConfig 继承 org.springframework.security.config.annotation.web.configuration.WebSecurityConfigurerAdapter 这个抽象类并重写 configure(HttpSecurity http) 方法。WebSecurityConfigurerAdapter 是由 Spring Security 提供的 Web 应用安全配置的适配器:
package com.zy.example.config;
import org.springframework.context.annotation.Configuration;
import org.springframework.security.config.annotation.web.builders.HttpSecurity;
import org.springframework.security.config.annotation.web.configuration.WebSecurityConfigurerAdapter;
/**
- @Author: zy
- @Description: spring security 配置类
- @Date: 2020-2-9
*/
@Configuration
public class WebSecurityConfig extends WebSecurityConfigurerAdapter {
/**
- 配置拦截请求资源
- @param http:HTTP 请求安全处理
- @throws Exception
*/
@Override
protected void configure(HttpSecurity http) throws Exception {
http.httpBasic() //HTTP Basic 认证方式
.and()
.authorizeRequests() // 授权配置
.anyRequest() // 所有请求
.authenticated(); // 都需要认证
}
}
Spring Security 提供了这种链式的方法调用。上面配置指定了认证方式为 HTTP Basic 登录,并且所有请求都需要进行认证。
这里有一点需要注意,我没并没有在 Spring Security 配置类上使用 @EnableWebSecurity 注解。这是因为在非 Spring Boot 的 Spring Web MVC 应用中,注解 @EnableWebSecurity 需要开发人员自己引入以启用 Web 安全。而在基于 Spring Boot 的 Spring Web MVC 应用中, 开发人员没有必要再次引用该注解,Spring Boot 的自动配置机制 WebSecurityEnablerConfiguration 已经引入了该注解,如下所示:
package org.springframework.boot.autoconfigure.security.servlet;
// 省略 imports 行
@Configuration
// 仅在存在 WebSecurityConfigurerAdapter bean 时该注解才有可能生效
// (最终生效与否要结合其他条件综合考虑)
@ConditionalOnBean(WebSecurityConfigurerAdapter.class)
// 仅在不存在 springSecurityFilterChain 时该注解才有可能生效
// (最终生效与否要结合其他条件综合考虑)
@ConditionalOnMissingBean(name = BeanIds.SPRING_SECURITY_FILTER_CHAIN)
// 仅在 Servlet 环境下该注解才有可能生效
// (最终生效与否要结合其他条件综合考虑)
@ConditionalOnWebApplication(type = ConditionalOnWebApplication.Type.SERVLET)
@EnableWebSecurity // <====== 这里启用了 Web 安全
public class WebSecurityEnablerConfiguration {
}
实际上,一个 Spring Web 应用中,WebSecurityConfigurerAdapter 可能有多个 , @EnableWebSecurity 可以不用在任何一个 WebSecurityConfigurerAdapter 上,可以用在每个 WebSecurityConfigurerAdapter 上,也可以只用在某一个 WebSecurityConfigurerAdapter 上。多处使用 @EnableWebSecurity 注解并不会导致问题,其最终运行时效果跟使用 @EnableWebSecurity 一次效果是一样的。
这时候我们重启项目,再次访问http://localhost:8080/hello,可以看到认证方式已经是 HTTP Basic 的方式了:
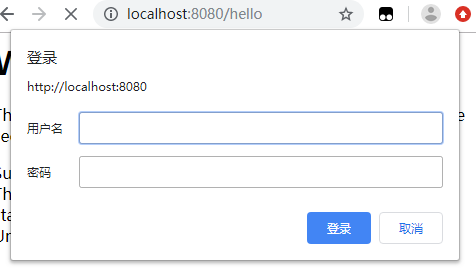
用户名依旧是 user,密码由 Spring Security 自动生成,如果需要换回表单的认证方式,我们只需要简单修改 configure 方法中的配置:
@Override
protected void configure(HttpSecurity http) throws Exception {
    // http.formLogin() // 表单方式
    http.httpBasic() // HTTP Basic 方式
            .and().authorizeRequests() // 授权配置
            .anyRequest()  // 所有请求
            .authenticated(); // 都需要认证
}
三、Spring Security 基本原理
上面我们开启了一个最简单的 Spring Security 安全配置,下面我们来了解下 Spring Security 的基本原理。通过上面的的配置。
1、基本原理
Spring Security 所解决的问题就是安全访问控制,而安全访问控制功能其实就是对所有进入系统的请求进行拦截, 校验每个请求是否能够访问它所期望的资源。而 Spring Security 对 Web 资源的保护是靠 Filter 实现的。当初始化 Spring Security 时,WebSecurityConfiguration 会创建一个名为 springSecurityFilterChain 的 Servlet 过滤器,类型为 org.springframework.security.web.FilterChainProxy,它实现了 javax.servlet.Filter,因此外部的请求会经过此类。

FilterChainProxy 是一个代理,真正起作用的是 FilterChainProxy 中 SecurityFilterChain 所包含的各个 Filter,下图为实际调试中创建的 FilterChainProxy 实例。

这些 Filter 作为 Bean 被 Spring 管理,它们是 Spring Security 核心,各有各的职责,但他们并不直接处理用户的认 证,也不直接处理用户的授权,而是把它们交给了认证管理器(AuthenticationManager)和决策管理器 (AccessDecisionManager)进行处理。 Spring Security 功能的实现主要是由一系列过滤器链相互配合完成,如下图(只是挑选了一些重要的 Filter 进行讲解):

下面介绍几个重要的过滤器:
- UsernamePasswordAuthenticationFilter 过滤器用于处理基于表单方式的登录验证,该过滤器默认只有当请求方法为 post、请求页面为 /login 时过滤器才生效,如果想修改默认拦截 url,只需在刚才介绍的 Spring Security 配置类 WebSecurityConfig 中配置该过滤器的拦截 url:.loginProcessingUrl("url") 即可;
- BasicAuthenticationFilter 用于处理基于 HTTP Basic 方式的登录验证,当通过 HTTP Basic 方式登录时,默认会发送 post 请求 /login,并且在请求头携带 Authorization:Basic dXNlcjoxOWEyYWIzOC1kMjBiLTQ0MTQtOTNlOC03OThkNjc2ZTZlZDM= 信息,该信息是登录用户名、密码加密后的信息,然后由 BasicAuthenticationFilter 过滤器解析后,构建 UsernamePasswordAuthenticationFilter 过滤器进行认证;如果请求头没有 Authorization 信息,BasicAuthenticationFilter 过滤器则直接放行;
- FilterSecurityInterceptor 的拦截器,用于判断当前请求身份认证是否成功,是否有相应的权限,当身份认证失败或者权限不足的时候便会抛出相应的异常;
- ExceptionTranslateFilter 捕获并处理,所以我们在 ExceptionTranslateFilter 过滤器用于处理了 FilterSecurityInterceptor 抛出的异常并进行处理,比如需要身份认证时将请求重定向到相应的认证页面,当认证失败或者权限不足时返回相应的提示信息;
2、认证流程
以表单方式登录验证为例,认证流程如下:

- 用户提交用户名、密码被 SecurityFilterChain 中的 UsernamePasswordAuthenticationFilter 过滤器获取到, 封装为请求 Authentication,通常情况下是 UsernamePasswordAuthenticationToken 这个实现类。
- 然后过滤器将 Authentication 提交至认证管理器(AuthenticationManager)进行认证 。
- 认证成功后, AuthenticationManager 身份管理器返回一个被填充满了信息的(包括上面提到的权限信息, 身份信息,细节信息,但密码通常会被移除) Authentication 实例。
- SecurityContextHolder 安全上下文容器将第 3 步填充了信息的 Authentication ,通过 SecurityContextHolder.getContext().setAuthentication(…) 方法,设置到其中。 可以看出 AuthenticationManager 接口(认证管理器)是认证相关的核心接口,也是发起认证的出发点,它的实现类为 ProviderManager。而 Spring Security 支持多种认证方式,因此 ProviderManager 维护着一个 List 列表,存放多种认证方式,最终实际的认证工作是由 AuthenticationProvider 完成的。其中 web 表单的对应的 AuthenticationProvider 实现类为 DaoAuthenticationProvider,它的内部又维护着一个 UserDetailsService 负责 UserDetails 的获取。最终 AuthenticationProvider 将 UserDetails 填充至 Authentication。
3、授权策略
Spring Security 可以通过 http.authorizeRequests() 对 web 请求进行授权保护。Spring Security 使用标准 Filter 建立了对 web 请求的拦截,最终实现对资源的授权访问。授权流程如下:

四、Spring Security filter 的构造和初始化
我们已经知道 Spring Security 通过构造层层 filter 来实现登录跳转、权限验证,角色管理等功能。这里我们将通过剖析 Spring Security 的核心源码来说明 Spring Security 的 filter 是如何开始构造的,下面的讲解比较长,如果你不是特别感兴趣,可以直接跳到总结,总结粗略了叙述了 Spring Security 框架 filters 的构建过程。我们可以下载 Spring Security 源码;
1、@EnableWebSecurity
我们知道要想启动 Spring Security,必须配置注解 @EnableWebSecurity,我们就从该注解说起:
@Retention(value = java.lang.annotation.RetentionPolicy.RUNTIME)
@Target(value = {java.lang.annotation.ElementType.TYPE})
@Documented
@Import({ WebSecurityConfiguration.class,
        SpringWebMvcImportSelector.class,
        OAuth2ImportSelector.class })
@EnableGlobalAuthentication
@Configuration
public @interface EnableWebSecurity {
</span><span style="color: rgba(0, 128, 0, 1)">/**</span><span style="color: rgba(0, 128, 0, 1)">
 * Controls debugging support for Spring Security. Default is false.
 * </span><span style="color: rgba(128, 128, 128, 1)">@return</span><span style="color: rgba(0, 128, 0, 1)"> if true, enables debug support with Spring Security
 </span><span style="color: rgba(0, 128, 0, 1)">*/</span>
<span style="color: rgba(0, 0, 255, 1)">boolean</span> debug() <span style="color: rgba(0, 0, 255, 1)">default</span> <span style="color: rgba(0, 0, 255, 1)">false</span><span style="color: rgba(0, 0, 0, 1)">;

}
2、WebSecurityConfiguration 类

我们可以看到该注解导入了 WebSecurityConfiguration 类,进入该类查看:


/*
* Copyright 2002-2019 the original author or authors.
*
* Licensed under the Apache License, Version 2.0 (the "License");
* you may not use this file except in compliance with the License.
* You may obtain a copy of the License at
*
* https://www.apache.org/licenses/LICENSE-2.0
*
* Unless required by applicable law or agreed to in writing, software
* distributed under the License is distributed on an "AS IS" BASIS,
* WITHOUT WARRANTIES OR CONDITIONS OF ANY KIND, either express or implied.
* See the License for the specific language governing permissions and
* limitations under the License.
*/
package org.springframework.security.config.annotation.web.configuration;
import java.util.List;
import java.util.Map;
import javax.servlet.Filter;
import org.springframework.beans.factory.BeanClassLoaderAware;
import org.springframework.beans.factory.annotation.Autowired;
import org.springframework.beans.factory.annotation.Value;
import org.springframework.beans.factory.config.BeanFactoryPostProcessor;
import org.springframework.beans.factory.config.ConfigurableListableBeanFactory;
import org.springframework.context.annotation.Bean;
import org.springframework.context.annotation.Configuration;
import org.springframework.context.annotation.DependsOn;
import org.springframework.context.annotation.ImportAware;
import org.springframework.core.OrderComparator;
import org.springframework.core.Ordered;
import org.springframework.core.annotation.AnnotationAttributes;
import org.springframework.core.annotation.AnnotationUtils;
import org.springframework.core.annotation.Order;
import org.springframework.core.type.AnnotationMetadata;
import org.springframework.security.access.expression.SecurityExpressionHandler;
import org.springframework.security.config.annotation.ObjectPostProcessor;
import org.springframework.security.config.annotation.SecurityConfigurer;
import org.springframework.security.config.annotation.web.WebSecurityConfigurer;
import org.springframework.security.config.annotation.web.builders.WebSecurity;
import org.springframework.security.config.crypto.RsaKeyConversionServicePostProcessor;
import org.springframework.security.context.DelegatingApplicationListener;
import org.springframework.security.web.FilterChainProxy;
import org.springframework.security.web.FilterInvocation;
import org.springframework.security.web.access.WebInvocationPrivilegeEvaluator;
import org.springframework.security.web.context.AbstractSecurityWebApplicationInitializer;
/**
-
Uses a {@link WebSecurity} to create the {@link FilterChainProxy} that performs the web
-
based security for Spring Security. It then exports the necessary beans. Customizations
-
can be made to {@link WebSecurity} by extending {@link WebSecurityConfigurerAdapter}
-
and exposing it as a {@link Configuration} or implementing
-
{@link WebSecurityConfigurer} and exposing it as a {@link Configuration}. This
-
configuration is imported when using {@link EnableWebSecurity}.
-
@see EnableWebSecurity
-
@see WebSecurity
-
@author Rob Winch
-
@author Keesun Baik
-
@since 3.2
*/
@Configuration(proxyBeanMethods = false)
public class WebSecurityConfiguration implements ImportAware, BeanClassLoaderAware {
private WebSecurity webSecurity;
private Boolean debugEnabled;
private List<SecurityConfigurer<Filter, WebSecurity>> webSecurityConfigurers;
private ClassLoader beanClassLoader;
@Autowired(required = false)
private ObjectPostProcessor<Object> objectObjectPostProcessor;
@Bean
public static DelegatingApplicationListener delegatingApplicationListener() {
return new DelegatingApplicationListener();
}
@Bean
@DependsOn(AbstractSecurityWebApplicationInitializer.DEFAULT_FILTER_NAME)
public SecurityExpressionHandler<FilterInvocation> webSecurityExpressionHandler() {
return webSecurity.getExpressionHandler();
}
/**
- Creates the Spring Security Filter Chain
- @return the {@link Filter} that represents the security filter chain
- @throws Exception
*/
@Bean(name = AbstractSecurityWebApplicationInitializer.DEFAULT_FILTER_NAME)
public Filter springSecurityFilterChain() throws Exception {
boolean hasConfigurers = webSecurityConfigurers != null
&& !webSecurityConfigurers.isEmpty();
if (!hasConfigurers) {
WebSecurityConfigurerAdapter adapter = objectObjectPostProcessor
.postProcess(new WebSecurityConfigurerAdapter() {
});
webSecurity.apply(adapter);
}
return webSecurity.build();
}
/**
- Creates the {@link WebInvocationPrivilegeEvaluator} that is necessary for the JSP
- tag support.
- @return the {@link WebInvocationPrivilegeEvaluator}
*/
@Bean
@DependsOn(AbstractSecurityWebApplicationInitializer.DEFAULT_FILTER_NAME)
public WebInvocationPrivilegeEvaluator privilegeEvaluator() {
return webSecurity.getPrivilegeEvaluator();
}
/**
-
Sets the {@code <SecurityConfigurer<FilterChainProxy, WebSecurityBuilder>}
-
instances used to create the web configuration.
-
@param objectPostProcessor the {@link ObjectPostProcessor} used to create a
-
{@link WebSecurity} instance
-
@param webSecurityConfigurers the
-
{@code <SecurityConfigurer<FilterChainProxy, WebSecurityBuilder>} instances used to
-
create the web configuration
-
@throws Exception
*/
@Autowired(required = false)
public void setFilterChainProxySecurityConfigurer(
ObjectPostProcessor<Object> objectPostProcessor,
@Value("#{@autowiredWebSecurityConfigurersIgnoreParents.getWebSecurityConfigurers()}") List<SecurityConfigurer<Filter, WebSecurity>> webSecurityConfigurers)
throws Exception {
webSecurity = objectPostProcessor
.postProcess(new WebSecurity(objectPostProcessor));
if (debugEnabled != null) {
webSecurity.debug(debugEnabled);
}
webSecurityConfigurers.sort(AnnotationAwareOrderComparator.INSTANCE);
Integer previousOrder = null;
Object previousConfig = null;
for (SecurityConfigurer<Filter, WebSecurity> config : webSecurityConfigurers) {
Integer order = AnnotationAwareOrderComparator.lookupOrder(config);
if (previousOrder != null && previousOrder.equals(order)) {
throw new IllegalStateException(
"@Order on WebSecurityConfigurers must be unique. Order of"
+ order + "was already used on" + previousConfig + ", so it cannot be used on"
+ config + "too.");
}
previousOrder = order;
previousConfig = config;
}
for (SecurityConfigurer<Filter, WebSecurity> webSecurityConfigurer : webSecurityConfigurers) {
webSecurity.apply(webSecurityConfigurer);
}
this.webSecurityConfigurers = webSecurityConfigurers;
}
@Bean
public static BeanFactoryPostProcessor conversionServicePostProcessor() {
return new RsaKeyConversionServicePostProcessor();
}
@Bean
public static AutowiredWebSecurityConfigurersIgnoreParents autowiredWebSecurityConfigurersIgnoreParents(
ConfigurableListableBeanFactory beanFactory) {
return new AutowiredWebSecurityConfigurersIgnoreParents(beanFactory);
}
/**
-
A custom verision of the Spring provided AnnotationAwareOrderComparator that uses
-
{@link AnnotationUtils#findAnnotation(Class, Class)} to look on super class
-
instances for the {@link Order} annotation.
-
@author Rob Winch
-
@since 3.2
*/
private static class AnnotationAwareOrderComparator extends OrderComparator {
private static final AnnotationAwareOrderComparator INSTANCE = new AnnotationAwareOrderComparator();
@Override
protected int getOrder(Object obj) {
return lookupOrder(obj);
}
private static int lookupOrder(Object obj) {
if (obj instanceof Ordered) {
return ((Ordered) obj).getOrder();
}
if (obj != null) {
Class<?> clazz = (obj instanceof Class ? (Class<?>)obj : obj.getClass());
Order order = AnnotationUtils.findAnnotation(clazz, Order.class);
if (order != null) {
return order.value();
}
}
return Ordered.LOWEST_PRECEDENCE;
}
}
/*
- (non-Javadoc)
- @see org.springframework.context.annotation.ImportAware#setImportMetadata(org.
- springframework.core.type.AnnotationMetadata)
*/
public void setImportMetadata(AnnotationMetadata importMetadata) {
Map<String, Object> enableWebSecurityAttrMap = importMetadata
.getAnnotationAttributes(EnableWebSecurity.class.getName());
AnnotationAttributes enableWebSecurityAttrs = AnnotationAttributes
.fromMap(enableWebSecurityAttrMap);
debugEnabled = enableWebSecurityAttrs.getBoolean("debug");
if (webSecurity != null) {
webSecurity.debug(debugEnabled);
}
}
/*
- (non-Javadoc)
- @see
- org.springframework.beans.factory.BeanClassLoaderAware#setBeanClassLoader(java.
- lang.ClassLoader)
*/
public void setBeanClassLoader(ClassLoader classLoader) {
this.beanClassLoader = classLoader;
}
}
如果我们忽略掉细节,只看最重要的步骤,该类主要实现了如下功能:

WebSecurityConfiguration 类是作为一个 Spring 配置源,同时定义了许多 bean,这里重点看 WebSecurityConfiguration#setFilterChainProxySecurityConfigurer 这个方法:
/**
* Sets the {@code <SecurityConfigurer<FilterChainProxy, WebSecurityBuilder>}
* instances used to create the web configuration.
*
* @param objectPostProcessor the {@link ObjectPostProcessor} used to create a
* {@link WebSecurity} instance
* @param webSecurityConfigurers the
* {@code <SecurityConfigurer<FilterChainProxy, WebSecurityBuilder>} instances used to
* create the web configuration
* @throws Exception
*/
@Autowired(required = false)
public void setFilterChainProxySecurityConfigurer(
ObjectPostProcessor<Object> objectPostProcessor,
@Value("#{@autowiredWebSecurityConfigurersIgnoreParents.getWebSecurityConfigurers()}") List<SecurityConfigurer<Filter, WebSecurity>> webSecurityConfigurers)
throws Exception {
webSecurity = objectPostProcessor
.postProcess(new WebSecurity(objectPostProcessor));
if (debugEnabled != null) {webSecurity.debug(debugEnabled);
}
webSecurityConfigurers.sort(AnnotationAwareOrderComparator.INSTANCE);
Integer previousOrder </span>= <span style="color: rgba(0, 0, 255, 1)">null</span><span style="color: rgba(0, 0, 0, 1)">;
Object previousConfig </span>= <span style="color: rgba(0, 0, 255, 1)">null</span><span style="color: rgba(0, 0, 0, 1)">;
</span><span style="color: rgba(0, 0, 255, 1)">for</span> (SecurityConfigurer<Filter, WebSecurity><span style="color: rgba(0, 0, 0, 1)"> config : webSecurityConfigurers) {
Integer order </span>=<span style="color: rgba(0, 0, 0, 1)"> AnnotationAwareOrderComparator.lookupOrder(config);
</span><span style="color: rgba(0, 0, 255, 1)">if</span> (previousOrder != <span style="color: rgba(0, 0, 255, 1)">null</span> &&<span style="color: rgba(0, 0, 0, 1)"> previousOrder.equals(order)) {
</span><span style="color: rgba(0, 0, 255, 1)">throw</span> <span style="color: rgba(0, 0, 255, 1)">new</span><span style="color: rgba(0, 0, 0, 1)"> IllegalStateException(
</span>"@Order on WebSecurityConfigurers must be unique. Order of "
+ order + " was already used on " + previousConfig + ", so it cannot be used on "
+ config + " too."<span style="color: rgba(0, 0, 0, 1)">);
}
previousOrder </span>=<span style="color: rgba(0, 0, 0, 1)"> order;
previousConfig </span>=<span style="color: rgba(0, 0, 0, 1)"> config;
}
</span><span style="color: rgba(0, 0, 255, 1)">for</span> (SecurityConfigurer<Filter, WebSecurity><span style="color: rgba(0, 0, 0, 1)"> webSecurityConfigurer : webSecurityConfigurers) {
webSecurity.apply(webSecurityConfigurer);
}
</span><span style="color: rgba(0, 0, 255, 1)">this</span>.webSecurityConfigurers =<span style="color: rgba(0, 0, 0, 1)"> webSecurityConfigurers;
}</span></span></pre>

下面我们对每一个步骤来做相应的源代码解释,首先我们来看一下方法得第二个参数:
@Value("#{@autowiredWebSecurityConfigurersIgnoreParents.getWebSecurityConfigurers()}"
可以看一下 autowiredWebSecurityConfigurersIgnoreParents.getWebSecurityConfigurers() 的源代码:
public List<SecurityConfigurer<Filter, WebSecurity>> getWebSecurityConfigurers() {
        List<SecurityConfigurer<Filter, WebSecurity>> webSecurityConfigurers = new ArrayList<SecurityConfigurer<Filter, WebSecurity>>();
        Map<String, WebSecurityConfigurer> beansOfType = beanFactory
                .getBeansOfType(WebSecurityConfigurer.class);
        for (Entry<String, WebSecurityConfigurer> entry : beansOfType.entrySet()) {webSecurityConfigurers.add(entry.getValue());
        }
        return webSecurityConfigurers;
    }
我们如果调试代码,可以发现 beanFactory.getBeansOfType 从 Spring 容器获取类型为 WebSecurityConfigurer 的 bean,在这里也就是获取到我们编写的 WebSecurityConfig 配置类:

我们可以看一下 WebSecurityConfig 类的类图:

        webSecurity = objectPostProcessor
                .postProcess(new WebSecurity(objectPostProcessor));
        if (debugEnabled != null) {webSecurity.debug(debugEnabled);
        }
当有多个配置项时进行排序,进行 order 重复验证:
webSecurityConfigurers.sort(AnnotationAwareOrderComparator.INSTANCE);
Integer previousOrder </span>= <span style="color: rgba(0, 0, 255, 1)">null</span><span style="color: rgba(0, 0, 0, 1)">;
Object previousConfig </span>= <span style="color: rgba(0, 0, 255, 1)">null</span><span style="color: rgba(0, 0, 0, 1)">;
</span><span style="color: rgba(0, 0, 255, 1)">for</span> (SecurityConfigurer<Filter, WebSecurity><span style="color: rgba(0, 0, 0, 1)"> config : webSecurityConfigurers) {
Integer order </span>=<span style="color: rgba(0, 0, 0, 1)"> AnnotationAwareOrderComparator.lookupOrder(config);
</span><span style="color: rgba(0, 0, 255, 1)">if</span> (previousOrder != <span style="color: rgba(0, 0, 255, 1)">null</span> &&<span style="color: rgba(0, 0, 0, 1)"> previousOrder.equals(order)) {
</span><span style="color: rgba(0, 0, 255, 1)">throw</span> <span style="color: rgba(0, 0, 255, 1)">new</span><span style="color: rgba(0, 0, 0, 1)"> IllegalStateException(
</span>"@Order on WebSecurityConfigurers must be unique. Order of "
+ order + " was already used on " + previousConfig + ", so it cannot be used on "
+ config + " too."<span style="color: rgba(0, 0, 0, 1)">);
}
previousOrder </span>=<span style="color: rgba(0, 0, 0, 1)"> order;
previousConfig </span>=<span style="color: rgba(0, 0, 0, 1)"> config;
}</span></span></pre>
遍历 WebSecurityConfiguration#webSecurityConfigurers 集合,调用 webSecurity 的 apply 方法,此时也会将我们自定义的 WebSecurityConfig 应用到 webSecurity.apply 方法上:
for (SecurityConfigurer<Filter, WebSecurity> webSecurityConfigurer : webSecurityConfigurers) {webSecurity.apply(webSecurityConfigurer);
        }
最后,初始化 WebSecurityConfiguration#webSecurityConfigurers 属性:
this.webSecurityConfigurers = webSecurityConfigurers;
3、WebSecurity 类

到这里我们知道了 WebSecurityConfiguration 类调用上述方法将我们配置的 WebSecurityConfig 类用 WebSecurity 类的 apply 方法关联起来,那么我们详细看看 WebSecurity 类的 apply 方法:
    public <C extends SecurityConfigurer<O, B>> C apply(C configurer) throws Exception {add(configurer);
        return configurer;
    }
private <C extends SecurityConfigurer<O, B>> void add(C configurer) {
Assert.notNull(configurer, "configurer cannot be null");
Class</span><? <span style="color: rgba(0, 0, 255, 1)">extends</span> SecurityConfigurer<O, B>> clazz = (Class<? <span style="color: rgba(0, 0, 255, 1)">extends</span> SecurityConfigurer<O, B>><span style="color: rgba(0, 0, 0, 1)">) configurer
.getClass();
</span><span style="color: rgba(0, 0, 255, 1)">synchronized</span><span style="color: rgba(0, 0, 0, 1)"> (configurers) {
</span><span style="color: rgba(0, 0, 255, 1)">if</span><span style="color: rgba(0, 0, 0, 1)"> (buildState.isConfigured()) {
</span><span style="color: rgba(0, 0, 255, 1)">throw</span> <span style="color: rgba(0, 0, 255, 1)">new</span> IllegalStateException("Cannot apply " +<span style="color: rgba(0, 0, 0, 1)"> configurer
</span>+ " to already built object"<span style="color: rgba(0, 0, 0, 1)">);
}
List</span><SecurityConfigurer<O, B>> configs = allowConfigurersOfSameType ? <span style="color: rgba(0, 0, 255, 1)">this</span><span style="color: rgba(0, 0, 0, 1)">.configurers
.get(clazz) : </span><span style="color: rgba(0, 0, 255, 1)">null</span><span style="color: rgba(0, 0, 0, 1)">;
</span><span style="color: rgba(0, 0, 255, 1)">if</span> (configs == <span style="color: rgba(0, 0, 255, 1)">null</span><span style="color: rgba(0, 0, 0, 1)">) {
configs </span>= <span style="color: rgba(0, 0, 255, 1)">new</span> ArrayList<>(1<span style="color: rgba(0, 0, 0, 1)">);
}
configs.add(configurer);
</span><span style="color: rgba(0, 0, 255, 1)">this</span><span style="color: rgba(0, 0, 0, 1)">.configurers.put(clazz, configs);
</span><span style="color: rgba(0, 0, 255, 1)">if</span><span style="color: rgba(0, 0, 0, 1)"> (buildState.isInitializing()) {
</span><span style="color: rgba(0, 0, 255, 1)">this</span><span style="color: rgba(0, 0, 0, 1)">.configurersAddedInInitializing.add(configurer);
}
}
}</span></span></pre>
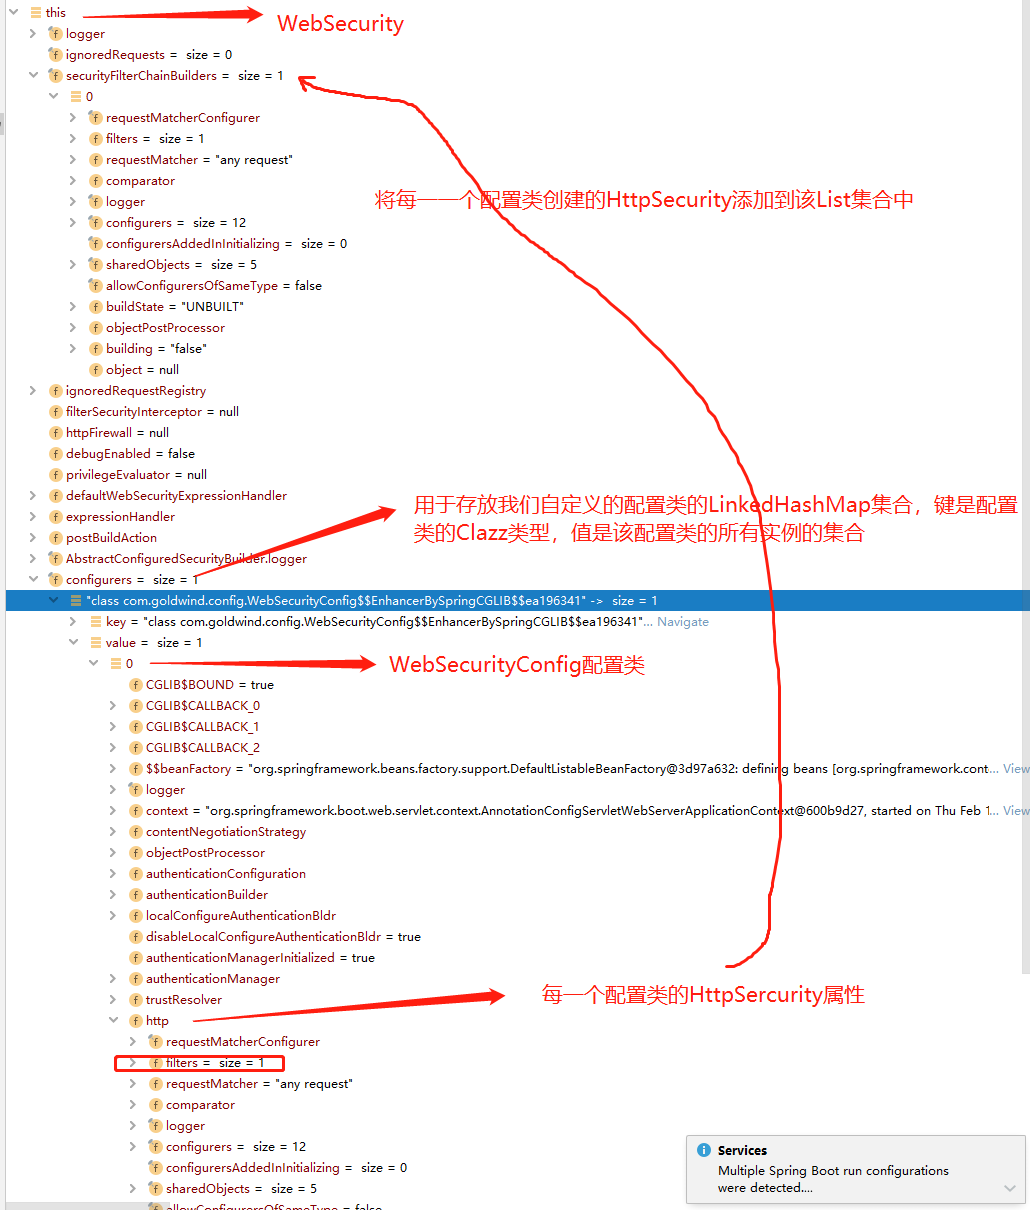
从上述代码可知,实际上就是将我们定义的 WebSecurityConfig 配置类放入了 WebSecurity 类的一个 LinkedHashMap 中:

该 LinkedHashMap 在 WebSecurity 中属性名为 configurers:
private final LinkedHashMap<Class<? extends SecurityConfigurer<O, B>>, List<SecurityConfigurer<O, B>>> configurers = new LinkedHashMap<>();

可以看到键就是我们定义的配置类的 Clazz 类型,而值是 List<SecurityConfigurer<Filter, WebSecurity>> 类型,是一个 list 集合,其中只有一个元素,就是我们编写的 WebSecurityConfig 配置类;
我们继续回到 WebSecurityConfiguration 类,查看它的另外一个重要的方法:

build 的方法来自于 WebSecurity 的父类 AbstractSecurityBuilder,该方法即为 Spring Security 构建 Filter 的核心方法,通过 webSecurity 的 build 方法构建了 Spring Security 的 Filter:

实际上调用了父类 AbstractConfiguredSecurityBuilder 的 doBuild:
    protected final O doBuild() throws Exception {
        synchronized (configurers) {
            buildState = BuildState.INITIALIZING;
        beforeInit();
        init();

        buildState </span>=<span style="color: rgba(0, 0, 0, 1)"> BuildState.CONFIGURING;

        beforeConfigure();
        configure();

        buildState </span>=<span style="color: rgba(0, 0, 0, 1)"> BuildState.BUILDING;

        O result </span>=<span style="color: rgba(0, 0, 0, 1)"> performBuild();

        buildState </span>=<span style="color: rgba(0, 0, 0, 1)"> BuildState.BUILT;

        </span><span style="color: rgba(0, 0, 255, 1)">return</span><span style="color: rgba(0, 0, 0, 1)"> result;
    }
}</span></span></pre>
这里主要看 AbstractConfiguredSecurityBuilder 的 init 方法和 WebSecurity 实现的 performBuild 方法, 首先看 init 方法,init 方法将会遍历 WebSecurity 的 LinkHashMap configurers 中每个元素 configurer,执行以下步骤:
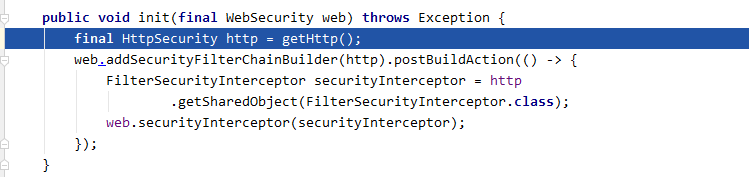
调用 configurer 的 init 方法,init 该方法来自父类 WebSecurityConfigurerAdapter(这里的 this 指定就是 WebSecurity):

init 方法中又会调用 WebSecurityConfigurerAdapter#getHttp 方法:
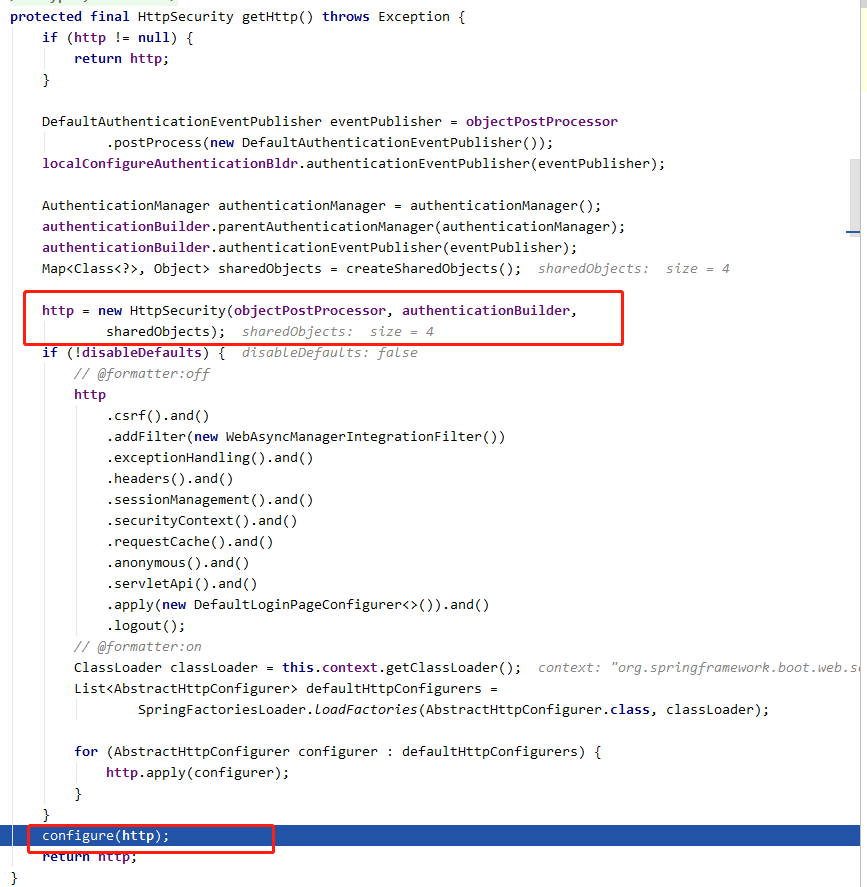
getHttp 方法首先创建一个 HttpSecurity 对象,用来初始化 configurer 的 http 成员:
private HttpSecurity http;
又调用 configure 方法,最终将会执行我们在 WebSecurityConfig 写的 configure 方法:
configurer 中的 init 方法执行完之后,WebSecurity 调用 addSecurityFilterChainBuilder 方法将 configurer 创建的 HttpSecurity 放入了 WebSecurity 的一个 list 集合里,该 list 集合属性名为 securityFilterChainBuilders:
public WebSecurity addSecurityFilterChainBuilder(SecurityBuilder<? extends SecurityFilterChain> securityFilterChainBuilder) {
        this.securityFilterChainBuilders.add(securityFilterChainBuilder);
        return this;
    }
到目前为止,我们终于知道我们编写的 WebSecurityConfig 类的 configure 方法是如何被调用的了,但是仍有许多疑问没解开,比如 HttpSecurity 类的作用,Spring Security 是如何通过 HttpSecurity 类构建一条拦截器链等。
这里我们先不分析 HttpSecurity 类的具体实现,再来看看 WebSecurity 的 init 方法执行后所执行的 performBuild 方法,该方法源码如下:
@Override
    protected Filter performBuild() throws Exception {
        Assert.state(
                !securityFilterChainBuilders.isEmpty(),
                () -> "At least one SecurityBuilder<? extends SecurityFilterChain> needs to be specified."
                        + "Typically this done by adding a @Configuration that extends WebSecurityConfigurerAdapter."
                        + "More advanced users can invoke"
                        + WebSecurity.class.getSimpleName()
                        + ".addSecurityFilterChainBuilder directly");
        int chainSize = ignoredRequests.size() + securityFilterChainBuilders.size();
        List<SecurityFilterChain> securityFilterChains = new ArrayList<>(chainSize);
        for (RequestMatcher ignoredRequest : ignoredRequests) {
            securityFilterChains.add(new DefaultSecurityFilterChain(ignoredRequest));
        }
        for (SecurityBuilder<? extends SecurityFilterChain> securityFilterChainBuilder : securityFilterChainBuilders) {
            securityFilterChains.add(securityFilterChainBuilder.build());}
        FilterChainProxy filterChainProxy = new FilterChainProxy(securityFilterChains);
        if (httpFirewall != null) {filterChainProxy.setFirewall(httpFirewall);
        }
        filterChainProxy.afterPropertiesSet();
    Filter result </span>=<span style="color: rgba(0, 0, 0, 1)"> filterChainProxy;
    </span><span style="color: rgba(0, 0, 255, 1)">if</span><span style="color: rgba(0, 0, 0, 1)"> (debugEnabled) {
        logger.warn(</span>"\n\n"
                + "********************************************************************\n"
                + "**********        Security debugging is enabled.       *************\n"
                + "**********    This may include sensitive information.  *************\n"
                + "**********      Do not use in a production system!     *************\n"
                + "********************************************************************\n\n"<span style="color: rgba(0, 0, 0, 1)">);
        result </span>= <span style="color: rgba(0, 0, 255, 1)">new</span><span style="color: rgba(0, 0, 0, 1)"> DebugFilter(filterChainProxy);
    }
    postBuildAction.run();
    </span><span style="color: rgba(0, 0, 255, 1)">return</span><span style="color: rgba(0, 0, 0, 1)"> result;
}</span></span></pre>
该方法执行的操作主要如下:
(1)、遍历 WebSecurity 的 securityFilterChainBuilders 列表,一般也就一个元素,也就是我们的 WebSecurityConfig 配置类创建的 HttpSecurity 对象,并执行该对象的 build 方法,初始化成员属性 filters,并通过 filters 集合构建 SecurityFilterChain 类;

然后将每个 HttpSecurity 对象构建的 SecurityFilterChain 对象添加到 securityFilterChains 列表中。
(2)、将 List<SecurityFilterChain> 集合构建成一个 FilterChainProxy 代理类,返回这个 FilterChainProxy 代理类;
到这里总的过程就非常明了,WebSecurityConfiguration 的 springSecurityFilterChain 方法最终返回了一个 FilterChainProxy 代理类,作为 Spring Security 的顶层 filter,而 HttpSecurity 主要用于注册和实例化各种 filter,HttpSecurity 类有个属性名为 filters 的 List 列表专门用于保存过滤器的。
到这里就分成了两路:
- 一路是 HttpSecurity 的 build 方法构建 SecurityFilterChain 类的原理;
- 一路是 FilterChainProxy 类的作用;
FilterChainProxy filterChainProxy = new FilterChainProxy(securityFilterChains);
我们先从 FilterChainProxy 类开始。
4、FilterChainProxy 类
当请求到达的时候,FilterChainProxy 会调用 dofilter 方法,会遍历所有的 SecurityFilterChain,对匹配到的 url,则调用 SecurityFilterChain 中的每一个 filter 做认证授权。FilterChainProxy 的 dofilter() 中调用了 doFilterInternal 方法,如下:
private List<SecurityFilterChain> filterChains;
@Override
public void doFilter(ServletRequest request, ServletResponse response,
FilterChain chain) throws IOException, ServletException {
boolean clearContext = request.getAttribute(FILTER_APPLIED) == null;
if (clearContext) {
try {request.setAttribute(FILTER_APPLIED, Boolean.TRUE);
doFilterInternal(request, response, chain);
}
finally {SecurityContextHolder.clearContext();
request.removeAttribute(FILTER_APPLIED);
}
}
else {doFilterInternal(request, response, chain);
}
}
</span><span style="color: rgba(0, 0, 255, 1)">private</span> <span style="color: rgba(0, 0, 255, 1)">void</span><span style="color: rgba(0, 0, 0, 1)"> doFilterInternal(ServletRequest request, ServletResponse response,
FilterChain chain) </span><span style="color: rgba(0, 0, 255, 1)">throws</span><span style="color: rgba(0, 0, 0, 1)"> IOException, ServletException {
FirewalledRequest fwRequest </span>=<span style="color: rgba(0, 0, 0, 1)"> firewall
.getFirewalledRequest((HttpServletRequest) request);
HttpServletResponse fwResponse </span>=<span style="color: rgba(0, 0, 0, 1)"> firewall
.getFirewalledResponse((HttpServletResponse) response);
List</span><Filter> filters =<span style="color: rgba(0, 0, 0, 1)"> getFilters(fwRequest);
</span><span style="color: rgba(0, 0, 255, 1)">if</span> (filters == <span style="color: rgba(0, 0, 255, 1)">null</span> || filters.size() == 0<span style="color: rgba(0, 0, 0, 1)">) {
</span><span style="color: rgba(0, 0, 255, 1)">if</span><span style="color: rgba(0, 0, 0, 1)"> (logger.isDebugEnabled()) {
logger.debug(UrlUtils.buildRequestUrl(fwRequest)
</span>+ (filters == <span style="color: rgba(0, 0, 255, 1)">null</span> ? " has no matching filters"<span style="color: rgba(0, 0, 0, 1)">
: </span>" has an empty filter list"<span style="color: rgba(0, 0, 0, 1)">));
}
fwRequest.reset();
chain.doFilter(fwRequest, fwResponse);
</span><span style="color: rgba(0, 0, 255, 1)">return</span><span style="color: rgba(0, 0, 0, 1)">;
}
VirtualFilterChain vfc </span>= <span style="color: rgba(0, 0, 255, 1)">new</span><span style="color: rgba(0, 0, 0, 1)"> VirtualFilterChain(fwRequest, chain, filters);
vfc.doFilter(fwRequest, fwResponse);
}</span></span></pre>
这里我就不贴 VirtualFilterChain 的源码了,实际上就是先去遍历执行我们 filters 中的过滤器的 doFilter,最后再去执行 chiin.doFilter。
我们理清了 FilterChainProxy 类的作用,那么这些 SecurityFilterChain 是从哪来的呢?从上节可知 SecurityFilterChain 是由 HttpSecurity 的 build 方法生成的,下面我们分析下 HttpSecurity 类。
5、HttpSecurity 类

HttpSecurity 与 WebSecurity 一样,都继承了 AbstractConfiguredSecurityBuilder 类,而 WebSecurity 的 build 和 doBuild 方法和 LinkedHashMap 属性,均来自 AbstractConfiguredSecurityBuilder,故 HttpSecurity 的 build 方法代码与 WebSecurity 的相同,区别在于 LinkedHashMap 存储的东西不同:

(1)、WebSecurityConfig 类的 configure 方法
在之前我们已经介绍了 WebSecurity 的 doBuild 是如何调用我们自己写的配置类 WebSecurityConfig 的 configure 方法;在该方法中 http 所调用的方法,最终的结果就是产生 url-filter 的关系映射:
  protected void configure(HttpSecurity http) throws Exception {http.formLogin()  //HTTP Basic 认证方式
                .and().authorizeRequests()  // 授权配置
                .anyRequest()  // 所有请求
                .authenticated(); // 都需要认证

    }
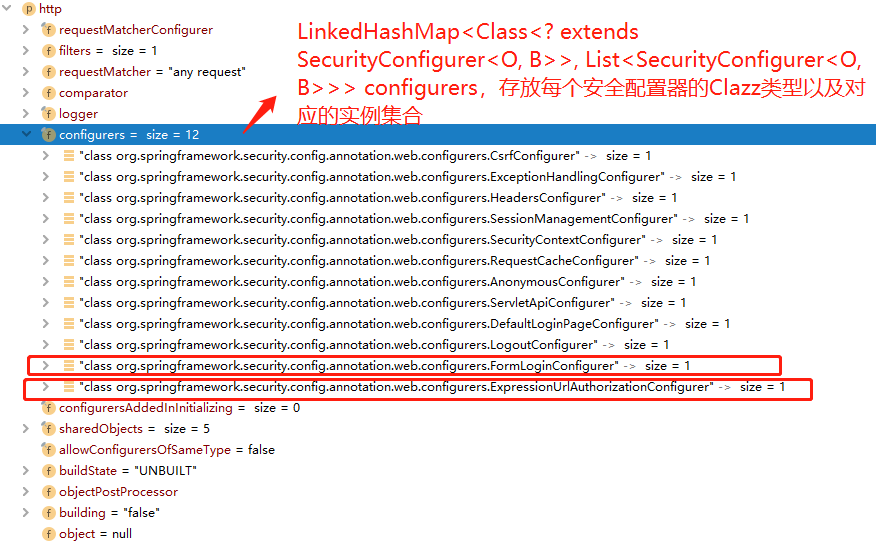
比如 authorizeRequests(),formLogin() 方法分别返回 ExpressionUrlAuthorizationConfigurer 和 FormLoginConfigurer,他们都是 SecurityConfigurer 接口的实现类,分别代表的是不同类型的安全配置器。而这些安全配置器分别对应一个或多个 filter:
- formLogin 对应 UsernamePasswordAuthenticationFilter,此外我们还可以给安全过滤器 FormLoginConfigurer 指定其它参数,比如.login("/login"):自定义登录请求页面;.loginProcessingUrl("/login") 指定 UsernamePasswordAuthenticationFilter 拦截的 Form action;
.and().formLogin()         // 或者 httpBasic()
                .loginPage("/login")  // 指定登录页的路径
                .loginProcessingUrl("/login")  // 指定自定义 form 表单提交请求的路径
- authorizeRequests 对应 FilterSecurityInterceptor;
    public ExpressionUrlAuthorizationConfigurer<HttpSecurity>.ExpressionInterceptUrlRegistry authorizeRequests()
            throws Exception {
        ApplicationContext context = getContext();
        return getOrApply(new ExpressionUrlAuthorizationConfigurer<>(context))
                .getRegistry();}
public FormLoginConfigurer<HttpSecurity> formLogin() throws Exception {
        return getOrApply(new FormLoginConfigurer<>());}
都调用了 getOrApply 方法,再来看 getOrApply 方法,又调用了其中的 apply 方法:
private <C extends SecurityConfigurerAdapter<DefaultSecurityFilterChain, HttpSecurity>> C getOrApply(C configurer) throws Exception {
        C existingConfig = (C) getConfigurer(configurer.getClass());
        if (existingConfig != null) {
            return existingConfig;
        }
        return apply(configurer);
    }
apply 方法又调用了 add 方法,这里的 add 方法最终还是将该 configurer 加入了 LinkedHashMap 中:
private <C extends SecurityConfigurer<O, B>> void add(C configurer) {
Assert.notNull(configurer, "configurer cannot be null");
Class</span><? <span style="color: rgba(0, 0, 255, 1)">extends</span> SecurityConfigurer<O, B>> clazz = (Class<? <span style="color: rgba(0, 0, 255, 1)">extends</span> SecurityConfigurer<O, B>><span style="color: rgba(0, 0, 0, 1)">) configurer
.getClass();
</span><span style="color: rgba(0, 0, 255, 1)">synchronized</span><span style="color: rgba(0, 0, 0, 1)"> (configurers) {
</span><span style="color: rgba(0, 0, 255, 1)">if</span><span style="color: rgba(0, 0, 0, 1)"> (buildState.isConfigured()) {
</span><span style="color: rgba(0, 0, 255, 1)">throw</span> <span style="color: rgba(0, 0, 255, 1)">new</span> IllegalStateException("Cannot apply " +<span style="color: rgba(0, 0, 0, 1)"> configurer
</span>+ " to already built object"<span style="color: rgba(0, 0, 0, 1)">);
}
List</span><SecurityConfigurer<O, B>> configs = allowConfigurersOfSameType ? <span style="color: rgba(0, 0, 255, 1)">this</span><span style="color: rgba(0, 0, 0, 1)">.configurers
.get(clazz) : </span><span style="color: rgba(0, 0, 255, 1)">null</span><span style="color: rgba(0, 0, 0, 1)">;
</span><span style="color: rgba(0, 0, 255, 1)">if</span> (configs == <span style="color: rgba(0, 0, 255, 1)">null</span><span style="color: rgba(0, 0, 0, 1)">) {
configs </span>= <span style="color: rgba(0, 0, 255, 1)">new</span> ArrayList<>(1<span style="color: rgba(0, 0, 0, 1)">);
}
configs.add(configurer);
</span><span style="color: rgba(0, 0, 255, 1)">this</span><span style="color: rgba(0, 0, 0, 1)">.configurers.put(clazz, configs);
</span><span style="color: rgba(0, 0, 255, 1)">if</span><span style="color: rgba(0, 0, 0, 1)"> (buildState.isInitializing()) {
</span><span style="color: rgba(0, 0, 255, 1)">this</span><span style="color: rgba(0, 0, 0, 1)">.configurersAddedInInitializing.add(configurer);
}
}
}</span></span></pre>
故 HttpSecurity 在构建 filter 的过程中,本质还是将形如 ExpressionUrlAuthorizationConfigurer、FormLoginConfigurer 等类加入了它的 LinkedHashMap 中,该 list 集合属性名为 configurers :
private final LinkedHashMap<Class<? extends SecurityConfigurer<O, B>>, List<SecurityConfigurer<O, B>>> configurers = new LinkedHashMap<>();
这里有一点需要注意,
- 在 HttpSecurity 的 configurers 列表中存放的元素都是继承自 SecurityConfigurerAdapter 类,Spring Security 框架提供的不同类型的安全配置器主要有以下这些;

- 而在 WebSecurity 的 configurers 列表中存放的元素都是继承自 WebSecurityConfigurerAdapter 类,也就是我们写的配置类:
啥时候我们会使用到 SecurityConfigurerAdapter 类,在后面我们介绍手机验证码登录的时候会有一个案例:

如果想使得这个配置生效,我们只需要在 WebSecurityConfig 配置类的 configure 方法添加如下代码:
.apply(smsAuthenticationConfig); // 将短信验证码认证配置加到 Spring Security 中 添加一个安全配置其到 http 的 configurers 集合
调用 http 的 apply 方法,最终将该 smsAuthenticationConfig 加入了 HttpSecurity 的 configurers 列表中。
(2)、HttpSecurity 的 build 方法构建 SecurityFilterChain 类的原理
那么将这些 Configurer 类存入 LinkedHashMap 的作用又是什么?
在前面我们已经说到通过调用 HttpSecurity 的 build 方法构建 SecurityFilterChain 类,而 build 方法封装了 doBuild 方法;
        for (SecurityBuilder<? extends SecurityFilterChain> securityFilterChainBuilder : securityFilterChainBuilders) {securityFilterChains.add(securityFilterChainBuilder.build());
        }
在我们回忆上面 WebSecurity 类的 doBuild 方法,我们知道 HttpSecurity 类调用的 doBuild 方法与 WebSecurity 类一样,而通过观察 WebSecurity 类 doBuild 方法里 init;configure;这些语句的具体实现,实际就是遍历 LinkedHashMap 中的元素:
并调用其 init 方法和 configure 方法:
    @Override
    protected final O doBuild() throws Exception {
        synchronized (configurers) {
            buildState = BuildState.INITIALIZING;
        beforeInit();
        init();

        buildState </span>=<span style="color: rgba(0, 0, 0, 1)"> BuildState.CONFIGURING;

        beforeConfigure();
        configure();

        buildState </span>=<span style="color: rgba(0, 0, 0, 1)"> BuildState.BUILDING;

        O result </span>=<span style="color: rgba(0, 0, 0, 1)"> performBuild();

        buildState </span>=<span style="color: rgba(0, 0, 0, 1)"> BuildState.BUILT;

        </span><span style="color: rgba(0, 0, 255, 1)">return</span><span style="color: rgba(0, 0, 0, 1)"> result;
    }
}</span></span></pre>
我们现在来查看其中一个 ExpressionUrlAuthorizationConfigurer 类的 configure 方法的详细代码:
    @Override
    public void configure(H http) throws Exception {
        FilterInvocationSecurityMetadataSource metadataSource = createMetadataSource(http);
        if (metadataSource == null) {
            return;
        }
        FilterSecurityInterceptor securityInterceptor = createFilterSecurityInterceptor(
                http, metadataSource, http.getSharedObject(AuthenticationManager.class));
        if (filterSecurityInterceptorOncePerRequest != null) {
            securityInterceptor
                    .setObserveOncePerRequest(filterSecurityInterceptorOncePerRequest);
        }
        securityInterceptor = postProcess(securityInterceptor);
        http.addFilter(securityInterceptor);
        http.setSharedObject(FilterSecurityInterceptor.class, securityInterceptor);}
最后来看看 HttpSecruity 的 performBuild() 方法:
    @Override
    protected DefaultSecurityFilterChain performBuild() {filters.sort(comparator);
        return new DefaultSecurityFilterChain(requestMatcher, filters);
    }
实际上就是通过 HttpSecurity 的 filters 集合构建了 SecurityFilterChain。
从上面代码可总结出,HttpSecurity 内部维护一个 filter 列表,而 HttpSecurity 调用形如 authorizeRequests(),formLogin() 等方法实际上就是将各种 filter 添加入它的列表当中,最后通过 performBuild() 方法构建出 SecurityFilterChain,至此 HttpSecurity 构建 filter 的总过程就完成了。
6、核心接口 SecurityBuilder 与 SecurityConfigurer
上面我们提到的 WebSecurity,HttpSecurity 都是具体的类。现在,我们从更高的层面来说,从两个核心接口以及其实现类的类图来理解下。


public interface SecurityConfigurer<O, B extends SecurityBuilder<O>> {
    /**
     * Initialize the {@link SecurityBuilder}. Here only shared state should be created
     * and modified, but not properties on the {@link SecurityBuilder} used for building
     * the object. This ensures that the {@link #configure(SecurityBuilder)} method uses
     * the correct shared objects when building. Configurers should be applied here.
     *
     * @param builder
     * @throws Exception
     */
    void init(B builder) throws Exception;
</span><span style="color: rgba(0, 128, 0, 1)">/**</span><span style="color: rgba(0, 128, 0, 1)">
 * Configure the {</span><span style="color: rgba(128, 128, 128, 1)">@link</span><span style="color: rgba(0, 128, 0, 1)"> SecurityBuilder} by setting the necessary properties on the
 * {</span><span style="color: rgba(128, 128, 128, 1)">@link</span><span style="color: rgba(0, 128, 0, 1)"> SecurityBuilder}.
 *
 * </span><span style="color: rgba(128, 128, 128, 1)">@param</span><span style="color: rgba(0, 128, 0, 1)"> builder
 * </span><span style="color: rgba(128, 128, 128, 1)">@throws</span><span style="color: rgba(0, 128, 0, 1)"> Exception
 </span><span style="color: rgba(0, 128, 0, 1)">*/</span>
<span style="color: rgba(0, 0, 255, 1)">void</span> configure(B builder) <span style="color: rgba(0, 0, 255, 1)">throws</span><span style="color: rgba(0, 0, 0, 1)"> Exception;

}
- HttpSecurity 是接口 SecurityBuilder 的实现类,HttpSecuirty 内部维护了一个 Filter 的 List 集合,我们添加的各种安全配置器对应的 Filter 最终都会被加入到这个 List 集合中;
- WebSecurity 也是接口 securityBuilder 的实现类,内部维护着 SecurityBuilder 的列表,存储 SecurityBuilder,这里主要是存储 HttpSecurity;
很多官方类是 XXXConfigurer,这些都是 SecurityConfigurer。这些 SecurityConfigurer 的 configure() 方法,都会把对应 filter 添加到 HttpSecurity。
7、总结
(1) WebSecurityConfiguration 配置类有两个重要成员属性,调用 setFilterChainProxySecurityConfigurer 方法初始化 webSecurity、使用我们编写的配置类 WebSecurityConfig 初始化 webSecurityConfigurers。
private WebSecurity webSecurity;
private List<SecurityConfigurer<Filter, WebSecurity>> webSecurityConfigurers;
需要注意的是:webSecurityConfigurers 的程序都是继承自 WebSecurityConfigurerAdapter 类。
(2)、WebSecurity 有两三个重要成员,然后使用 WebSecurityConfiguration#webSecurityConfigurers 初始化 webSecurity#configurers 成员;
private final LinkedHashMap<Class<? extends SecurityConfigurer<O, B>>, List<SecurityConfigurer<O, B>>> configurers = new LinkedHashMap<>();
private final List<SecurityBuilder<? extends SecurityFilterChain>> securityFilterChainBuilders = new ArrayList<>();
(3) 调用 WebSecurityConfiguration#springSecurityFilterChain 生成 FilterChainProxy,主要是通过 webSecurity.build() 方法实现构建,该方法主要包含两步:
a、执行父类 AbstractConfiguredSecurityBuilder#init 方法:
- 遍历 webSecurity#configurers 成员,执行 configurer 的 init 方法;
- init 方法调用 getHttp 方法,去初始化 configurer 的 http 成员(HttpSecurity 类型),与此同时执行我们 configure(http) 方法,就是去调用我们配置类 WebSecurityConfig 中的 configure 方法;、
public class WebSecurityConfig extends WebSecurityConfigurerAdapter {
     ...
@Override
</span><span style="color: rgba(0, 0, 255, 1)">protected</span> <span style="color: rgba(0, 0, 255, 1)">void</span><span style="color: rgba(0, 0, 0, 1)"> configure(HttpSecurity http) throws Exception {
    http.formLogin()  </span><span style="color: rgba(0, 128, 0, 1)">//</span><span style="color: rgba(0, 128, 0, 1)">HTTP Basic认证方式</span>

                .and()
.authorizeRequests()  // 授权配置
.anyRequest()  // 所有请求
.authenticated(); // 都需要认证
    }
}
- 比如 authorizeRequests(),formLogin() 方法分别返回 ExpressionUrlAuthorizationConfigurer 和 FormLoginConfigurer,最终会将不同类型的安全配置器添加到 http 的 configurers,这些 configure 都是继承自 SecurityConfigurerAdapter 类。HttpSecurity 也是有两个非常重要的成员:
    private List<Filter> filters = new ArrayList<>();
    private final LinkedHashMap<Class<? extends SecurityConfigurer<O, B>>, List<SecurityConfigurer<O, B>>> configurers = new LinkedHashMap<>();
- 然后调用 webSecurity#addSecurityFilterChainBuilder 方法将 webSecurity#configurers 中每个 configurer 创建的 HttpSecurity 放入了 webSecurity 的 securityFilterChainBuilders 集合里;
b、执行 webSecurity#performBuild
- 遍历 webSecurity 的 securityFilterChainBuilders 列表,一般也就一个元素,也就是我们的 WebSecurityConfig 配置类创建的 http 对象,并执行 http 对象的 build 方法,生成 SecurityFilterChain 对象,该方法主要包含两步:
- 执行父类 AbstractConfiguredSecurityBuilder#init 方法:
- 遍历 http#configurers 成员,执行 configurer 的 init 方法,只是在 init 过程中不会创建 http 对象,而是把 http 对象传进去,以 ExpressionUrlAuthorizationConfigurer 为例,它会向 http 的 filters 属性添加 securityInterceptor;
@Override
    public void configure(H http) throws Exception {
        FilterInvocationSecurityMetadataSource metadataSource = createMetadataSource(http);
        if (metadataSource == null) {
            return;
        }
        FilterSecurityInterceptor securityInterceptor = createFilterSecurityInterceptor(
                http, metadataSource, http.getSharedObject(AuthenticationManager.class));
        if (filterSecurityInterceptorOncePerRequest != null) {
            securityInterceptor
                    .setObserveOncePerRequest(filterSecurityInterceptorOncePerRequest);
        }
        securityInterceptor = postProcess(securityInterceptor);
        http.addFilter(securityInterceptor);
        http.setSharedObject(FilterSecurityInterceptor.class, securityInterceptor);}
- 执行 http#performBuild 方法,实际上就是通过 HttpSecurity 的 filters 集合构建了 SecurityFilterChain;
- 然后将每个 http 对象构建的 SecurityFilterChain 对象添加到 List<SecurityFilterChain> securityFilterChains 临时列表中:
- 将 securityFilterChains 集合构建成一个 FilterChainProxy 代理类,返回这个 FilterChainProxy 代理类;
(4) 当请求到达的时候,FilterChainProxy 会调用 dofilter 方法,会遍历所有的 SecurityFilterChain,对匹配到的 url,则调用 SecurityFilterChain 中的每一个 filter 做认证授权。
最后放一张概括图,有兴趣的朋友可以绘制出具体的时序图,这里我就不绘制了:

五、登录、验证流程分析
我们已经明白了 Spring Security 的 filter 的构造。下面我们来介绍一下 filter 的执行顺序(登录方式改回表单的方式)。
当我们启动项目访问http://localhost:8080/hello时:
1、请求 /hello 接口
由于 BasicAuthenticationFilter、UsernamePasswordAuthenticationFilter 默认只拦截 /login post 请求,因此过滤器会直接放行,代码直接跳转到 FilterSecurityInteceptor 上进行权限校验;

2、权限验证
此时会调用父类的 beforeInvocation 进行权限校验:
protected InterceptorStatusToken beforeInvocation(Object object) {
Assert.notNull(object, "Object was null");
final boolean debug = logger.isDebugEnabled();
</span><span style="color: rgba(0, 0, 255, 1)">if</span> (!<span style="color: rgba(0, 0, 0, 1)">getSecureObjectClass().isAssignableFrom(object.getClass())) {
</span><span style="color: rgba(0, 0, 255, 1)">throw</span> <span style="color: rgba(0, 0, 255, 1)">new</span><span style="color: rgba(0, 0, 0, 1)"> IllegalArgumentException(
</span>"Security invocation attempted for object "
+<span style="color: rgba(0, 0, 0, 1)"> object.getClass().getName()
</span>+ " but AbstractSecurityInterceptor only configured to support secure objects of type: "
+<span style="color: rgba(0, 0, 0, 1)"> getSecureObjectClass());
}
Collection</span><ConfigAttribute> attributes = <span style="color: rgba(0, 0, 255, 1)">this</span><span style="color: rgba(0, 0, 0, 1)">.obtainSecurityMetadataSource()
.getAttributes(object);
</span><span style="color: rgba(0, 0, 255, 1)">if</span> (attributes == <span style="color: rgba(0, 0, 255, 1)">null</span> ||<span style="color: rgba(0, 0, 0, 1)"> attributes.isEmpty()) {
</span><span style="color: rgba(0, 0, 255, 1)">if</span><span style="color: rgba(0, 0, 0, 1)"> (rejectPublicInvocations) {
</span><span style="color: rgba(0, 0, 255, 1)">throw</span> <span style="color: rgba(0, 0, 255, 1)">new</span><span style="color: rgba(0, 0, 0, 1)"> IllegalArgumentException(
</span>"Secure object invocation "
+<span style="color: rgba(0, 0, 0, 1)"> object
</span>+ " was denied as public invocations are not allowed via this interceptor. "
+ "This indicates a configuration error because the "
+ "rejectPublicInvocations property is set to 'true'"<span style="color: rgba(0, 0, 0, 1)">);
}
</span><span style="color: rgba(0, 0, 255, 1)">if</span><span style="color: rgba(0, 0, 0, 1)"> (debug) {
logger.debug(</span>"Public object - authentication not attempted"<span style="color: rgba(0, 0, 0, 1)">);
}
publishEvent(</span><span style="color: rgba(0, 0, 255, 1)">new</span><span style="color: rgba(0, 0, 0, 1)"> PublicInvocationEvent(object));
</span><span style="color: rgba(0, 0, 255, 1)">return</span> <span style="color: rgba(0, 0, 255, 1)">null</span>; <span style="color: rgba(0, 128, 0, 1)">//</span><span style="color: rgba(0, 128, 0, 1)"> no further work post-invocation</span>
}
</span><span style="color: rgba(0, 0, 255, 1)">if</span><span style="color: rgba(0, 0, 0, 1)"> (debug) {
logger.debug(</span>"Secure object: " + object + "; Attributes: " +<span style="color: rgba(0, 0, 0, 1)"> attributes);
}
</span><span style="color: rgba(0, 0, 255, 1)">if</span> (SecurityContextHolder.getContext().getAuthentication() == <span style="color: rgba(0, 0, 255, 1)">null</span><span style="color: rgba(0, 0, 0, 1)">) {
credentialsNotFound(messages.getMessage(
</span>"AbstractSecurityInterceptor.authenticationNotFound"<span style="color: rgba(0, 0, 0, 1)">,
</span>"An Authentication object was not found in the SecurityContext"<span style="color: rgba(0, 0, 0, 1)">),
object, attributes);
}
Authentication authenticated </span>=<span style="color: rgba(0, 0, 0, 1)"> authenticateIfRequired();
</span><span style="color: rgba(0, 128, 0, 1)">//</span><span style="color: rgba(0, 128, 0, 1)"> Attempt authorization</span>
<span style="color: rgba(0, 0, 255, 1)">try</span><span style="color: rgba(0, 0, 0, 1)"> {
</span><span style="color: rgba(0, 0, 255, 1)">this</span><span style="color: rgba(0, 0, 0, 1)">.accessDecisionManager.decide(authenticated, object, attributes);
}
</span><span style="color: rgba(0, 0, 255, 1)">catch</span><span style="color: rgba(0, 0, 0, 1)"> (AccessDeniedException accessDeniedException) {
publishEvent(</span><span style="color: rgba(0, 0, 255, 1)">new</span><span style="color: rgba(0, 0, 0, 1)"> AuthorizationFailureEvent(object, attributes, authenticated,
accessDeniedException));
</span><span style="color: rgba(0, 0, 255, 1)">throw</span><span style="color: rgba(0, 0, 0, 1)"> accessDeniedException;
}
</span><span style="color: rgba(0, 0, 255, 1)">if</span><span style="color: rgba(0, 0, 0, 1)"> (debug) {
logger.debug(</span>"Authorization successful"<span style="color: rgba(0, 0, 0, 1)">);
}
</span><span style="color: rgba(0, 0, 255, 1)">if</span><span style="color: rgba(0, 0, 0, 1)"> (publishAuthorizationSuccess) {
publishEvent(</span><span style="color: rgba(0, 0, 255, 1)">new</span><span style="color: rgba(0, 0, 0, 1)"> AuthorizedEvent(object, attributes, authenticated));
}
</span><span style="color: rgba(0, 128, 0, 1)">//</span><span style="color: rgba(0, 128, 0, 1)"> Attempt to run as a different user</span>
Authentication runAs = <span style="color: rgba(0, 0, 255, 1)">this</span><span style="color: rgba(0, 0, 0, 1)">.runAsManager.buildRunAs(authenticated, object,
attributes);
</span><span style="color: rgba(0, 0, 255, 1)">if</span> (runAs == <span style="color: rgba(0, 0, 255, 1)">null</span><span style="color: rgba(0, 0, 0, 1)">) {
</span><span style="color: rgba(0, 0, 255, 1)">if</span><span style="color: rgba(0, 0, 0, 1)"> (debug) {
logger.debug(</span>"RunAsManager did not change Authentication object"<span style="color: rgba(0, 0, 0, 1)">);
}
</span><span style="color: rgba(0, 128, 0, 1)">//</span><span style="color: rgba(0, 128, 0, 1)"> no further work post-invocation</span>
<span style="color: rgba(0, 0, 255, 1)">return</span> <span style="color: rgba(0, 0, 255, 1)">new</span> InterceptorStatusToken(SecurityContextHolder.getContext(), <span style="color: rgba(0, 0, 255, 1)">false</span><span style="color: rgba(0, 0, 0, 1)">,
attributes, object);
}
</span><span style="color: rgba(0, 0, 255, 1)">else</span><span style="color: rgba(0, 0, 0, 1)"> {
</span><span style="color: rgba(0, 0, 255, 1)">if</span><span style="color: rgba(0, 0, 0, 1)"> (debug) {
logger.debug(</span>"Switching to RunAs Authentication: " +<span style="color: rgba(0, 0, 0, 1)"> runAs);
}
SecurityContext origCtx </span>=<span style="color: rgba(0, 0, 0, 1)"> SecurityContextHolder.getContext();
SecurityContextHolder.setContext(SecurityContextHolder.createEmptyContext());
SecurityContextHolder.getContext().setAuthentication(runAs);
</span><span style="color: rgba(0, 128, 0, 1)">//</span><span style="color: rgba(0, 128, 0, 1)"> need to revert to token.Authenticated post-invocation</span>
<span style="color: rgba(0, 0, 255, 1)">return</span> <span style="color: rgba(0, 0, 255, 1)">new</span> InterceptorStatusToken(origCtx, <span style="color: rgba(0, 0, 255, 1)">true</span><span style="color: rgba(0, 0, 0, 1)">, attributes, object);
}
}</span></span></pre>
this.obtainSecurityMetadataSource() 会调用默认的权限资源管理器,由于我们配置了任何请求都需要经过授权:
 .anyRequest()  // 所有请求
            .authenticated(); // 都需要认证
因此 /hello 需要的权限为 authenticated,此处我们可以通过实现FilterInvocationSecurityMetadataSource 接口配置自己权限资源管理器,通过查询数据库来实现权限的动态配置,感兴趣的可以阅读:SpringSecurity 动态配置权限。

由于用户没有登录,经过 AnonymousAuthenticationFilter 匿名过滤器处理之后,我们从上下文中可以获取到用户的主体信息为:

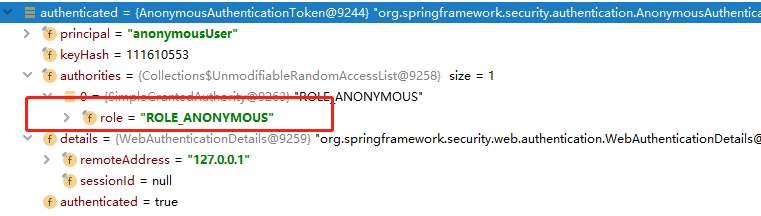
此时匿名用户具有的权限为 ROLE_ANONYMOUS;然后经过访问决策管理器判断用户有无权限:
this.accessDecisionManager.decide(authenticated, object, attributes);

Spring 提供了 3 个决策管理器:
- AffirmativeBased 一票通过,只要有一个投票器通过就允许访问;
- ConsensusBased 有一半以上投票器通过才允许访问资源;
- UnanimousBased 所有投票器都通过才允许访问;
这里使用默认的决策管理进行判断有无权限,可以看到决策管理中在引入了投票器(AccessDecisionVoter)的概念,有无权限访问的最终觉得权是由投票器来决定的,这里权限无法通过:

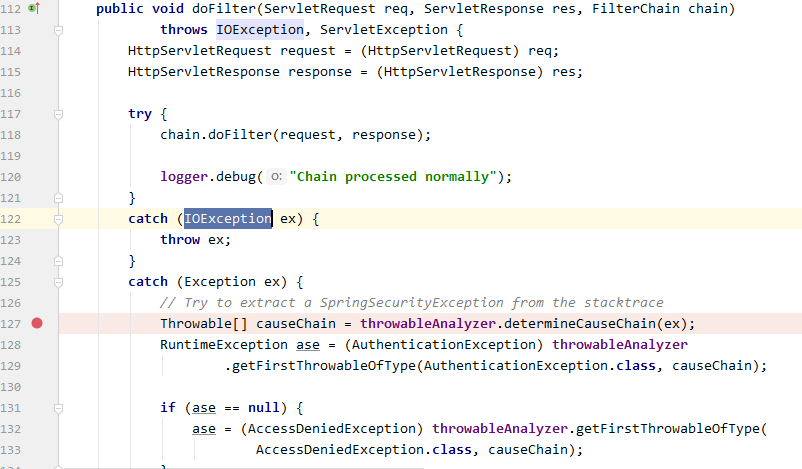
会抛出权限拒绝的异常,该异常会被 ExceptionTranslateFilter 捕获;
3、跳转到登陆页面
由于用户未登录直接访问 /hello,所以抛出用户未认证的异常,所以接下来跳转到 Spring Security 提供的默认登录页 GET:http://localhost:8080/login,最终请求被 DefaultLoginPageGeneratingFilter 拦截进行处理,返回默认的登录页面:
public void doFilter(ServletRequest req, ServletResponse res, FilterChain chain)
            throws IOException, ServletException {
        HttpServletRequest request = (HttpServletRequest) req;
        HttpServletResponse response = (HttpServletResponse) res;
        //登录失败
        boolean loginError = isErrorPage(request);
        //登出请求
        boolean logoutSuccess = isLogoutSuccess(request);
        //是否是登录请求
        if (isLoginUrlRequest(request) || loginError || logoutSuccess) {
            String loginPageHtml = generateLoginPageHtml(request, loginError,
                    logoutSuccess);
            response.setContentType("text/html;charset=UTF-8");
            response.setContentLength(loginPageHtml.length());
            response.getWriter().write(loginPageHtml);
        </span><span style="color: rgba(0, 0, 255, 1)">return</span><span style="color: rgba(0, 0, 0, 1)">;
    }

    chain.doFilter(request, response);
}</span></span></pre>
isLoginUrlRequest(request) 方法中,如果判断是 /login 请求则接下来生成默认的登录页面返回:
private boolean isLoginUrlRequest(HttpServletRequest request) {
return matches(request, loginPageUrl);
}
private boolean matches(HttpServletRequest request, String url) {
//首先判断是不是 GET 请求
if (!"GET".equals(request.getMethod()) || url == null) {
return false;
}
String uri = request.getRequestURI();
int pathParamIndex = uri.indexOf(';');
</span><span style="color: rgba(0, 0, 255, 1)">if</span> (pathParamIndex > 0<span style="color: rgba(0, 0, 0, 1)">) {
</span><span style="color: rgba(0, 128, 0, 1)">//</span><span style="color: rgba(0, 128, 0, 1)"> strip everything after the first semi-colon</span>
uri = uri.substring(0<span style="color: rgba(0, 0, 0, 1)">, pathParamIndex);
}
</span><span style="color: rgba(0, 0, 255, 1)">if</span> (request.getQueryString() != <span style="color: rgba(0, 0, 255, 1)">null</span><span style="color: rgba(0, 0, 0, 1)">) {
uri </span>+= "?" +<span style="color: rgba(0, 0, 0, 1)"> request.getQueryString();
}
</span><span style="color: rgba(0, 0, 255, 1)">if</span> (""<span style="color: rgba(0, 0, 0, 1)">.equals(request.getContextPath())) {
</span><span style="color: rgba(0, 0, 255, 1)">return</span><span style="color: rgba(0, 0, 0, 1)"> uri.equals(url);
}
</span><span style="color: rgba(0, 0, 255, 1)">return</span> uri.equals(request.getContextPath() +<span style="color: rgba(0, 0, 0, 1)"> url);
}</span></span></pre>
generateLoginPageHtml 方法中生成默认登录页面:
private String generateLoginPageHtml(HttpServletRequest request, boolean loginError,
boolean logoutSuccess) {
String errorMsg = "none";
</span><span style="color: rgba(0, 0, 255, 1)">if</span><span style="color: rgba(0, 0, 0, 1)"> (loginError) {
HttpSession session </span>= request.getSession(<span style="color: rgba(0, 0, 255, 1)">false</span><span style="color: rgba(0, 0, 0, 1)">);
</span><span style="color: rgba(0, 0, 255, 1)">if</span> (session != <span style="color: rgba(0, 0, 255, 1)">null</span><span style="color: rgba(0, 0, 0, 1)">) {
AuthenticationException ex </span>=<span style="color: rgba(0, 0, 0, 1)"> (AuthenticationException) session
.getAttribute(WebAttributes.AUTHENTICATION_EXCEPTION);
errorMsg </span>= ex != <span style="color: rgba(0, 0, 255, 1)">null</span> ? ex.getMessage() : "none"<span style="color: rgba(0, 0, 0, 1)">;
}
}
StringBuilder sb </span>= <span style="color: rgba(0, 0, 255, 1)">new</span><span style="color: rgba(0, 0, 0, 1)"> StringBuilder();
sb.append(</span>"<html><head><title>Login Page</title></head>"<span style="color: rgba(0, 0, 0, 1)">);
</span><span style="color: rgba(0, 0, 255, 1)">if</span><span style="color: rgba(0, 0, 0, 1)"> (formLoginEnabled) {
sb.append(</span>"<body οnlοad='document.f."<span style="color: rgba(0, 0, 0, 1)">).append(usernameParameter)
.append(</span>".focus();'>\n"<span style="color: rgba(0, 0, 0, 1)">);
}
</span><span style="color: rgba(0, 0, 255, 1)">if</span><span style="color: rgba(0, 0, 0, 1)"> (loginError) {
sb.append(</span>"<p><font color='red'>Your login attempt was not successful, try again.<br/><br/>Reason: "<span style="color: rgba(0, 0, 0, 1)">);
sb.append(errorMsg);
sb.append(</span>"</font></p>"<span style="color: rgba(0, 0, 0, 1)">);
}
</span><span style="color: rgba(0, 0, 255, 1)">if</span><span style="color: rgba(0, 0, 0, 1)"> (logoutSuccess) {
sb.append(</span>"<p><font color='green'>You have been logged out</font></p>"<span style="color: rgba(0, 0, 0, 1)">);
}
</span><span style="color: rgba(0, 0, 255, 1)">if</span><span style="color: rgba(0, 0, 0, 1)"> (formLoginEnabled) {
sb.append(</span>"<h3>Login with Username and Password</h3>"<span style="color: rgba(0, 0, 0, 1)">);
sb.append(</span>"<form name='f' action='"<span style="color: rgba(0, 0, 0, 1)">).append(request.getContextPath())
.append(authenticationUrl).append(</span>"' method='POST'>\n"<span style="color: rgba(0, 0, 0, 1)">);
sb.append(</span>"<table>\n"<span style="color: rgba(0, 0, 0, 1)">);
sb.append(</span>" <tr><td>User:</td><td><input type='text' name='"<span style="color: rgba(0, 0, 0, 1)">);
sb.append(usernameParameter).append(</span>"' value='").append("'></td></tr>\n"<span style="color: rgba(0, 0, 0, 1)">);
sb.append(</span>" <tr><td>Password:</td><td><input type='password' name='"<span style="color: rgba(0, 0, 0, 1)">)
.append(passwordParameter).append(</span>"'/></td></tr>\n"<span style="color: rgba(0, 0, 0, 1)">);
</span><span style="color: rgba(0, 0, 255, 1)">if</span> (rememberMeParameter != <span style="color: rgba(0, 0, 255, 1)">null</span><span style="color: rgba(0, 0, 0, 1)">) {
sb.append(</span>" <tr><td><input type='checkbox' name='"<span style="color: rgba(0, 0, 0, 1)">)
.append(rememberMeParameter)
.append(</span>"'/></td><td>Remember me on this computer.</td></tr>\n"<span style="color: rgba(0, 0, 0, 1)">);
}
sb.append(</span>" <tr><td colspan='2'><input name=\"submit\" type=\"submit\" value=\"Login\"/></td></tr>\n"<span style="color: rgba(0, 0, 0, 1)">);
renderHiddenInputs(sb, request);
sb.append(</span>"</table>\n"<span style="color: rgba(0, 0, 0, 1)">);
sb.append(</span>"</form>"<span style="color: rgba(0, 0, 0, 1)">);
}
</span><span style="color: rgba(0, 0, 255, 1)">if</span><span style="color: rgba(0, 0, 0, 1)"> (openIdEnabled) {
sb.append(</span>"<h3>Login with OpenID Identity</h3>"<span style="color: rgba(0, 0, 0, 1)">);
sb.append(</span>"<form name='oidf' action='"<span style="color: rgba(0, 0, 0, 1)">).append(request.getContextPath())
.append(openIDauthenticationUrl).append(</span>"' method='POST'>\n"<span style="color: rgba(0, 0, 0, 1)">);
sb.append(</span>"<table>\n"<span style="color: rgba(0, 0, 0, 1)">);
sb.append(</span>" <tr><td>Identity:</td><td><input type='text' size='30' name='"<span style="color: rgba(0, 0, 0, 1)">);
sb.append(openIDusernameParameter).append(</span>"'/></td></tr>\n"<span style="color: rgba(0, 0, 0, 1)">);
</span><span style="color: rgba(0, 0, 255, 1)">if</span> (openIDrememberMeParameter != <span style="color: rgba(0, 0, 255, 1)">null</span><span style="color: rgba(0, 0, 0, 1)">) {
sb.append(</span>" <tr><td><input type='checkbox' name='"<span style="color: rgba(0, 0, 0, 1)">)
.append(openIDrememberMeParameter)
.append(</span>"'></td><td>Remember me on this computer.</td></tr>\n"<span style="color: rgba(0, 0, 0, 1)">);
}
sb.append(</span>" <tr><td colspan='2'><input name=\"submit\" type=\"submit\" value=\"Login\"/></td></tr>\n"<span style="color: rgba(0, 0, 0, 1)">);
sb.append(</span>"</table>\n"<span style="color: rgba(0, 0, 0, 1)">);
renderHiddenInputs(sb, request);
sb.append(</span>"</form>"<span style="color: rgba(0, 0, 0, 1)">);
}
sb.append(</span>"</body></html>"<span style="color: rgba(0, 0, 0, 1)">);
</span><span style="color: rgba(0, 0, 255, 1)">return</span><span style="color: rgba(0, 0, 0, 1)"> sb.toString();
}</span></span></pre>
4、开始登录
当我们输入完用户名、密码点击登录时,将会发送 post 请求:http://localhost:8080/login,该请求页面是在 form 标签 action 中指定的,POST 请求会提交用户名和密码登录信息,此时由 UsernamePasswordAuthenticationFilter 的父类 AbstractAuthenticationProcessingFilter 处理,简单来说就是从请求 request 中获取用户名和密码进行认证操作(这里有一点需要注意,默认情况下 UsernamePasswordAuthenticationFilter 该过滤器默认只有当请求方法为 post、请求页面为 /login 时过滤器才生效,如果想修改其默认拦截页面,需要在 BrowserSecurityConfig 中配置该过滤器的拦截 url:.loginProcessingUrl("url"),也就是说只有当 form 标签 action 指定的 url 和.loginProcessingUrl 配置的相同时,UsernamePasswordAuthenticationFilter 过滤器才生效):
public void doFilter(ServletRequest req, ServletResponse res, FilterChain chain)
throws IOException, ServletException {
HttpServletRequest request </span>=<span style="color: rgba(0, 0, 0, 1)"> (HttpServletRequest) req;
HttpServletResponse response </span>=<span style="color: rgba(0, 0, 0, 1)"> (HttpServletResponse) res;
</span><span style="color: rgba(0, 128, 0, 1)">//</span><span style="color: rgba(0, 128, 0, 1)">当不是登录请求 POST:/login时则直接跳过</span>
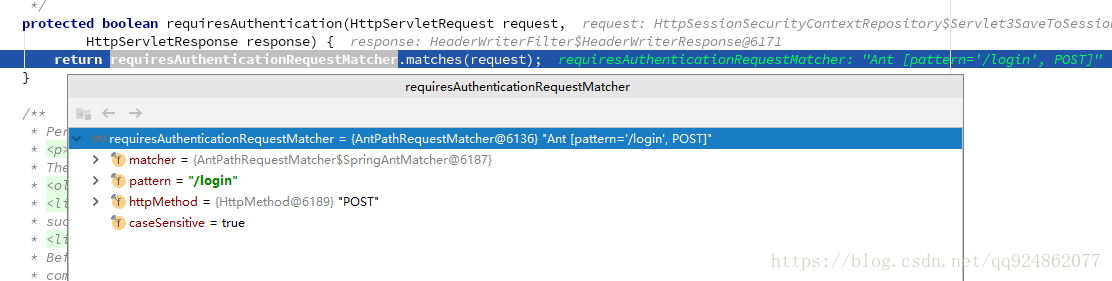
<span style="color: rgba(0, 0, 255, 1)">if</span> (!<span style="color: rgba(0, 0, 0, 1)">requiresAuthentication(request, response)) {
chain.doFilter(request, response);
</span><span style="color: rgba(0, 0, 255, 1)">return</span><span style="color: rgba(0, 0, 0, 1)">;
}
</span><span style="color: rgba(0, 128, 0, 1)">//</span><span style="color: rgba(0, 128, 0, 1)">如果是登录请求 POST:/login则进行验证处理</span>
<span style="color: rgba(0, 0, 255, 1)">if</span><span style="color: rgba(0, 0, 0, 1)"> (logger.isDebugEnabled()) {
logger.debug(</span>"Request is to process authentication"<span style="color: rgba(0, 0, 0, 1)">);
}
Authentication authResult;
</span><span style="color: rgba(0, 0, 255, 1)">try</span><span style="color: rgba(0, 0, 0, 1)"> {
</span><span style="color: rgba(0, 128, 0, 1)">//</span><span style="color: rgba(0, 128, 0, 1)">从请求中获取用户名密码进行校验</span>
authResult =<span style="color: rgba(0, 0, 0, 1)"> attemptAuthentication(request, response);
</span><span style="color: rgba(0, 0, 255, 1)">if</span> (authResult == <span style="color: rgba(0, 0, 255, 1)">null</span><span style="color: rgba(0, 0, 0, 1)">) {
</span><span style="color: rgba(0, 128, 0, 1)">//</span><span style="color: rgba(0, 128, 0, 1)"> return immediately as subclass has indicated that it hasn't completed
</span><span style="color: rgba(0, 128, 0, 1)">//</span><span style="color: rgba(0, 128, 0, 1)"> authentication</span>
<span style="color: rgba(0, 0, 255, 1)">return</span><span style="color: rgba(0, 0, 0, 1)">;
}
sessionStrategy.onAuthentication(authResult, request, response);
}
</span><span style="color: rgba(0, 0, 255, 1)">catch</span><span style="color: rgba(0, 0, 0, 1)"> (InternalAuthenticationServiceException failed) {
logger.error(
</span>"An internal error occurred while trying to authenticate the user."<span style="color: rgba(0, 0, 0, 1)">,
failed);
</span><span style="color: rgba(0, 128, 0, 1)">//</span><span style="color: rgba(0, 128, 0, 1)">校验失败则跳转到登录页面</span>
unsuccessfulAuthentication(request, response, failed);
</span><span style="color: rgba(0, 0, 255, 1)">return</span><span style="color: rgba(0, 0, 0, 1)">;
}
</span><span style="color: rgba(0, 0, 255, 1)">catch</span><span style="color: rgba(0, 0, 0, 1)"> (AuthenticationException failed) {
</span><span style="color: rgba(0, 128, 0, 1)">//</span><span style="color: rgba(0, 128, 0, 1)"> Authentication failed
</span><span style="color: rgba(0, 128, 0, 1)">//</span><span style="color: rgba(0, 128, 0, 1)">校验失败则跳转到登录页面</span>
unsuccessfulAuthentication(request, response, failed);
</span><span style="color: rgba(0, 0, 255, 1)">return</span><span style="color: rgba(0, 0, 0, 1)">;
}
</span><span style="color: rgba(0, 128, 0, 1)">//</span><span style="color: rgba(0, 128, 0, 1)"> Authentication success</span>
<span style="color: rgba(0, 0, 255, 1)">if</span><span style="color: rgba(0, 0, 0, 1)"> (continueChainBeforeSuccessfulAuthentication) {
chain.doFilter(request, response);
}
</span><span style="color: rgba(0, 128, 0, 1)">//</span><span style="color: rgba(0, 128, 0, 1)">校验成功则跳转到成功之后页面</span>
successfulAuthentication(request, response, chain, authResult);
}
在 doFilter 方法中,首先会调用 requiresAuthentication 方法判断是不是登录请求,如果不是则直接跳过这个 Filter,如果是则进行身份验证:
如果请求是登录操作,则接下来进行身份验证相关的操作,
UsernamePasswordAuthenticationFilter 处理表单方式的用户认证。在 UsernamePasswordAuthenticationFilter 的 attemptAuthentication 方法上打个断点: 调用 authResult = attemptAuthentication(request, response) 方法进行验证,在 attemptAuthentication 中会从请求中获取用户名和密码构建 UsernamePasswordAuthenticationToken :
public Authentication attemptAuthentication(HttpServletRequest request,
            HttpServletResponse response) throws AuthenticationException {
        if (postOnly && !request.getMethod().equals("POST")) {
            throw new AuthenticationServiceException(
                    "Authentication method not supported:" + request.getMethod());}
        //获取用户名密码
        String username = obtainUsername(request);
        String password = obtainPassword(request);
    </span><span style="color: rgba(0, 0, 255, 1)">if</span> (username == <span style="color: rgba(0, 0, 255, 1)">null</span><span style="color: rgba(0, 0, 0, 1)">) {
        username </span>= ""<span style="color: rgba(0, 0, 0, 1)">;
    }

    </span><span style="color: rgba(0, 0, 255, 1)">if</span> (password == <span style="color: rgba(0, 0, 255, 1)">null</span><span style="color: rgba(0, 0, 0, 1)">) {
        password </span>= ""<span style="color: rgba(0, 0, 0, 1)">;
    }

    username </span>=<span style="color: rgba(0, 0, 0, 1)"> username.trim();

    UsernamePasswordAuthenticationToken authRequest </span>= <span style="color: rgba(0, 0, 255, 1)">new</span><span style="color: rgba(0, 0, 0, 1)"> UsernamePasswordAuthenticationToken(
            username, password);

    </span><span style="color: rgba(0, 128, 0, 1)">//</span><span style="color: rgba(0, 128, 0, 1)"> Allow subclasses to set the "details" property</span>

        setDetails(request, authRequest);
//调用 AuthenticationManager 的实现类进行校验
return this.getAuthenticationManager().authenticate(authRequest);
}
5、认证管理器(AuthenticationManager)进行认证
在接口 AuthenticationManager 的实现类 ProviderManager 调用 authenticate 方法进行校验操作。在 authenticate 方法中提供了一个 List<AuthenticationProvider>,开发者可以提供不同的校验方式(用户名密码、手机号密码、邮箱密码等)只要其中有一个 AutenticationProvider 调用 authenticate 方法校验通过即可,当校验不通过时会抛出 AuthenticationException ,当所有的 AuthenticationProvider 校验不通过时,直接抛出异常由 ExceptionTranslationFilter 捕捉处理,跳转到登录页面。
public Authentication authenticate(Authentication authentication)
throws AuthenticationException {
Class<? extends Authentication> toTest = authentication.getClass();
AuthenticationException lastException = null;
Authentication result = null;
boolean debug = logger.isDebugEnabled();
//可以提供多个验证器,只要其中有一个校验通过接口
for (AuthenticationProvider provider : getProviders()) {
if (!provider.supports(toTest)) {
continue;
}
</span><span style="color: rgba(0, 0, 255, 1)">if</span><span style="color: rgba(0, 0, 0, 1)"> (debug) {
logger.debug(</span>"Authentication attempt using "
+<span style="color: rgba(0, 0, 0, 1)"> provider.getClass().getName());
}
</span><span style="color: rgba(0, 0, 255, 1)">try</span><span style="color: rgba(0, 0, 0, 1)"> {
</span><span style="color: rgba(0, 128, 0, 1)">//</span><span style="color: rgba(0, 128, 0, 1)">进行校验,校验不通过则直接抛出AuthenticationException </span>
result =<span style="color: rgba(0, 0, 0, 1)"> provider.authenticate(authentication);
</span><span style="color: rgba(0, 0, 255, 1)">if</span> (result != <span style="color: rgba(0, 0, 255, 1)">null</span><span style="color: rgba(0, 0, 0, 1)">) {
copyDetails(authentication, result);
</span><span style="color: rgba(0, 0, 255, 1)">break</span><span style="color: rgba(0, 0, 0, 1)">;
}
}
</span><span style="color: rgba(0, 0, 255, 1)">catch</span><span style="color: rgba(0, 0, 0, 1)"> (AccountStatusException e) {
prepareException(e, authentication);
</span><span style="color: rgba(0, 128, 0, 1)">//</span><span style="color: rgba(0, 128, 0, 1)"> SEC-546: Avoid polling additional providers if auth failure is due to
</span><span style="color: rgba(0, 128, 0, 1)">//</span><span style="color: rgba(0, 128, 0, 1)"> invalid account status</span>
<span style="color: rgba(0, 0, 255, 1)">throw</span><span style="color: rgba(0, 0, 0, 1)"> e;
}
</span><span style="color: rgba(0, 0, 255, 1)">catch</span><span style="color: rgba(0, 0, 0, 1)"> (InternalAuthenticationServiceException e) {
prepareException(e, authentication);
</span><span style="color: rgba(0, 0, 255, 1)">throw</span><span style="color: rgba(0, 0, 0, 1)"> e;
}
</span><span style="color: rgba(0, 0, 255, 1)">catch</span><span style="color: rgba(0, 0, 0, 1)"> (AuthenticationException e) {
lastException </span>=<span style="color: rgba(0, 0, 0, 1)"> e;
}
}
</span><span style="color: rgba(0, 0, 255, 1)">if</span> (result == <span style="color: rgba(0, 0, 255, 1)">null</span> && parent != <span style="color: rgba(0, 0, 255, 1)">null</span><span style="color: rgba(0, 0, 0, 1)">) {
</span><span style="color: rgba(0, 128, 0, 1)">//</span><span style="color: rgba(0, 128, 0, 1)"> Allow the parent to try.</span>
<span style="color: rgba(0, 0, 255, 1)">try</span><span style="color: rgba(0, 0, 0, 1)"> {
result </span>=<span style="color: rgba(0, 0, 0, 1)"> parent.authenticate(authentication);
}
</span><span style="color: rgba(0, 0, 255, 1)">catch</span><span style="color: rgba(0, 0, 0, 1)"> (ProviderNotFoundException e) {
</span><span style="color: rgba(0, 128, 0, 1)">//</span><span style="color: rgba(0, 128, 0, 1)"> ignore as we will throw below if no other exception occurred prior to
</span><span style="color: rgba(0, 128, 0, 1)">//</span><span style="color: rgba(0, 128, 0, 1)"> calling parent and the parent
</span><span style="color: rgba(0, 128, 0, 1)">//</span><span style="color: rgba(0, 128, 0, 1)"> may throw ProviderNotFound even though a provider in the child already
</span><span style="color: rgba(0, 128, 0, 1)">//</span><span style="color: rgba(0, 128, 0, 1)"> handled the request</span>
}
catch (AuthenticationException e) {
lastException = e;
}
}
</span><span style="color: rgba(0, 0, 255, 1)">if</span> (result != <span style="color: rgba(0, 0, 255, 1)">null</span><span style="color: rgba(0, 0, 0, 1)">) {
</span><span style="color: rgba(0, 0, 255, 1)">if</span><span style="color: rgba(0, 0, 0, 1)"> (eraseCredentialsAfterAuthentication
</span>&& (result <span style="color: rgba(0, 0, 255, 1)">instanceof</span><span style="color: rgba(0, 0, 0, 1)"> CredentialsContainer)) {
</span><span style="color: rgba(0, 128, 0, 1)">//</span><span style="color: rgba(0, 128, 0, 1)"> Authentication is complete. Remove credentials and other secret data
</span><span style="color: rgba(0, 128, 0, 1)">//</span><span style="color: rgba(0, 128, 0, 1)"> from authentication</span>
((CredentialsContainer) result).eraseCredentials();
}
eventPublisher.publishAuthenticationSuccess(result);
</span><span style="color: rgba(0, 0, 255, 1)">return</span><span style="color: rgba(0, 0, 0, 1)"> result;
}
</span><span style="color: rgba(0, 128, 0, 1)">//</span><span style="color: rgba(0, 128, 0, 1)"> Parent was null, or didn't authenticate (or throw an exception).
</span><span style="color: rgba(0, 128, 0, 1)">//</span><span style="color: rgba(0, 128, 0, 1)">最终校验不通过则抛出异常,由ExceptionTranslationFilter捕捉处理</span>
<span style="color: rgba(0, 0, 255, 1)">if</span> (lastException == <span style="color: rgba(0, 0, 255, 1)">null</span><span style="color: rgba(0, 0, 0, 1)">) {
lastException </span>= <span style="color: rgba(0, 0, 255, 1)">new</span><span style="color: rgba(0, 0, 0, 1)"> ProviderNotFoundException(messages.getMessage(
</span>"ProviderManager.providerNotFound"<span style="color: rgba(0, 0, 0, 1)">,
</span><span style="color: rgba(0, 0, 255, 1)">new</span><span style="color: rgba(0, 0, 0, 1)"> Object[] { toTest.getName() },
</span>"No AuthenticationProvider found for {0}"<span style="color: rgba(0, 0, 0, 1)">));
}
prepareException(lastException, authentication);
</span><span style="color: rgba(0, 0, 255, 1)">throw</span><span style="color: rgba(0, 0, 0, 1)"> lastException;
}</span></span></pre>
在接口 AuthenticationProvider 的实现类 AbstractUserDetailsAuthenticationProvider 中调用 authenticate 进行用户名密码等的校验
- 首先从缓存 userCahce 中获取,如果获取不到,则从子类 DaoAuthenticationProvider 的 retirveUser 方法中获取,该方法利用 loadUserByUsername 函数根据用户名从数据库获得用户详情,如果获取不到则直接抛出异常;
- 将获取的 user 和 authentication(从浏览器输入的用户和密码,用户名和密码会传递到 Spring Security 内部,最终封装成 UsernamePasswordAuthenticationToken 对象 authentication) 进行匹配,匹配成功调用 createSuccessAuthentication 方法创建 Authentication 返回。;
public Authentication authenticate(Authentication authentication)
            throws AuthenticationException {
        Assert.isInstanceOf(UsernamePasswordAuthenticationToken.class, authentication,
                messages.getMessage(
                        "AbstractUserDetailsAuthenticationProvider.onlySupports",
                        "Only UsernamePasswordAuthenticationToken is supported"));
    </span><span style="color: rgba(0, 128, 0, 1)">//</span><span style="color: rgba(0, 128, 0, 1)"> Determine username</span>
    String username = (authentication.getPrincipal() == <span style="color: rgba(0, 0, 255, 1)">null</span>) ? "NONE_PROVIDED"<span style="color: rgba(0, 0, 0, 1)">
            : authentication.getName();

    </span><span style="color: rgba(0, 0, 255, 1)">boolean</span> cacheWasUsed = <span style="color: rgba(0, 0, 255, 1)">true</span><span style="color: rgba(0, 0, 0, 1)">;
    UserDetails user </span>= <span style="color: rgba(0, 0, 255, 1)">this</span><span style="color: rgba(0, 0, 0, 1)">.userCache.getUserFromCache(username);

    </span><span style="color: rgba(0, 0, 255, 1)">if</span> (user == <span style="color: rgba(0, 0, 255, 1)">null</span><span style="color: rgba(0, 0, 0, 1)">) {
        cacheWasUsed </span>= <span style="color: rgba(0, 0, 255, 1)">false</span><span style="color: rgba(0, 0, 0, 1)">;

        </span><span style="color: rgba(0, 0, 255, 1)">try</span><span style="color: rgba(0, 0, 0, 1)"> {
            user </span>=<span style="color: rgba(0, 0, 0, 1)"> retrieveUser(username,
                    (UsernamePasswordAuthenticationToken) authentication);
        }
        </span><span style="color: rgba(0, 0, 255, 1)">catch</span><span style="color: rgba(0, 0, 0, 1)"> (UsernameNotFoundException notFound) {
            logger.debug(</span>"User '" + username + "' not found"<span style="color: rgba(0, 0, 0, 1)">);

            </span><span style="color: rgba(0, 0, 255, 1)">if</span><span style="color: rgba(0, 0, 0, 1)"> (hideUserNotFoundExceptions) {
                </span><span style="color: rgba(0, 0, 255, 1)">throw</span> <span style="color: rgba(0, 0, 255, 1)">new</span><span style="color: rgba(0, 0, 0, 1)"> BadCredentialsException(messages.getMessage(
                        </span>"AbstractUserDetailsAuthenticationProvider.badCredentials"<span style="color: rgba(0, 0, 0, 1)">,
                        </span>"Bad credentials"<span style="color: rgba(0, 0, 0, 1)">));
            }
            </span><span style="color: rgba(0, 0, 255, 1)">else</span><span style="color: rgba(0, 0, 0, 1)"> {
                </span><span style="color: rgba(0, 0, 255, 1)">throw</span><span style="color: rgba(0, 0, 0, 1)"> notFound;
            }
        }

        Assert.notNull(user,
                </span>"retrieveUser returned null - a violation of the interface contract"<span style="color: rgba(0, 0, 0, 1)">);
    }

    </span><span style="color: rgba(0, 0, 255, 1)">try</span><span style="color: rgba(0, 0, 0, 1)"> {
        preAuthenticationChecks.check(user);
        </span><span style="color: rgba(0, 128, 0, 1)">//</span><span style="color: rgba(0, 128, 0, 1)">判断用户名和密码等信息是否完全匹配</span>

            additionalAuthenticationChecks(user,
(UsernamePasswordAuthenticationToken) authentication);
}
catch (AuthenticationException exception) {
if (cacheWasUsed) {
// There was a problem, so try again after checking
// we're using latest data (i.e. not from the cache)
cacheWasUsed = false;
user = retrieveUser(username,
(UsernamePasswordAuthenticationToken) authentication);
preAuthenticationChecks.check(user);
additionalAuthenticationChecks(user,
(UsernamePasswordAuthenticationToken) authentication);
}
else {
throw exception;
}
}
    postAuthenticationChecks.check(user);

    </span><span style="color: rgba(0, 0, 255, 1)">if</span> (!<span style="color: rgba(0, 0, 0, 1)">cacheWasUsed) {
        </span><span style="color: rgba(0, 0, 255, 1)">this</span><span style="color: rgba(0, 0, 0, 1)">.userCache.putUserInCache(user);
    }

    Object principalToReturn </span>=<span style="color: rgba(0, 0, 0, 1)"> user;

    </span><span style="color: rgba(0, 0, 255, 1)">if</span><span style="color: rgba(0, 0, 0, 1)"> (forcePrincipalAsString) {
        principalToReturn </span>=<span style="color: rgba(0, 0, 0, 1)"> user.getUsername();
    }

    </span><span style="color: rgba(0, 0, 255, 1)">return</span><span style="color: rgba(0, 0, 0, 1)"> createSuccessAuthentication(principalToReturn, authentication, user);
}</span></span></pre>
在子类 DaoAuthenticationProvider 中调用接口的 UserDetailsService 的 loadUserByUsername 方法根据用户名来查找用户信息 (在正式项目中实现此接口来完成从数据库等中查找),如果查找不到还是直接抛出异常,由上层去处理:
protected final UserDetails retrieveUser(String username,
            UsernamePasswordAuthenticationToken authentication)
            throws AuthenticationException {
        UserDetails loadedUser;
    </span><span style="color: rgba(0, 0, 255, 1)">try</span><span style="color: rgba(0, 0, 0, 1)"> {
        </span><span style="color: rgba(0, 128, 0, 1)">//</span><span style="color: rgba(0, 128, 0, 1)">调用默认实现InMemoryUserDetailsManager查找用户名密码</span>
        loadedUser = <span style="color: rgba(0, 0, 255, 1)">this</span><span style="color: rgba(0, 0, 0, 1)">.getUserDetailsService().loadUserByUsername(username);
    }
    </span><span style="color: rgba(0, 0, 255, 1)">catch</span><span style="color: rgba(0, 0, 0, 1)"> (UsernameNotFoundException notFound) {
        </span><span style="color: rgba(0, 0, 255, 1)">if</span> (authentication.getCredentials() != <span style="color: rgba(0, 0, 255, 1)">null</span><span style="color: rgba(0, 0, 0, 1)">) {
            String presentedPassword </span>=<span style="color: rgba(0, 0, 0, 1)"> authentication.getCredentials().toString();
            passwordEncoder.isPasswordValid(userNotFoundEncodedPassword,
                    presentedPassword, </span><span style="color: rgba(0, 0, 255, 1)">null</span><span style="color: rgba(0, 0, 0, 1)">);
        }
        </span><span style="color: rgba(0, 0, 255, 1)">throw</span><span style="color: rgba(0, 0, 0, 1)"> notFound;
    }
    </span><span style="color: rgba(0, 0, 255, 1)">catch</span><span style="color: rgba(0, 0, 0, 1)"> (Exception repositoryProblem) {
        </span><span style="color: rgba(0, 0, 255, 1)">throw</span> <span style="color: rgba(0, 0, 255, 1)">new</span><span style="color: rgba(0, 0, 0, 1)"> InternalAuthenticationServiceException(
                repositoryProblem.getMessage(), repositoryProblem);
    }

    </span><span style="color: rgba(0, 0, 255, 1)">if</span> (loadedUser == <span style="color: rgba(0, 0, 255, 1)">null</span><span style="color: rgba(0, 0, 0, 1)">) {
        </span><span style="color: rgba(0, 0, 255, 1)">throw</span> <span style="color: rgba(0, 0, 255, 1)">new</span><span style="color: rgba(0, 0, 0, 1)"> InternalAuthenticationServiceException(
                </span>"UserDetailsService returned null, which is an interface contract violation"<span style="color: rgba(0, 0, 0, 1)">);
    }
    </span><span style="color: rgba(0, 0, 255, 1)">return</span><span style="color: rgba(0, 0, 0, 1)"> loadedUser;
}</span></span></pre>
当找到用户信息后,还需要根据用户信息和 password 字段进行匹配,在 additionalAuthenticationChecks 中完成完整的用户名和密码认证:
protected void additionalAuthenticationChecks(UserDetails userDetails,
            UsernamePasswordAuthenticationToken authentication)
            throws AuthenticationException {
        Object salt = null;
    </span><span style="color: rgba(0, 0, 255, 1)">if</span> (<span style="color: rgba(0, 0, 255, 1)">this</span>.saltSource != <span style="color: rgba(0, 0, 255, 1)">null</span><span style="color: rgba(0, 0, 0, 1)">) {
        salt </span>= <span style="color: rgba(0, 0, 255, 1)">this</span><span style="color: rgba(0, 0, 0, 1)">.saltSource.getSalt(userDetails);
    }

    </span><span style="color: rgba(0, 0, 255, 1)">if</span> (authentication.getCredentials() == <span style="color: rgba(0, 0, 255, 1)">null</span><span style="color: rgba(0, 0, 0, 1)">) {
        logger.debug(</span>"Authentication failed: no credentials provided"<span style="color: rgba(0, 0, 0, 1)">);

        </span><span style="color: rgba(0, 0, 255, 1)">throw</span> <span style="color: rgba(0, 0, 255, 1)">new</span><span style="color: rgba(0, 0, 0, 1)"> BadCredentialsException(messages.getMessage(
                </span>"AbstractUserDetailsAuthenticationProvider.badCredentials"<span style="color: rgba(0, 0, 0, 1)">,
                </span>"Bad credentials"<span style="color: rgba(0, 0, 0, 1)">));
    }

    String presentedPassword </span>=<span style="color: rgba(0, 0, 0, 1)"> authentication.getCredentials().toString();

    </span><span style="color: rgba(0, 0, 255, 1)">if</span> (!<span style="color: rgba(0, 0, 0, 1)">passwordEncoder.isPasswordValid(userDetails.getPassword(),
            presentedPassword, salt)) {
        logger.debug(</span>"Authentication failed: password does not match stored value"<span style="color: rgba(0, 0, 0, 1)">);

        </span><span style="color: rgba(0, 0, 255, 1)">throw</span> <span style="color: rgba(0, 0, 255, 1)">new</span><span style="color: rgba(0, 0, 0, 1)"> BadCredentialsException(messages.getMessage(
                </span>"AbstractUserDetailsAuthenticationProvider.badCredentials"<span style="color: rgba(0, 0, 0, 1)">,
                </span>"Bad credentials"<span style="color: rgba(0, 0, 0, 1)">));
    }
}</span></span></pre>
6、权限校验
当认证通过时,进行权限校验,执行 FilterSecurityInterceptor 代码的 doFilter 方法:
    public void doFilter(ServletRequest request, ServletResponse response,
            FilterChain chain) throws IOException, ServletException {
        FilterInvocation fi = new FilterInvocation(request, response, chain);
        invoke(fi);
    }
在 invoke 方法中会调用父类 AbstractSecurityInterceptor 的 beforeInvocation 对 Authentication 对象进行权限校验:
public void invoke(FilterInvocation fi) throws IOException, ServletException {
        if ((fi.getRequest() != null)
                && (fi.getRequest().getAttribute(FILTER_APPLIED) != null)
                && observeOncePerRequest) {
            // filter already applied to this request and user wants us to observe
            // once-per-request handling, so don't re-do security checking
            fi.getChain().doFilter(fi.getRequest(), fi.getResponse());}
        else {
            // first time this request being called, so perform security checking
            if (fi.getRequest() != null) {fi.getRequest().setAttribute(FILTER_APPLIED, Boolean.TRUE);
            }
            //调用父类的 beforeInvocation 进行权限校验
            InterceptorStatusToken token = super.beforeInvocation(fi);
        </span><span style="color: rgba(0, 0, 255, 1)">try</span><span style="color: rgba(0, 0, 0, 1)"> {
            fi.getChain().doFilter(fi.getRequest(), fi.getResponse());
        }
        </span><span style="color: rgba(0, 0, 255, 1)">finally</span><span style="color: rgba(0, 0, 0, 1)"> {
            </span><span style="color: rgba(0, 0, 255, 1)">super</span><span style="color: rgba(0, 0, 0, 1)">.finallyInvocation(token);
        }

        </span><span style="color: rgba(0, 0, 255, 1)">super</span>.afterInvocation(token, <span style="color: rgba(0, 0, 255, 1)">null</span><span style="color: rgba(0, 0, 0, 1)">);
    }
}</span></span></pre>
在 beforeInvocation 中调用接口 AccessDecisionManager 的实现类,校验角色:

protected InterceptorStatusToken beforeInvocation(Object object) {
//省略部分代码
</span><span style="color: rgba(0, 128, 0, 1)">//</span><span style="color: rgba(0, 128, 0, 1)">获取当前线程的Authentication对象</span>
    Authentication authenticated =<span style="color: rgba(0, 0, 0, 1)"> authenticateIfRequired();

</span><span style="color: rgba(0, 128, 0, 1)">//</span><span style="color: rgba(0, 128, 0, 1)"> Attempt authorization</span>
    <span style="color: rgba(0, 0, 255, 1)">try</span><span style="color: rgba(0, 0, 0, 1)"> {
 </span><span style="color: rgba(0, 128, 0, 1)">//</span><span style="color: rgba(0, 128, 0, 1)">权限角色校验</span>
        <span style="color: rgba(0, 0, 255, 1)">this</span><span style="color: rgba(0, 0, 0, 1)">.accessDecisionManager.decide(authenticated, object, attributes);
    }
</span><span style="color: rgba(0, 128, 0, 1)">//</span><span style="color: rgba(0, 128, 0, 1)">校验失败抛出异常</span>
    <span style="color: rgba(0, 0, 255, 1)">catch</span><span style="color: rgba(0, 0, 0, 1)"> (AccessDeniedException accessDeniedException) {
        publishEvent(</span><span style="color: rgba(0, 0, 255, 1)">new</span><span style="color: rgba(0, 0, 0, 1)"> AuthorizationFailureEvent(object, attributes, authenticated,
                accessDeniedException));

        </span><span style="color: rgba(0, 0, 255, 1)">throw</span><span style="color: rgba(0, 0, 0, 1)"> accessDeniedException;
    }

    </span><span style="color: rgba(0, 128, 0, 1)">//</span><span style="color: rgba(0, 128, 0, 1)">省略部分代码</span>
}</span></pre>
最终调用子类 AffirmativeBased 的 decide 方法,在 decide 方法中会获取 AccessDecisionVoter 对权限进行投票处理,获取投票结果,当投票结果是 1 时则表示有权限,否则等于 -1 表示没有权限,拒绝:
public void decide(Authentication authentication, Object object,
            Collection<ConfigAttribute> configAttributes) throws AccessDeniedException {
        int deny = 0;
    </span><span style="color: rgba(0, 0, 255, 1)">for</span><span style="color: rgba(0, 0, 0, 1)"> (AccessDecisionVoter voter : getDecisionVoters()) {
        </span><span style="color: rgba(0, 128, 0, 1)">//</span><span style="color: rgba(0, 128, 0, 1)">投票获取结果</span>
        <span style="color: rgba(0, 0, 255, 1)">int</span> result =<span style="color: rgba(0, 0, 0, 1)"> voter.vote(authentication, object, configAttributes);

        </span><span style="color: rgba(0, 0, 255, 1)">if</span><span style="color: rgba(0, 0, 0, 1)"> (logger.isDebugEnabled()) {
            logger.debug(</span>"Voter: " + voter + ", returned: " +<span style="color: rgba(0, 0, 0, 1)"> result);
        }
        </span><span style="color: rgba(0, 128, 0, 1)">//</span><span style="color: rgba(0, 128, 0, 1)">当有权限时直接返回</span>
        <span style="color: rgba(0, 0, 255, 1)">switch</span><span style="color: rgba(0, 0, 0, 1)"> (result) {
        </span><span style="color: rgba(0, 0, 255, 1)">case</span><span style="color: rgba(0, 0, 0, 1)"> AccessDecisionVoter.ACCESS_GRANTED:
            </span><span style="color: rgba(0, 0, 255, 1)">return</span><span style="color: rgba(0, 0, 0, 1)">;
        </span><span style="color: rgba(0, 128, 0, 1)">//</span><span style="color: rgba(0, 128, 0, 1)">否则拒绝</span>
        <span style="color: rgba(0, 0, 255, 1)">case</span><span style="color: rgba(0, 0, 0, 1)"> AccessDecisionVoter.ACCESS_DENIED:
            deny</span>++<span style="color: rgba(0, 0, 0, 1)">;

            </span><span style="color: rgba(0, 0, 255, 1)">break</span><span style="color: rgba(0, 0, 0, 1)">;

        </span><span style="color: rgba(0, 0, 255, 1)">default</span><span style="color: rgba(0, 0, 0, 1)">:
            </span><span style="color: rgba(0, 0, 255, 1)">break</span><span style="color: rgba(0, 0, 0, 1)">;
        }
    }
    </span><span style="color: rgba(0, 128, 0, 1)">//

        if (deny > 0) {
throw new AccessDeniedException(messages.getMessage(
"AbstractAccessDecisionManager.accessDenied", "Access is denied"));
}
    </span><span style="color: rgba(0, 128, 0, 1)">//</span><span style="color: rgba(0, 128, 0, 1)"> To get this far, every AccessDecisionVoter abstained</span>

        checkAllowIfAllAbstainDecisions();
}
在实现类 WebExpressionVoter 会根据 authentication 结果进行校验判断,根据 Authentication 对象创建接口 SecurityExpressionOperations 的实现类 SecurityExpressionRoot:
- 当请求 url 被配置为 permitAll,则直接返回 true,校验通过;
- 其他需要登录请求 url 会调用 isAuthenticated 方法,最终调用 AuthenticationTrustResolver 的 AuthenticationTrustResolverImpl 的方法进行判断;
public abstract class SecurityExpressionRoot implements SecurityExpressionOperations {
protected final Authentication authentication;
private AuthenticationTrustResolver trustResolver;
private RoleHierarchy roleHierarchy;
private Set<String> roles;
private String defaultRolePrefix = "ROLE_";
</span><span style="color: rgba(0, 128, 0, 1)">/**</span><span style="color: rgba(0, 128, 0, 1)"> Allows "permitAll" expression </span><span style="color: rgba(0, 128, 0, 1)">*/</span>
<span style="color: rgba(0, 0, 255, 1)">public</span> <span style="color: rgba(0, 0, 255, 1)">final</span> <span style="color: rgba(0, 0, 255, 1)">boolean</span> permitAll = <span style="color: rgba(0, 0, 255, 1)">true</span><span style="color: rgba(0, 0, 0, 1)">;
</span><span style="color: rgba(0, 128, 0, 1)">/**</span><span style="color: rgba(0, 128, 0, 1)"> Allows "denyAll" expression </span><span style="color: rgba(0, 128, 0, 1)">*/</span>
<span style="color: rgba(0, 0, 255, 1)">public</span> <span style="color: rgba(0, 0, 255, 1)">final</span> <span style="color: rgba(0, 0, 255, 1)">boolean</span> denyAll = <span style="color: rgba(0, 0, 255, 1)">false</span><span style="color: rgba(0, 0, 0, 1)">;
</span><span style="color: rgba(0, 0, 255, 1)">private</span><span style="color: rgba(0, 0, 0, 1)"> PermissionEvaluator permissionEvaluator;
</span><span style="color: rgba(0, 0, 255, 1)">public</span> <span style="color: rgba(0, 0, 255, 1)">final</span> String read = "read"<span style="color: rgba(0, 0, 0, 1)">;
</span><span style="color: rgba(0, 0, 255, 1)">public</span> <span style="color: rgba(0, 0, 255, 1)">final</span> String write = "write"<span style="color: rgba(0, 0, 0, 1)">;
</span><span style="color: rgba(0, 0, 255, 1)">public</span> <span style="color: rgba(0, 0, 255, 1)">final</span> String create = "create"<span style="color: rgba(0, 0, 0, 1)">;
</span><span style="color: rgba(0, 0, 255, 1)">public</span> <span style="color: rgba(0, 0, 255, 1)">final</span> String delete = "delete"<span style="color: rgba(0, 0, 0, 1)">;
</span><span style="color: rgba(0, 0, 255, 1)">public</span> <span style="color: rgba(0, 0, 255, 1)">final</span> String admin = "administration"<span style="color: rgba(0, 0, 0, 1)">;
</span><span style="color: rgba(0, 128, 0, 1)">/**</span><span style="color: rgba(0, 128, 0, 1)">
* Creates a new instance
* </span><span style="color: rgba(128, 128, 128, 1)">@param</span><span style="color: rgba(0, 128, 0, 1)"> authentication the {</span><span style="color: rgba(128, 128, 128, 1)">@link</span><span style="color: rgba(0, 128, 0, 1)"> Authentication} to use. Cannot be null.
</span><span style="color: rgba(0, 128, 0, 1)">*/</span>
<span style="color: rgba(0, 0, 255, 1)">public</span><span style="color: rgba(0, 0, 0, 1)"> SecurityExpressionRoot(Authentication authentication) {
</span><span style="color: rgba(0, 0, 255, 1)">if</span> (authentication == <span style="color: rgba(0, 0, 255, 1)">null</span><span style="color: rgba(0, 0, 0, 1)">) {
</span><span style="color: rgba(0, 0, 255, 1)">throw</span> <span style="color: rgba(0, 0, 255, 1)">new</span> IllegalArgumentException("Authentication object cannot be null"<span style="color: rgba(0, 0, 0, 1)">);
}
</span><span style="color: rgba(0, 0, 255, 1)">this</span>.authentication =<span style="color: rgba(0, 0, 0, 1)"> authentication;
}
</span><span style="color: rgba(0, 0, 255, 1)">public</span> <span style="color: rgba(0, 0, 255, 1)">final</span> <span style="color: rgba(0, 0, 255, 1)">boolean</span><span style="color: rgba(0, 0, 0, 1)"> hasAuthority(String authority) {
</span><span style="color: rgba(0, 0, 255, 1)">return</span><span style="color: rgba(0, 0, 0, 1)"> hasAnyAuthority(authority);
}
</span><span style="color: rgba(0, 0, 255, 1)">public</span> <span style="color: rgba(0, 0, 255, 1)">final</span> <span style="color: rgba(0, 0, 255, 1)">boolean</span><span style="color: rgba(0, 0, 0, 1)"> hasAnyAuthority(String... authorities) {
</span><span style="color: rgba(0, 0, 255, 1)">return</span> hasAnyAuthorityName(<span style="color: rgba(0, 0, 255, 1)">null</span><span style="color: rgba(0, 0, 0, 1)">, authorities);
}
</span><span style="color: rgba(0, 0, 255, 1)">public</span> <span style="color: rgba(0, 0, 255, 1)">final</span> <span style="color: rgba(0, 0, 255, 1)">boolean</span><span style="color: rgba(0, 0, 0, 1)"> hasRole(String role) {
</span><span style="color: rgba(0, 0, 255, 1)">return</span><span style="color: rgba(0, 0, 0, 1)"> hasAnyRole(role);
}
</span><span style="color: rgba(0, 0, 255, 1)">public</span> <span style="color: rgba(0, 0, 255, 1)">final</span> <span style="color: rgba(0, 0, 255, 1)">boolean</span><span style="color: rgba(0, 0, 0, 1)"> hasAnyRole(String... roles) {
</span><span style="color: rgba(0, 0, 255, 1)">return</span><span style="color: rgba(0, 0, 0, 1)"> hasAnyAuthorityName(defaultRolePrefix, roles);
}
</span><span style="color: rgba(0, 0, 255, 1)">private</span> <span style="color: rgba(0, 0, 255, 1)">boolean</span><span style="color: rgba(0, 0, 0, 1)"> hasAnyAuthorityName(String prefix, String... roles) {
Set</span><String> roleSet =<span style="color: rgba(0, 0, 0, 1)"> getAuthoritySet();
</span><span style="color: rgba(0, 0, 255, 1)">for</span><span style="color: rgba(0, 0, 0, 1)"> (String role : roles) {
String defaultedRole </span>=<span style="color: rgba(0, 0, 0, 1)"> getRoleWithDefaultPrefix(prefix, role);
</span><span style="color: rgba(0, 0, 255, 1)">if</span><span style="color: rgba(0, 0, 0, 1)"> (roleSet.contains(defaultedRole)) {
</span><span style="color: rgba(0, 0, 255, 1)">return</span> <span style="color: rgba(0, 0, 255, 1)">true</span><span style="color: rgba(0, 0, 0, 1)">;
}
}
</span><span style="color: rgba(0, 0, 255, 1)">return</span> <span style="color: rgba(0, 0, 255, 1)">false</span><span style="color: rgba(0, 0, 0, 1)">;
}
</span><span style="color: rgba(0, 0, 255, 1)">public</span> <span style="color: rgba(0, 0, 255, 1)">final</span><span style="color: rgba(0, 0, 0, 1)"> Authentication getAuthentication() {
</span><span style="color: rgba(0, 0, 255, 1)">return</span><span style="color: rgba(0, 0, 0, 1)"> authentication;
}
</span><span style="color: rgba(0, 0, 255, 1)">public</span> <span style="color: rgba(0, 0, 255, 1)">final</span> <span style="color: rgba(0, 0, 255, 1)">boolean</span><span style="color: rgba(0, 0, 0, 1)"> permitAll() {
</span><span style="color: rgba(0, 0, 255, 1)">return</span> <span style="color: rgba(0, 0, 255, 1)">true</span><span style="color: rgba(0, 0, 0, 1)">;
}
</span><span style="color: rgba(0, 0, 255, 1)">public</span> <span style="color: rgba(0, 0, 255, 1)">final</span> <span style="color: rgba(0, 0, 255, 1)">boolean</span><span style="color: rgba(0, 0, 0, 1)"> denyAll() {
</span><span style="color: rgba(0, 0, 255, 1)">return</span> <span style="color: rgba(0, 0, 255, 1)">false</span><span style="color: rgba(0, 0, 0, 1)">;
}
</span><span style="color: rgba(0, 0, 255, 1)">public</span> <span style="color: rgba(0, 0, 255, 1)">final</span> <span style="color: rgba(0, 0, 255, 1)">boolean</span><span style="color: rgba(0, 0, 0, 1)"> isAnonymous() {
</span><span style="color: rgba(0, 0, 255, 1)">return</span><span style="color: rgba(0, 0, 0, 1)"> trustResolver.isAnonymous(authentication);
}
</span><span style="color: rgba(0, 0, 255, 1)">public</span> <span style="color: rgba(0, 0, 255, 1)">final</span> <span style="color: rgba(0, 0, 255, 1)">boolean</span><span style="color: rgba(0, 0, 0, 1)"> isAuthenticated() {
</span><span style="color: rgba(0, 0, 255, 1)">return</span> !<span style="color: rgba(0, 0, 0, 1)">isAnonymous();
}
</span><span style="color: rgba(0, 0, 255, 1)">public</span> <span style="color: rgba(0, 0, 255, 1)">final</span> <span style="color: rgba(0, 0, 255, 1)">boolean</span><span style="color: rgba(0, 0, 0, 1)"> isRememberMe() {
</span><span style="color: rgba(0, 0, 255, 1)">return</span><span style="color: rgba(0, 0, 0, 1)"> trustResolver.isRememberMe(authentication);
}
</span><span style="color: rgba(0, 0, 255, 1)">public</span> <span style="color: rgba(0, 0, 255, 1)">final</span> <span style="color: rgba(0, 0, 255, 1)">boolean</span><span style="color: rgba(0, 0, 0, 1)"> isFullyAuthenticated() {
</span><span style="color: rgba(0, 0, 255, 1)">return</span> !<span style="color: rgba(0, 0, 0, 1)">trustResolver.isAnonymous(authentication)
</span>&& !<span style="color: rgba(0, 0, 0, 1)">trustResolver.isRememberMe(authentication);
}
</span><span style="color: rgba(0, 128, 0, 1)">/**</span><span style="color: rgba(0, 128, 0, 1)">
* Convenience method to access {</span><span style="color: rgba(128, 128, 128, 1)">@link</span><span style="color: rgba(0, 128, 0, 1)"> Authentication#getPrincipal()} from
* {</span><span style="color: rgba(128, 128, 128, 1)">@link</span><span style="color: rgba(0, 128, 0, 1)"> #getAuthentication()}
* </span><span style="color: rgba(128, 128, 128, 1)">@return</span>
<span style="color: rgba(0, 128, 0, 1)">*/</span>
<span style="color: rgba(0, 0, 255, 1)">public</span><span style="color: rgba(0, 0, 0, 1)"> Object getPrincipal() {
</span><span style="color: rgba(0, 0, 255, 1)">return</span><span style="color: rgba(0, 0, 0, 1)"> authentication.getPrincipal();
}
</span><span style="color: rgba(0, 0, 255, 1)">public</span> <span style="color: rgba(0, 0, 255, 1)">void</span><span style="color: rgba(0, 0, 0, 1)"> setTrustResolver(AuthenticationTrustResolver trustResolver) {
</span><span style="color: rgba(0, 0, 255, 1)">this</span>.trustResolver =<span style="color: rgba(0, 0, 0, 1)"> trustResolver;
}
</span><span style="color: rgba(0, 0, 255, 1)">public</span> <span style="color: rgba(0, 0, 255, 1)">void</span><span style="color: rgba(0, 0, 0, 1)"> setRoleHierarchy(RoleHierarchy roleHierarchy) {
</span><span style="color: rgba(0, 0, 255, 1)">this</span>.roleHierarchy =<span style="color: rgba(0, 0, 0, 1)"> roleHierarchy;
}
</span><span style="color: rgba(0, 128, 0, 1)">/**</span><span style="color: rgba(0, 128, 0, 1)">
* <p>
* Sets the default prefix to be added to {</span><span style="color: rgba(128, 128, 128, 1)">@link</span><span style="color: rgba(0, 128, 0, 1)"> #hasAnyRole(String...)} or
* {</span><span style="color: rgba(128, 128, 128, 1)">@link</span><span style="color: rgba(0, 128, 0, 1)"> #hasRole(String)}. For example, if hasRole("ADMIN") or hasRole("ROLE_ADMIN")
* is passed in, then the role ROLE_ADMIN will be used when the defaultRolePrefix is
* "ROLE_" (default).
* </p>
*
* <p>
* If null or empty, then no default role prefix is used.
* </p>
*
* </span><span style="color: rgba(128, 128, 128, 1)">@param</span><span style="color: rgba(0, 128, 0, 1)"> defaultRolePrefix the default prefix to add to roles. Default "ROLE_".
</span><span style="color: rgba(0, 128, 0, 1)">*/</span>
<span style="color: rgba(0, 0, 255, 1)">public</span> <span style="color: rgba(0, 0, 255, 1)">void</span><span style="color: rgba(0, 0, 0, 1)"> setDefaultRolePrefix(String defaultRolePrefix) {
</span><span style="color: rgba(0, 0, 255, 1)">this</span>.defaultRolePrefix =<span style="color: rgba(0, 0, 0, 1)"> defaultRolePrefix;
}
</span><span style="color: rgba(0, 0, 255, 1)">private</span> Set<String><span style="color: rgba(0, 0, 0, 1)"> getAuthoritySet() {
</span><span style="color: rgba(0, 0, 255, 1)">if</span> (roles == <span style="color: rgba(0, 0, 255, 1)">null</span><span style="color: rgba(0, 0, 0, 1)">) {
roles </span>= <span style="color: rgba(0, 0, 255, 1)">new</span> HashSet<String><span style="color: rgba(0, 0, 0, 1)">();
Collection</span><? <span style="color: rgba(0, 0, 255, 1)">extends</span> GrantedAuthority> userAuthorities =<span style="color: rgba(0, 0, 0, 1)"> authentication
.getAuthorities();
</span><span style="color: rgba(0, 0, 255, 1)">if</span> (roleHierarchy != <span style="color: rgba(0, 0, 255, 1)">null</span><span style="color: rgba(0, 0, 0, 1)">) {
userAuthorities </span>=<span style="color: rgba(0, 0, 0, 1)"> roleHierarchy
.getReachableGrantedAuthorities(userAuthorities);
}
roles </span>=<span style="color: rgba(0, 0, 0, 1)"> AuthorityUtils.authorityListToSet(userAuthorities);
}
</span><span style="color: rgba(0, 0, 255, 1)">return</span><span style="color: rgba(0, 0, 0, 1)"> roles;
}
</span><span style="color: rgba(0, 0, 255, 1)">public</span> <span style="color: rgba(0, 0, 255, 1)">boolean</span><span style="color: rgba(0, 0, 0, 1)"> hasPermission(Object target, Object permission) {
</span><span style="color: rgba(0, 0, 255, 1)">return</span><span style="color: rgba(0, 0, 0, 1)"> permissionEvaluator.hasPermission(authentication, target, permission);
}
</span><span style="color: rgba(0, 0, 255, 1)">public</span> <span style="color: rgba(0, 0, 255, 1)">boolean</span><span style="color: rgba(0, 0, 0, 1)"> hasPermission(Object targetId, String targetType, Object permission) {
</span><span style="color: rgba(0, 0, 255, 1)">return</span><span style="color: rgba(0, 0, 0, 1)"> permissionEvaluator.hasPermission(authentication, (Serializable) targetId,
targetType, permission);
}
</span><span style="color: rgba(0, 0, 255, 1)">public</span> <span style="color: rgba(0, 0, 255, 1)">void</span><span style="color: rgba(0, 0, 0, 1)"> setPermissionEvaluator(PermissionEvaluator permissionEvaluator) {
</span><span style="color: rgba(0, 0, 255, 1)">this</span>.permissionEvaluator =<span style="color: rgba(0, 0, 0, 1)"> permissionEvaluator;
}
</span><span style="color: rgba(0, 128, 0, 1)">/**</span><span style="color: rgba(0, 128, 0, 1)">
* Prefixes role with defaultRolePrefix if defaultRolePrefix is non-null and if role
* does not already start with defaultRolePrefix.
*
* </span><span style="color: rgba(128, 128, 128, 1)">@param</span><span style="color: rgba(0, 128, 0, 1)"> defaultRolePrefix
* </span><span style="color: rgba(128, 128, 128, 1)">@param</span><span style="color: rgba(0, 128, 0, 1)"> role
* </span><span style="color: rgba(128, 128, 128, 1)">@return</span>
<span style="color: rgba(0, 128, 0, 1)">*/</span>
<span style="color: rgba(0, 0, 255, 1)">private</span> <span style="color: rgba(0, 0, 255, 1)">static</span><span style="color: rgba(0, 0, 0, 1)"> String getRoleWithDefaultPrefix(String defaultRolePrefix, String role) {
</span><span style="color: rgba(0, 0, 255, 1)">if</span> (role == <span style="color: rgba(0, 0, 255, 1)">null</span><span style="color: rgba(0, 0, 0, 1)">) {
</span><span style="color: rgba(0, 0, 255, 1)">return</span><span style="color: rgba(0, 0, 0, 1)"> role;
}
</span><span style="color: rgba(0, 0, 255, 1)">if</span> (defaultRolePrefix == <span style="color: rgba(0, 0, 255, 1)">null</span> || defaultRolePrefix.length() == 0<span style="color: rgba(0, 0, 0, 1)">) {
</span><span style="color: rgba(0, 0, 255, 1)">return</span><span style="color: rgba(0, 0, 0, 1)"> role;
}
</span><span style="color: rgba(0, 0, 255, 1)">if</span><span style="color: rgba(0, 0, 0, 1)"> (role.startsWith(defaultRolePrefix)) {
</span><span style="color: rgba(0, 0, 255, 1)">return</span><span style="color: rgba(0, 0, 0, 1)"> role;
}
</span><span style="color: rgba(0, 0, 255, 1)">return</span> defaultRolePrefix +<span style="color: rgba(0, 0, 0, 1)"> role;
}
}
在 AuthenticationTrustResolverImpl 方法 isAnonymous 中就是判断传递过来的 Authentication 对象是不是 AnonymousAuthenticationToken,如果是 AnonymousAuthenticationToken 则表示没有登录,因为登录之后生成的对象是 UsernamePasswordAuthenticationToken 或其他 Authentication 对象,这也是 Spring Security 设计的最精华也是最难以理解也是最简单的方式。
private Class<? extends Authentication> anonymousClass = AnonymousAuthenticationToken.class;
</span><span style="color: rgba(0, 0, 255, 1)">public</span> <span style="color: rgba(0, 0, 255, 1)">boolean</span><span style="color: rgba(0, 0, 0, 1)"> isAnonymous(Authentication authentication) {
    </span><span style="color: rgba(0, 0, 255, 1)">if</span> ((anonymousClass == <span style="color: rgba(0, 0, 255, 1)">null</span>) || (authentication == <span style="color: rgba(0, 0, 255, 1)">null</span><span style="color: rgba(0, 0, 0, 1)">)) {
        </span><span style="color: rgba(0, 0, 255, 1)">return</span> <span style="color: rgba(0, 0, 255, 1)">false</span><span style="color: rgba(0, 0, 0, 1)">;
    }

    </span><span style="color: rgba(0, 0, 255, 1)">return</span><span style="color: rgba(0, 0, 0, 1)"> anonymousClass.isAssignableFrom(authentication.getClass());
}</span></span></pre>
总结:Spring Security 对 url 的权限判断有两种方式,一种是请求是 permitAll 的则直接返回校验通过,另外一个是判断 Authentication 是不是 AnonymousAuthenticationToken,因为正常登录等产生的不是这个对象,如果不是这个类型的对象则表示登录成功了。
7、权限验证通过
如果权限通过,代码最终跳转到 /hello 上:
浏览器页面将显示 hello spring security 信息;
六、代码下载
参考文章:
[1] Spring Boot 中开启 Spring Security(部分转载)
[2] Spring Security 原理学习 -- 用户名和密码认证 (三)
[3] Spring Security 原理学习 -- 权限校验 (四)
[4] Spring Security Config : 注解 EnableWebSecurity 启用 Web 安全
[5] Spring Security 实现原理剖析(一):filter 的构造和初始化
[6] Spring Security 实现原理的理解记录(推荐)
[8]SpringBoot+SpringSecurity+jwt 整合及初体验
亲爱的读者和支持者们,自动博客加入了打赏功能,陆陆续续收到了各位老铁的打赏。在此,我想由衷地感谢每一位对我们博客的支持和打赏。你们的慷慨与支持,是我们前行的动力与源泉。
| 日期 | 姓名 | 金额 |
|---|---|---|
| 2023-09-06 | * 源 | 19 |
| 2023-09-11 | * 朝科 | 88 |
| 2023-09-21 | * 号 | 5 |
| 2023-09-16 | * 真 | 60 |
| 2023-10-26 | * 通 | 9.9 |
| 2023-11-04 | * 慎 | 0.66 |
| 2023-11-24 | * 恩 | 0.01 |
| 2023-12-30 | I*B | 1 |
| 2024-01-28 | * 兴 | 20 |
| 2024-02-01 | QYing | 20 |
| 2024-02-11 | * 督 | 6 |
| 2024-02-18 | 一 *x | 1 |
| 2024-02-20 | c*l | 18.88 |
| 2024-01-01 | *I | 5 |
| 2024-04-08 | * 程 | 150 |
| 2024-04-18 | * 超 | 20 |
| 2024-04-26 | .*V | 30 |
| 2024-05-08 | D*W | 5 |
| 2024-05-29 | * 辉 | 20 |
| 2024-05-30 | * 雄 | 10 |
| 2024-06-08 | *: | 10 |
| 2024-06-23 | 小狮子 | 666 |
| 2024-06-28 | *s | 6.66 |
| 2024-06-29 | * 炼 | 1 |
| 2024-06-30 | *! | 1 |
| 2024-07-18 | A*1 | 6.66 |
| 2024-07-31 | * 北 | 12 |
