

vue+Ueditor集成 [前后端分离项目][图片、文件上传][富文本编辑]
后端 DEMO:https://github.com/coderliguoqing/UeditorSpringboot
前端 DEMO:https://github.com/coderliguoqing/ueditor-web
预览地址:https://coderliguoqing.github.io/ueditor-web/dist/#/ueditor
写在最前面的话:鉴于近期很多的博友讨论,说我按照文章的一步一步来,弄好之后,怎么会提示后端配置项 http 错误,文件上传会提示上传错误。这里提别申明一点,ueditor 在前端配置好后,需要与后端部分配合进行,后端部分的项目代码 git 地址:https://github.com/coderliguoqing/UeditorSpringboot,然后将配置 ueditor.config.js 里的 serverUrl 的前缀改陈你自己的后端访问的请求路径地址,文件上传的后端部分,只提供了 demo,具体对接文件服务器的部分需要自己修改完成。
首先,谈下这篇文章中的前后端所涉及到的技术框架内容。
虽然是后端的管理项目,但整体项目,是采用前后端分离的方式完成,这样做的目的也是产品化的需求;
前端,vue+vuex+vue router+webpack+elementUI 的方案完成框架的搭建,其中用到了 superUI 来作为后端登陆之后的主页面框架,中间集成 vue 的大型单页应用;
后端,springboot+spring+springmvc+spring serurity+mybatis+maven+redis+dubbo
+zookeeper 的方式来构建项目框架和管理,提供给前端 restful 风格的接口。此处还提供 app 端、PC WEB 端的接口。
UEditor 之前一直有在项目中使用,作为国内开源的富文本编辑器,有百度的强大技术支持,整体来说是不错的选择,百度也提供了 php、asp、.net、jsp 的版本。原有的项目是采用整体式的开发方式,采用的是 jsp 的页面开发技术,所以集成起来相对来说更加容易,只需要按照文档的方式将前端集成进去,然后后端拿到源码之后,针对文件上传的类修改最终存储的方法即可将文件等上传到本身的服务器了。
然而,由于决定了做前后端分离的方式,必然就会有新的坑,特别是还选择了新的技术 vue.js+elementUI 的这种方式。那么也只能放手一搏,不多啰嗦,介绍完,马上开始正事。
1、下载 UEditor 官网最新的 jsp 版本的包,下载完成解压之后得到一个 ueditor1_4_3_3-utf8-jsp 的文件夹,里面包含的内容如下:
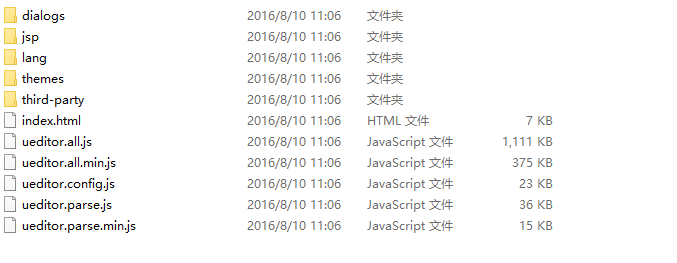
除了 jsp 的文件夹之外,其余的文件和文件夹复制到前端项目中的 static 用于存放静态文件的目录下,结构如下:
这里特别说明 jsp 目录下的资源为何不放进来,因为我们是 vue 搭建的项目,jsp 页面肯定是不会放在前端的项目中的,包括 config.json 也放在后端用于解析,这里后面会解释这样做的原因。
2、前端将文件放进来之后,暂时先这样,咱们来整理后端的东西。这里将 jsp 目录下的 lib 目中的 ueditor.jar 文件中的所有类全部拿出来(具体方式自己决定,反编译工具或者拿到源码都可以), 放到后端项目中,然后在 control 层新建一个 UeditorController.java 的类,如下:
 1 /**
 2  * 用于处理关于 ueditor 插件相关的请求
 3  * @author Guoqing
 4  *
 5  */
 6 @RestController
 7 @CrossOrigin
 8 @RequestMapping("/sys/ueditor")
 9 public class UeditorController extends BaseController {
10
11     @RequestMapping(value = "/exec")
12     @ResponseBody
13     public String exec(HttpServletRequest request) throws UnsupportedEncodingException{
14         request.setCharacterEncoding("utf-8");
15         String rootPath = request.getRealPath("/");
16         return new ActionEnter(request, rootPath).exec();
17     }
18 }
该类主要处理,ueditor 与后端服务器的交互,通过 action='' 不同的类型来处理,其中 action=config 为加载配置项,action=uploadImg 图片上传,在 ActionEntor 类中,你可以根据不同的请求类型来处理;
处理当 action=config 时的情况,保证前端的编辑器各项文件上传功能,能够正常使用。
然后 jsp 目录下的 config.json 文件放到 java/main/resources 目录下,修改 ConfigManager.java 类,如下:
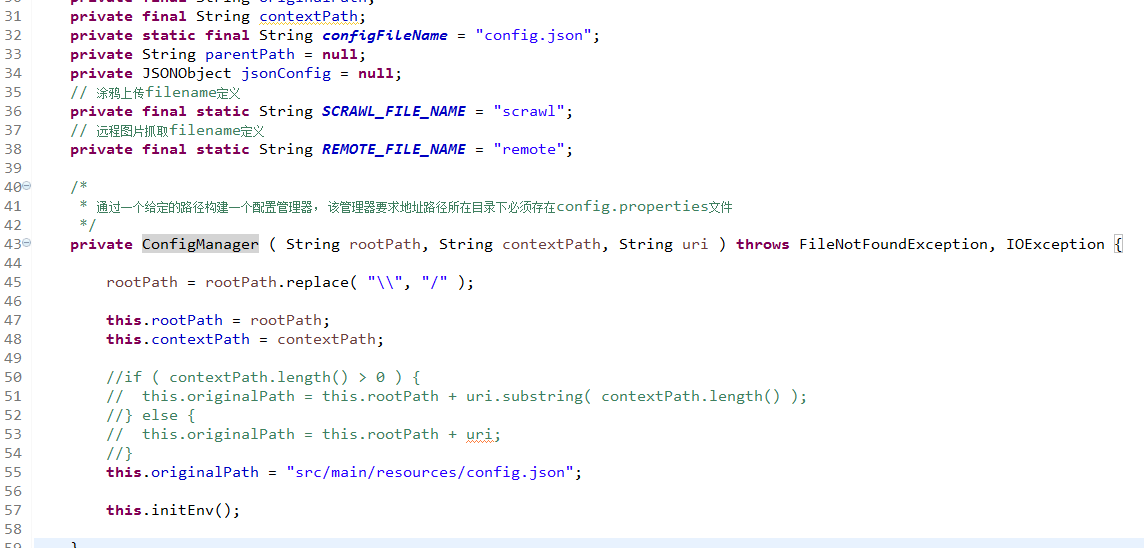
注释掉原有的读取配置文件的方式,添加新的读取路径,这样确保 ueditor 在初始化能够正确的加载配置文件。此时,修改前端项目中 ueditor.config.js 中的 serverUrl 的值为:
// 服务器统一请求接口路径
, serverUrl:  "http://localhost:8080/sys/ueditor/exec"
而,针对 ActionEnter.java 类中,如下代码后的文件上传的处理,请大家针对自身的上传方式和文件服务器选择适合自己的方式:
switch (actionCode) { //读取配置文件时的请求处理 case ActionMap.CONFIG: return this.configManager.getAllConfig().toString(); //上传图片、视频、文件时的处理 case ActionMap.UPLOAD_IMAGE: case ActionMap.UPLOAD_SCRAWL: case ActionMap.UPLOAD_VIDEO: case ActionMap.UPLOAD_FILE: conf = this.configManager.getConfig(actionCode); state = new Uploader(request, conf, baseFileService).doExec(); break; //抓取远程图片时的处理方式,此处也可以关闭</span><span style="color: rgba(0, 128, 0, 1)">//</span><span style="color: rgba(0, 128, 0, 1)">当从网页上复制内容到编辑器中,如果图片与该域名不同源,则会自动抓到本地的服务器保存 </span> <span style="color: rgba(0, 0, 255, 1)">case</span><span style="color: rgba(0, 0, 0, 1)"> ActionMap.CATCH_IMAGE: conf </span>=<span style="color: rgba(0, 0, 0, 1)"> configManager.getConfig( actionCode ); String[] list </span>= <span style="color: rgba(0, 0, 255, 1)">this</span>.request.getParameterValues( (String)conf.get( "fieldName"<span style="color: rgba(0, 0, 0, 1)"> ) ); state </span>= <span style="color: rgba(0, 0, 255, 1)">new</span><span style="color: rgba(0, 0, 0, 1)"> ImageHunter( conf ).capture( list ); </span><span style="color: rgba(0, 0, 255, 1)">break</span><span style="color: rgba(0, 0, 0, 1)">; </span><span style="color: rgba(0, 128, 0, 1)">//</span><span style="color: rgba(0, 128, 0, 1)">上传多文件时的文件在线管理</span> <span style="color: rgba(0, 0, 255, 1)">case</span><span style="color: rgba(0, 0, 0, 1)"> ActionMap.LIST_IMAGE: </span><span style="color: rgba(0, 0, 255, 1)">case</span><span style="color: rgba(0, 0, 0, 1)"> ActionMap.LIST_FILE: conf </span>=<span style="color: rgba(0, 0, 0, 1)"> configManager.getConfig( actionCode ); </span><span style="color: rgba(0, 0, 255, 1)">int</span> start = <span style="color: rgba(0, 0, 255, 1)">this</span><span style="color: rgba(0, 0, 0, 1)">.getStartIndex(); state </span>= <span style="color: rgba(0, 0, 255, 1)">new</span><span style="color: rgba(0, 0, 0, 1)"> FileManager( conf ).listFile( start ); </span><span style="color: rgba(0, 0, 255, 1)">break</span><span style="color: rgba(0, 0, 0, 1)">; } </span><span style="color: rgba(0, 0, 255, 1)">return</span> state.toJSONString();</pre>
接下来是前端的处理,介于大家的要求。作者将原本的 demo 进行了优化,将编辑器封装成组件的方式,方便调用,代码如下:
<template> <div> <script id="editor" type="text/plain" ></script> </div> </template><script>
import AppConfig from '@/config'
import '../../../../../../static/ueditor/ueditor.config.js'
import '../../../../../../static/ueditor/ueditor.all.js'
import '../../../../../../static/ueditor/lang/zh-cn/zh-cn.js'export default {
name: "UEditor",
props: {
id: {
type: String
},
config: {
type: Object
}
},
data() {
return {
editor: null
}
},
mounted() {
//初始化 UE
const _this = this;
this.editor = UE.getEditor('editor',this.config);
},
destoryed() {
this.editor.destory();
},
methods:{
getUEContent: function(){
return this.editor.getContent();
}
}
}
</script>
导出组件:
var UEditor = require('./src/ueditor.vue');module.exports = {
UEditor
}
这里之所以是用一个模态框的方式来加载编辑器,是因为会存在编辑器工具栏浮动的问题,如果有问题,请根据如下的配置来处理即可;
页面调用:
<template>
  <div id="app" class="hello">
    <el-button size="primary" type="info" icon="plus" @click="openWindow"> 打开窗口 </el-button>
    <el-dialog title="新增菜单" size="small" v-model="addFormVisible" :close-on-click-modal="false">
      <div>
        <el-button size="primary" type="info" icon="plus" @click="getContent"> 获取内容 </el-button>
        <UEditor :config=config ref="ueditor"></UEditor>
      </div>
    </el-dialog>
</div>
</template>
<script>
import {UEditor} from './ueditor/index.js'
export default{
name: 'hello',
components: {UEditor},
data(){
return {
config: {
/// 可以在此处定义工具栏的内容
toolbars: [
['fullscreen', 'source','|', 'undo', 'redo','|','bold', 'italic', 'underline', 'fontborder', 'strikethrough',
'|','superscript','subscript','|', 'forecolor', 'backcolor','|', 'removeformat','|', 'insertorderedlist', 'insertunorderedlist',
'|','selectall', 'cleardoc','fontfamily','fontsize','justifyleft','justifyright','justifycenter','justifyjustify','|',
'link','unlink']
],/
autoHeightEnabled: false,
autoFloatEnabled: true,  // 是否工具栏可浮动
initialContent:'请输入内容',   //初始化编辑器的内容, 也可以通过 textarea/script 给值,看官网例子
autoClearinitialContent:true, //是否自动清除编辑器初始内容,注意:如果 focus 属性设置为 true, 这个也为真,那么编辑器一上来就会触发导致初始化的内容看不到了
initialFrameWidth: null,
initialFrameHeight: 450,
BaseUrl: '',
UEDITOR_HOME_URL: 'static/ueditor/'
},
addFormVisible: false
}
},
methods: {
openWindow: function(){
this.addFormVisible = true;
},
//获取文档内容
getContent: function(){
let content = this.$refs.ueditor.getUEContent();
console.log(content);
alert(content);
}
}
}
</script>
至此,大功告成,包括文件上传下载等部分全部搞定,不过要声明一点的是,当出现接口与页面部署域名不同时,点击选择图片上传会出现 iframe 跨域的问题。
2017-09-08 的更新,作者已经通过更改源码的方式,处理了单图选择文件上传存在跨域的问题,处理方式当然就是将原有的 form.submit 的表单上传方式,更改为 ajax 的上传方式;
ueditor.all.js 24503 行的方法替换,源码如下:
/** * 2017-09-07 改掉了 ueditor 源码,将本身的单文件上传的方法改为 ajax 上传,主要目的是为了解决跨域的问题 * @author Guoqing */ domUtils.on(input, 'change', function() { if(!input.value) return; var loadingId = 'loading_' + (+new Date()).toString(36); var imageActionUrl = me.getActionUrl(me.getOpt('imageActionName')); var allowFiles = me.getOpt('imageAllowFiles');me.focus(); me.execCommand(</span>'inserthtml', '<img class="loadingclass" id="' + loadingId + '" src="' + me.options.themePath + me.options.theme +'/images/spacer.gif" title="' + (me.getLang('simpleupload.loading') || '') + '" >'<span style="color: rgba(0, 0, 0, 1)">); </span>/!* 判断后端配置是否没有加载成功 *!/ <span style="color: rgba(0, 0, 255, 1)">if</span> (!me.getOpt('imageActionName'<span style="color: rgba(0, 0, 0, 1)">)) { errorHandler(me.getLang(</span>'autoupload.errorLoadConfig'<span style="color: rgba(0, 0, 0, 1)">)); </span><span style="color: rgba(0, 0, 255, 1)">return</span><span style="color: rgba(0, 0, 0, 1)">; } </span><span style="color: rgba(0, 128, 0, 1)">//</span><span style="color: rgba(0, 128, 0, 1)"> 判断文件格式是否错误</span> <span style="color: rgba(0, 0, 255, 1)">var</span> filename =<span style="color: rgba(0, 0, 0, 1)"> input.value, fileext </span>= filename ? filename.substr(filename.lastIndexOf('.')):''<span style="color: rgba(0, 0, 0, 1)">; </span><span style="color: rgba(0, 0, 255, 1)">if</span> (!fileext || (allowFiles && (allowFiles.join('') + '.').indexOf(fileext.toLowerCase() + '.') == -1<span style="color: rgba(0, 0, 0, 1)">)) { showErrorLoader(me.getLang(</span>'simpleupload.exceedTypeError'<span style="color: rgba(0, 0, 0, 1)">)); </span><span style="color: rgba(0, 0, 255, 1)">return</span><span style="color: rgba(0, 0, 0, 1)">; } </span><span style="color: rgba(0, 0, 255, 1)">var</span> params = utils.serializeParam(me.queryCommandValue('serverparam')) || ''<span style="color: rgba(0, 0, 0, 1)">; </span><span style="color: rgba(0, 0, 255, 1)">var</span> action = utils.formatUrl(imageActionUrl + (imageActionUrl.indexOf('?') == -1 ? '?' : '&') +<span style="color: rgba(0, 0, 0, 1)"> params); </span><span style="color: rgba(0, 0, 255, 1)">var</span> formData = <span style="color: rgba(0, 0, 255, 1)">new</span><span style="color: rgba(0, 0, 0, 1)"> FormData(); formData.append(</span>"upfile", form[0].files[0<span style="color: rgba(0, 0, 0, 1)">] ); $.ajax({ url: action, type: </span>'POST'<span style="color: rgba(0, 0, 0, 1)">, cache: </span><span style="color: rgba(0, 0, 255, 1)">false</span><span style="color: rgba(0, 0, 0, 1)">, data: formData, processData: </span><span style="color: rgba(0, 0, 255, 1)">false</span><span style="color: rgba(0, 0, 0, 1)">, contentType: </span><span style="color: rgba(0, 0, 255, 1)">false</span><span style="color: rgba(0, 0, 0, 1)">, success: </span><span style="color: rgba(0, 0, 255, 1)">function</span><span style="color: rgba(0, 0, 0, 1)"> (data) { data </span>=<span style="color: rgba(0, 0, 0, 1)"> JSON.parse(data); </span><span style="color: rgba(0, 0, 255, 1)">var</span><span style="color: rgba(0, 0, 0, 1)"> link, loader, body </span>= (iframe.contentDocument ||<span style="color: rgba(0, 0, 0, 1)"> iframe.contentWindow.document).body, result </span>= body.innerText || body.textContent || ''<span style="color: rgba(0, 0, 0, 1)">; link </span>= me.options.imageUrlPrefix +<span style="color: rgba(0, 0, 0, 1)"> data.url; </span><span style="color: rgba(0, 0, 255, 1)">if</span>(data.state == 'SUCCESS' &&<span style="color: rgba(0, 0, 0, 1)"> data.url) { loader </span>=<span style="color: rgba(0, 0, 0, 1)"> me.document.getElementById(loadingId); loader.setAttribute(</span>'src'<span style="color: rgba(0, 0, 0, 1)">, link); loader.setAttribute(</span>'_src'<span style="color: rgba(0, 0, 0, 1)">, link); loader.setAttribute(</span>'title', data.title || ''<span style="color: rgba(0, 0, 0, 1)">); loader.setAttribute(</span>'alt', data.original || ''<span style="color: rgba(0, 0, 0, 1)">); loader.removeAttribute(</span>'id'<span style="color: rgba(0, 0, 0, 1)">); domUtils.removeClasses(loader, </span>'loadingclass'<span style="color: rgba(0, 0, 0, 1)">); } </span><span style="color: rgba(0, 0, 255, 1)">else</span><span style="color: rgba(0, 0, 0, 1)"> { showErrorLoader </span>&&<span style="color: rgba(0, 0, 0, 1)"> showErrorLoader(data.state); } form.reset(); } }); </span><span style="color: rgba(0, 0, 255, 1)">function</span><span style="color: rgba(0, 0, 0, 1)"> showErrorLoader(title){ </span><span style="color: rgba(0, 0, 255, 1)">if</span><span style="color: rgba(0, 0, 0, 1)">(loadingId) { </span><span style="color: rgba(0, 0, 255, 1)">var</span> loader =<span style="color: rgba(0, 0, 0, 1)"> me.document.getElementById(loadingId); loader </span>&&<span style="color: rgba(0, 0, 0, 1)"> domUtils.remove(loader); me.fireEvent(</span>'showmessage'<span style="color: rgba(0, 0, 0, 1)">, { </span>'id'<span style="color: rgba(0, 0, 0, 1)">: loadingId, </span>'content'<span style="color: rgba(0, 0, 0, 1)">: title, </span>'type': 'error'<span style="color: rgba(0, 0, 0, 1)">, </span>'timeout': 4000<span style="color: rgba(0, 0, 0, 1)"> }); } } });</span></pre>
好了,如果以上对你有帮助的话,请顺手点个赞,谢谢各位大虾们啦!
效果图如下:
/************************ 华丽丽的分割线 *************************/
2017-11-29 响应大家的要求,前后端项目都提供了源码的 demo 请上 github 上查看,如还有问题,请多多交流
各位如果还有问题的,那么请入群吧: qq 581036486 入群密码:88888888
https://github.com/coderliguoqing
欢迎围观、点赞!
我只是一个不想做程序员的好程序员。